For each Wi-Fi network, Android enables you to set proxy settings. This feature is occasionally necessary to connect to your internet on a corporate or educational network, and your web traffic will be routed through the proxy that you set up.
Chrome and other web browsers will use the proxy you set up, but other applications may not. Each app developer may decide whether or not to use Android’s proxy.
This procedure is the same in all contemporary Android versions, ranging from 4.0 to 7.1. Because some device makers alter the appearance and functionality of Android’s Settings screen, the Wi-Fi and proxy settings may be located in a different area. Here is how you can configure a proxy server on your android device.
1. How to Configure a Proxy Server on Android Step by Step
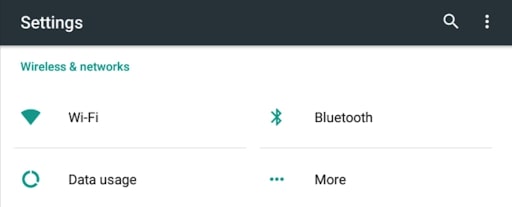
Step 1: To see your list of Wi-Fi networks, open Android’s Settings app and select “Wi-Fi.”
Android setting
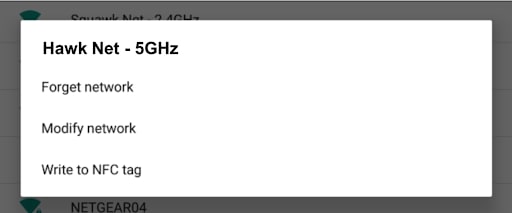
Step 2: Long-press the ID of the Wi-Fi network whose proxy settings you wish to alter. When a menu displays, tap “Modify Network.” If you haven’t previously done so, connect to a Wi-Fi network and input the password before proceeding to the “Modify Network” choices.
Modify network
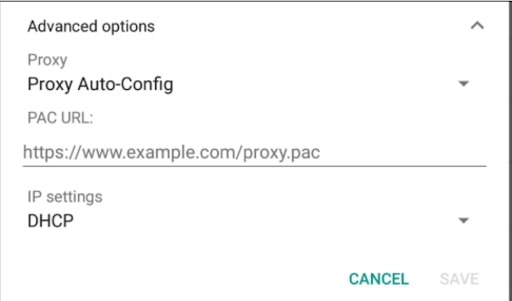
Step 3: Expand the “Advanced settings” box on this page. Select “None” for no proxy, “Manual” to manually input proxy server settings, and otherwise “Proxy Auto-Config” to automatically determine the necessary configuration for your network by tapping the “Proxy” option. On previous Android versions, the “Proxy Auto-Config” option might not be accessible.
Proxy auto-config
Step 4: If you choose “Proxy Auto-Config,” Android will ask you for the URL of a proxy auto-configuration code, generally known as a.PAC file. The network administrator or proxy service provider will supply you with the URL of the PAC file you need to provide here if your company or proxy service provider requires one.
Android doesn’t support the WPAD or Web Proxy Auto-discovery Protocol, unlike other operating systems such as macOS, Windows, iOS, and even Google’s Chrome OS. WPAD is used to automatically deploy the proxy configuration to devices on that particular network on corporate or school networks. If you activate “Proxy Auto-Config,” nothing happens until you additionally specify the location of a.PAC file from which Android may obtain proxy settings.
Step 5: You must either refer Android to the right automated proxy configuration code or manually input proxy server settings on a WPAD network. You may manually input the proxy server details if you choose “Manual.” In the “Proxy hostname” box, type the proxy’s address. Despite the box’s name, you may use it to input hostnames such as “proxy.example.com” and IP addresses such as “191.166.1.100.” Please enter any address that you have. In the “Proxy port” box, type the proxy’s port required.
Enter any addresses you wish Android to skip the proxy for in the “Bypass proxy for” box, split by commas.
Proxy hostname and port
Step 6: When you’re finished, tap “Save” to save your settings.
The proxy server settings are different for each Wi-Fi network. Your other Wi-Fi networks would naturally use a proxy server even after configuring a proxy server only for one. If you need to modify the proxy server configuration related to some other Wi-Fi network, repeat the process. That’s how, folks, you can configure a proxy server on your Android device. We hope this article can guide you well in this simple process.
Marcus is a cybersecurity analyst with a focus on VPN and proxy services. As the founder and driving force behind a prominent VPN and proxy website, Private Proxy Guide, Marcus has emerged as a trusted authority in the digital realm. With a passion for staying ahead of evolving cyber threats, he has played a pivotal role in educating and empowering individuals and businesses to safeguard their online presence.


 Proxy Providers in [year]")

![19 BEST Instagram Proxies 2021 [LTE 4G & Mobile Proxies]](https://www.privateproxyguide.com/wp-content/uploads/2019/01/Best-Instagram-Proxies-150x150.jpg "19 Best Instagram Proxies [year] 4G & Residential Proxy List")


