Download and install NordVPN on your Windows 11 PC.
Open the app and log in with your credentials
Connect to one of 6,500+ worldwide servers and enjoy!
This is the simplest method of connecting to a VPN on Windows 11. For more information about manual methods, read the article further, as they’re far more complex. We’ll also explain what to do if the VPN fails to connect and simply isn’t working.
It’s never too late to secure your Windows 11 PC with a VPN. This software is capable of securing your connection and allowing you to browse privately. Also, thanks to its IP-changing characteristics, it allows you to get over geo-blocks and access restricted sites.
All of this sounds awesome – admit it. However, the question is how to set up a VPN connection on Windows 11. Well, there are quite a few ways. You can install a VPN client, connect to a server, and you’re set. Then, there’s the manual method, which many users go for.
In the following guide, we’ll explain how to set up a VPN connection on Windows 11 and enjoy all the greatest VPN benefits on your Windows 11 computer or laptop. The entire setup won’t take longer than a few minutes and you don’t have to be a rocket scientist.
Set Up a VPN on Windows 11 With NordVPN
Okay, so the simplest way to set up a VPN on Windows 11 is to install one. Now, you might be wondering which VPN to use, as there are hundreds of them online. Well, our team of experts recommends NordVPN as the most reliable, and simultaneously, the simplest VPN to install.
Below, we present the required steps for this Windows 11 VPN setup.
1. Subscribe to NordVPN
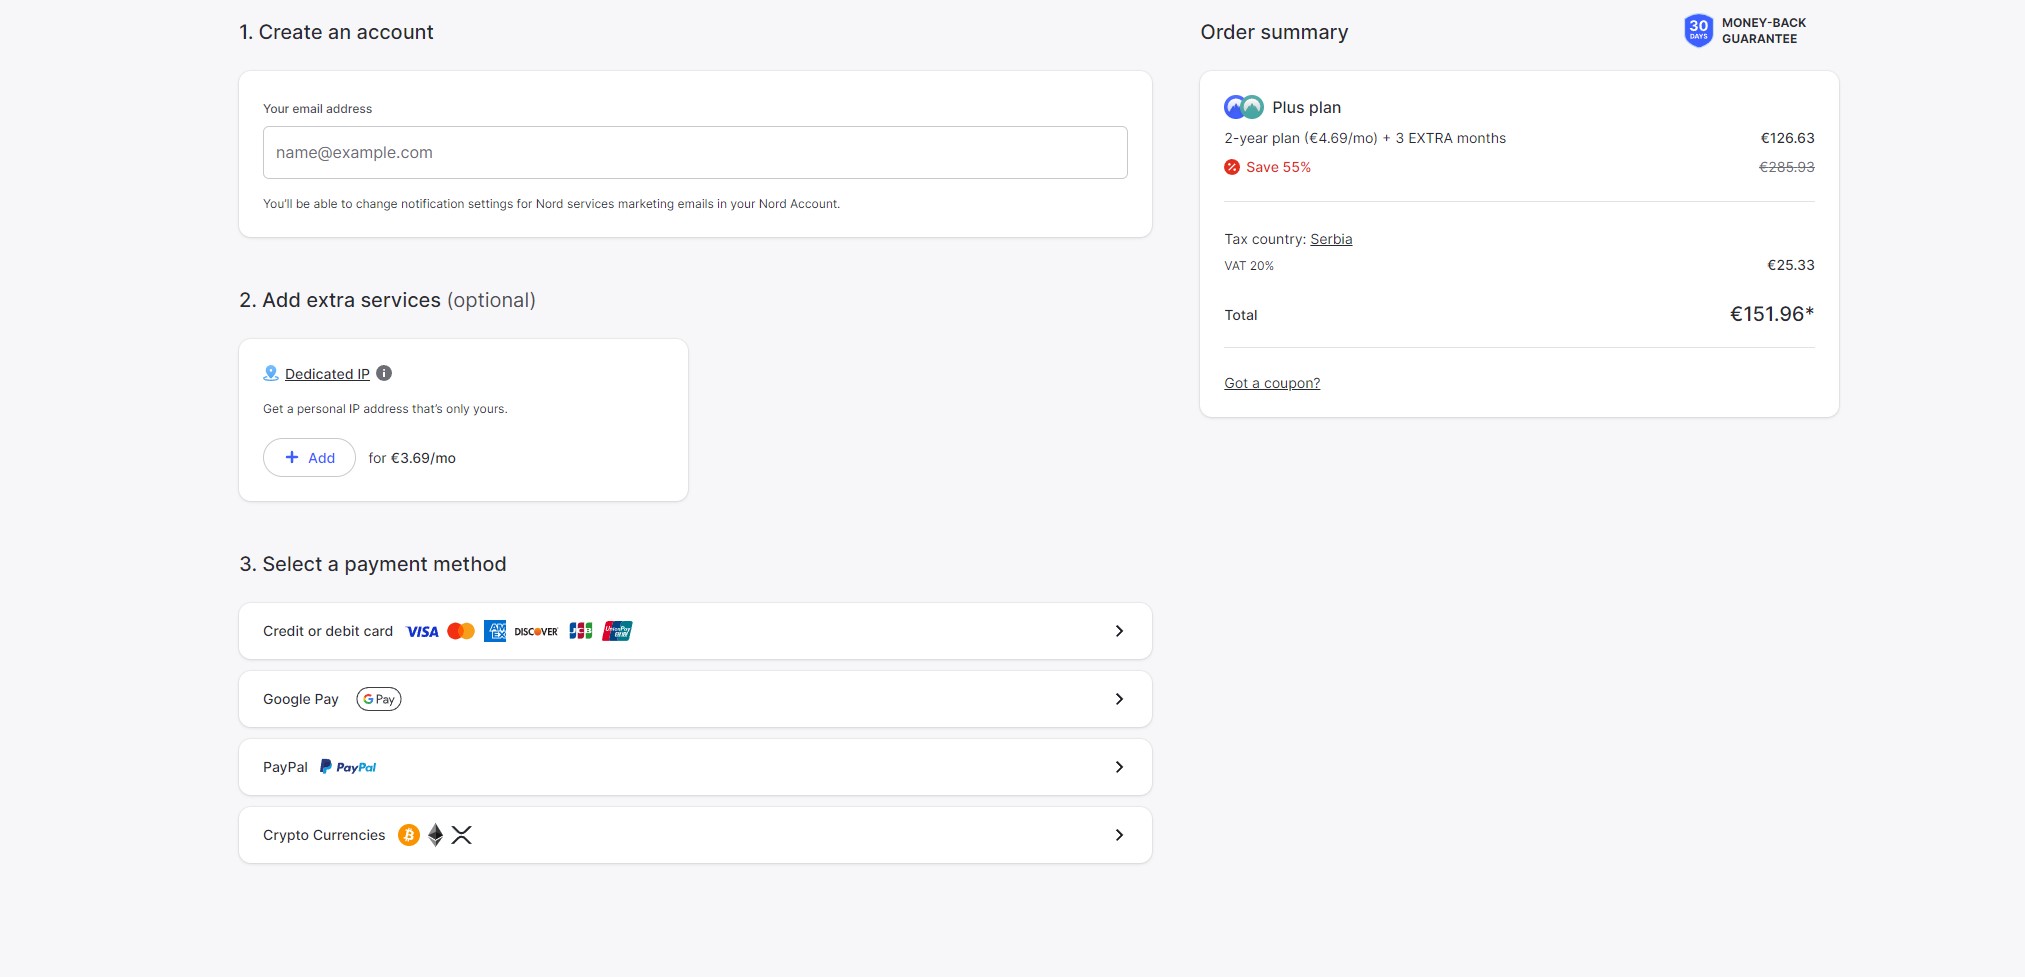
NordVPN requires a subscription, which you can obtain from our site. This VPN has a special discount on its 2-year plans and offers extensive security, privacy, streaming, and P2P features, making it a splendid option. Go to NordVPN’s site and select the plan you want.
Then, provide your email address and pay with the preferred payment method. When the payment is processed, you’ll have to create a secure password to finish the account creation. This step can be finished in a minute and you likely don’t need a special guide.
2. Install the VPN on Your Windows 11 Computer
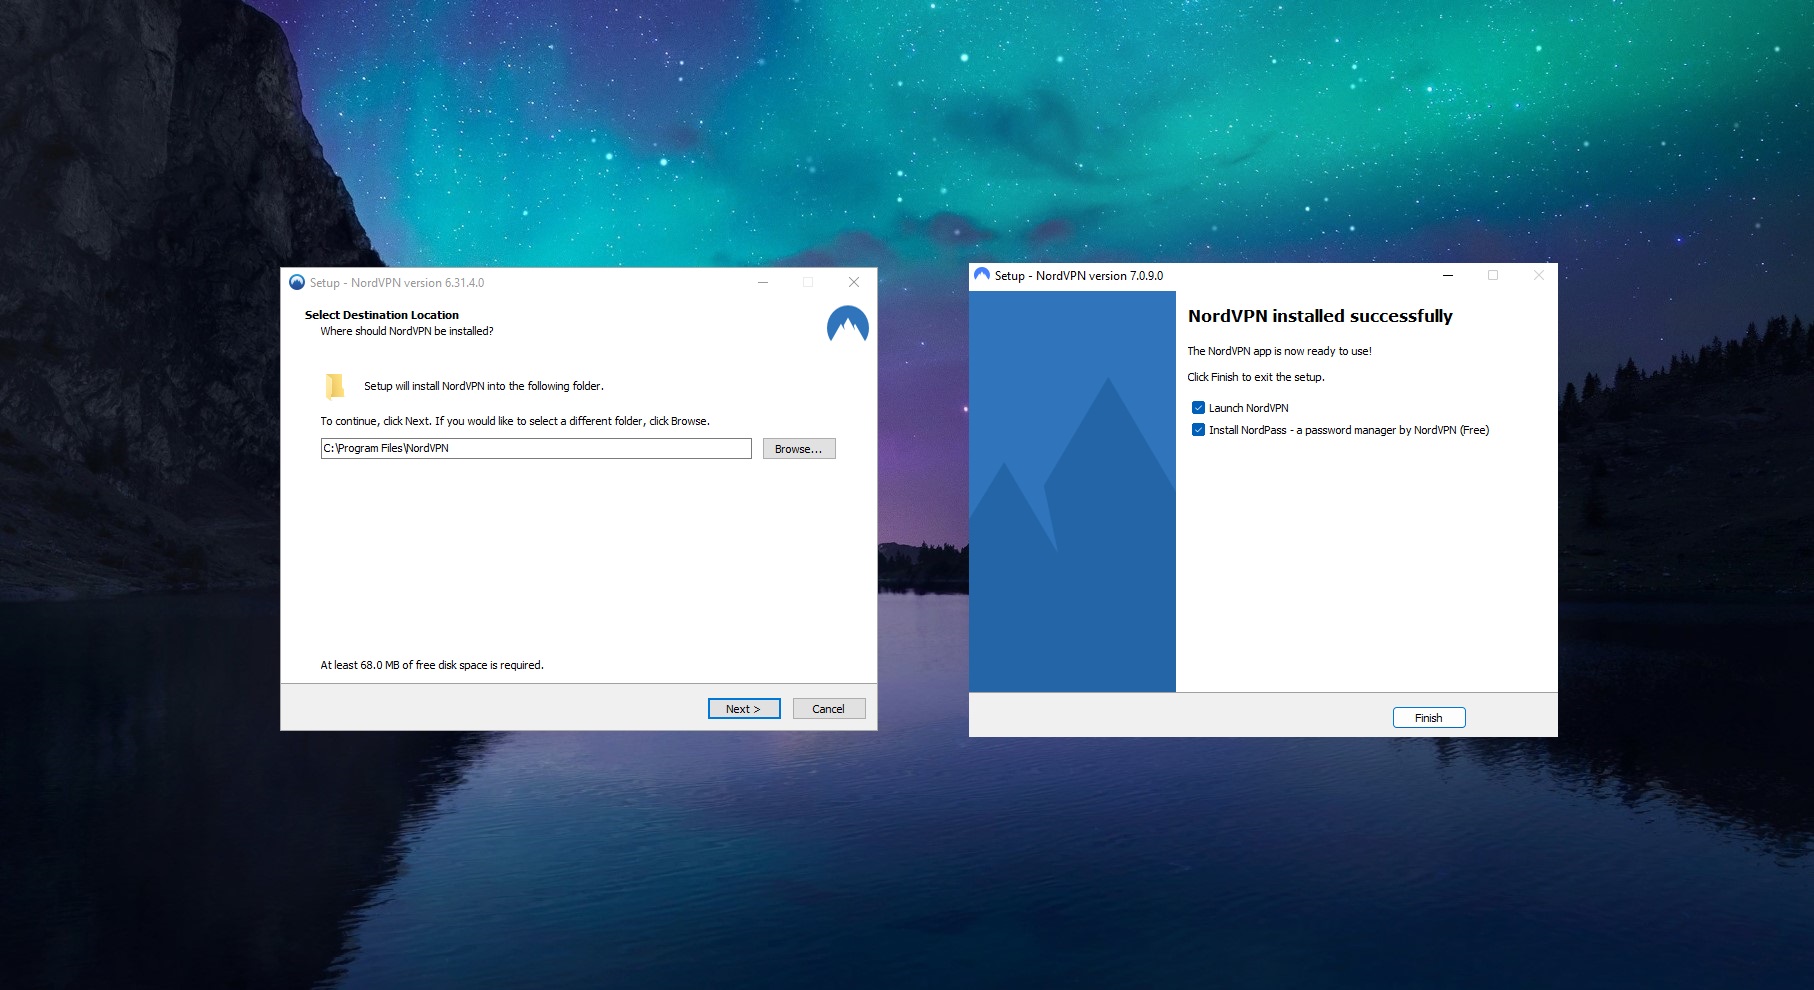
Download NordVPN from its official site. To do that, click on “Download VPN” at the top and then click on “Download App“, as displayed below. When the setup file is downloaded, open it up and the installation wizard will open. Follow the steps to install the app.
When that is completed, NordVPN might require you to restart your computer. If that’s the case, restart immediately to ensure the installation is complete.
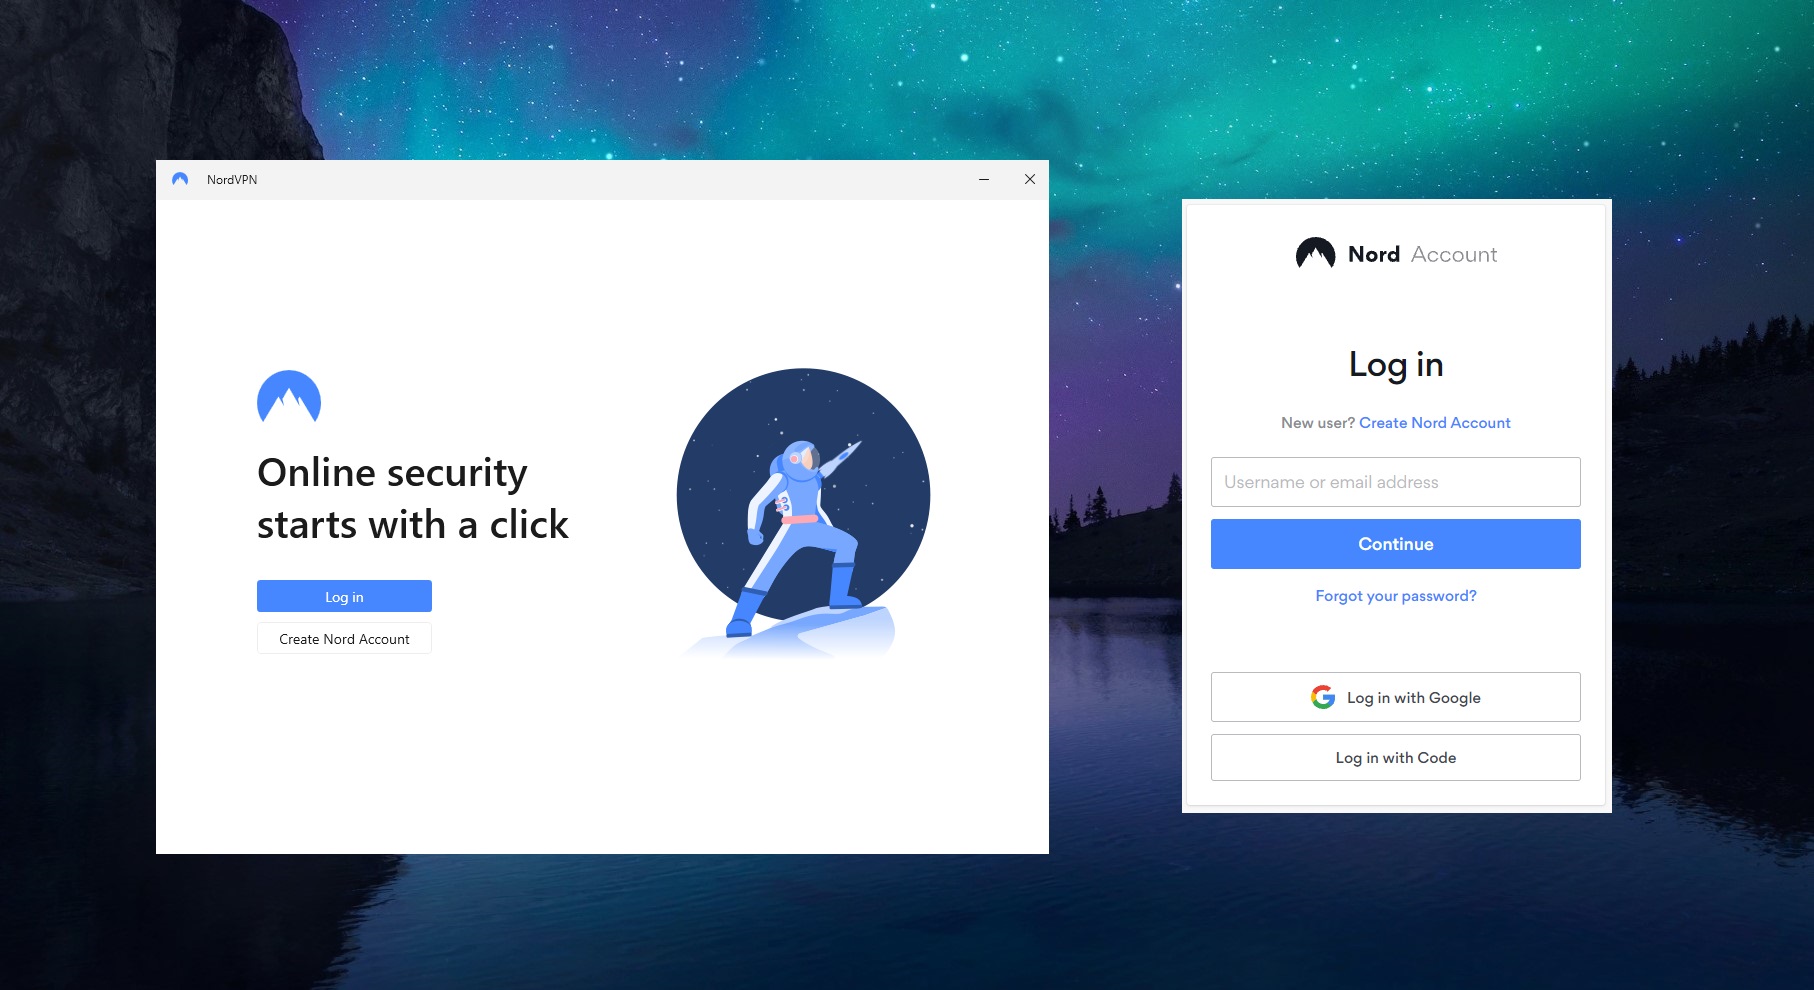
3. Open NordVPN and Sign In
It’s time to open NordVPN and set up the VPN connection on Windows 11. Upon opening the app, NordVPN will require you to log in. Remember the email and password you provided in Step 1? Use them here to log in to your account.
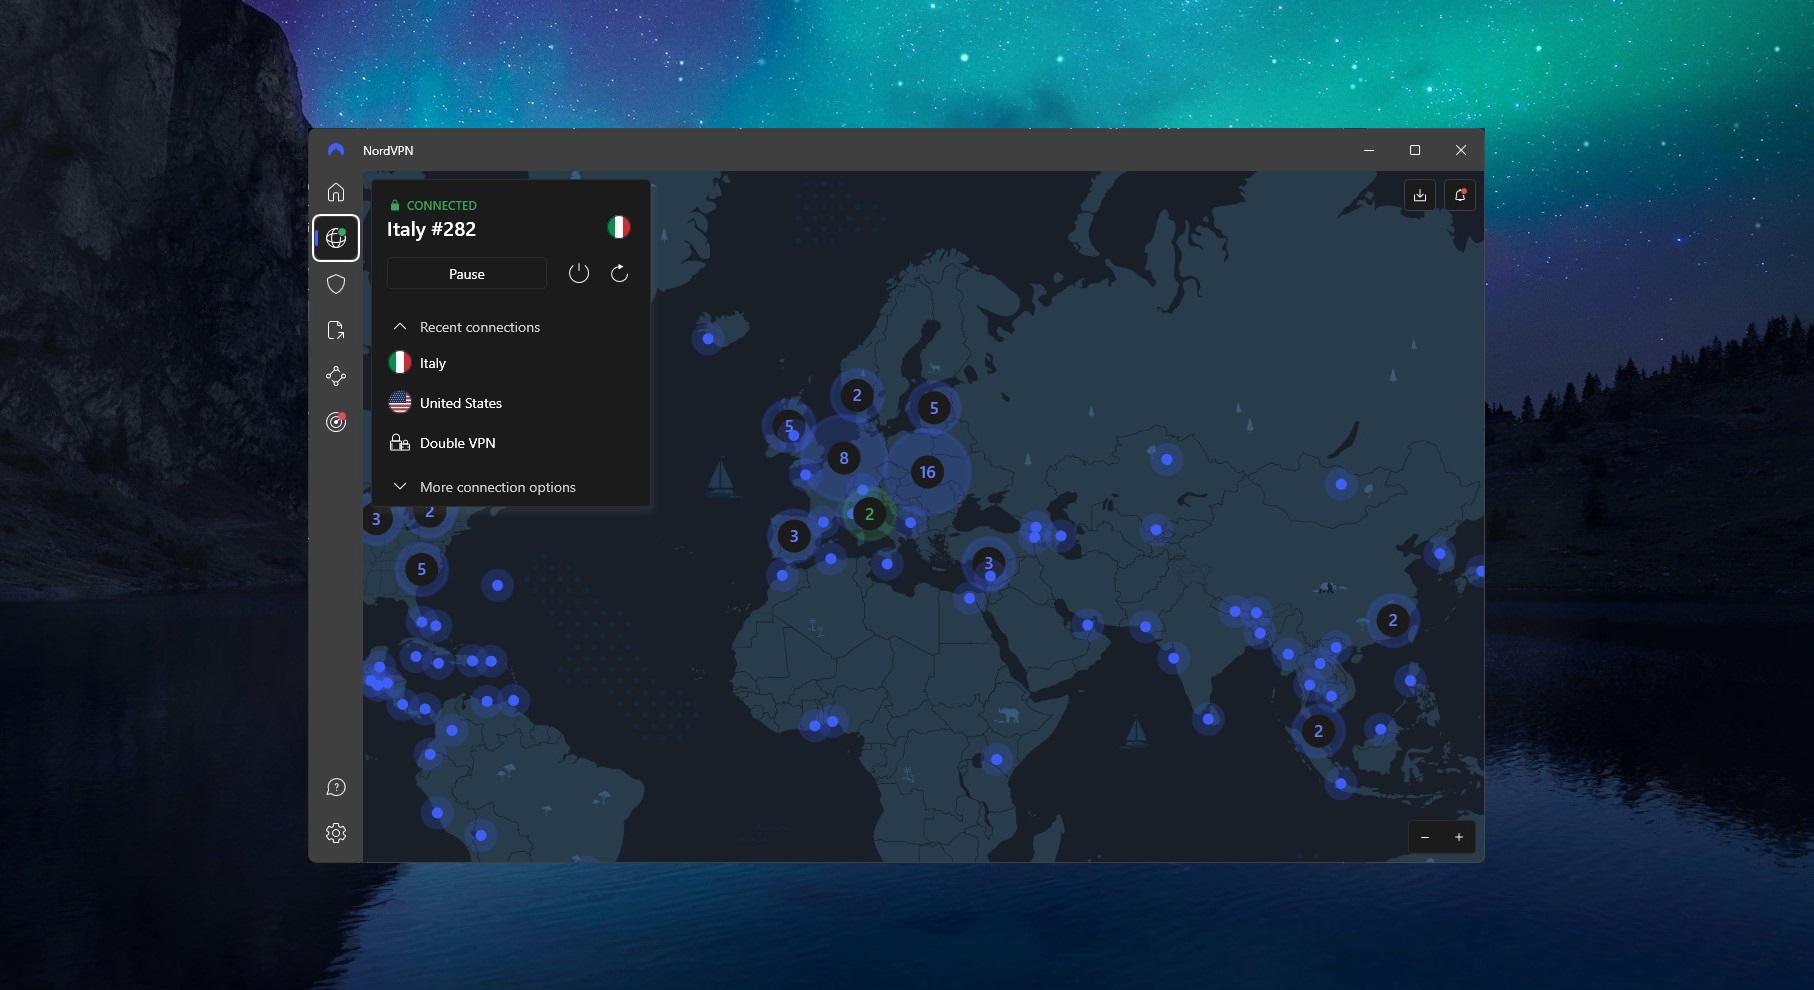
Above is the screenshot of the app’s main dashboard, which should open with the successful sign-in.
4. Connect to a Server
To finally set up the VPN on your Windows 11 computer, you’ll need to connect to a server. Which server to use? It depends on your needs! For the fastest speeds, connect to the closest one – you can use the Quick Connect button. For a specific server, open the server list and find the one you want.
As displayed in the screenshot, NordVPN will display the “Connected” message once you connect to a server. Congrats! Your connection is now encrypted and you can go online in true privacy. However, this is just the tip of the iceberg, as NordVPN offers so much more.
Manual Windows 11 VPN Setup (Advanced Methods)
When it comes to the manual VPN setup on Windows 11, things are a tad more complicated. Why would one want a manual setup when using the app is much simpler? There are plenty of reasons. Some people would like more control over the VPN connection, especially with corporate VPNs.
Also, on some occasions, VPN blocks can be bypassed with the manual setup. Another scenario is in which you don’t have permission to install a VPN app on the computer. In that case, you can manually set up the VPN connection on Windows 11 without the VPN client.
Manual connection is, as a result, more complex, especially because you have to decide on which protocol to use. This also depends on which VPN protocols your VPN provider supports. Windows 11 supports all of them, so WireGuard, OpenVPN, IPSec, IKEv2, SSTP, and L2TP can be used.
Manual Windows 11 VPN Setup With a Default VPN Option
Even with a manual setup, you’ll need a VPN subscription to connect to a server. If you have NordVPN, it’s great – don’t get a refund or quit the subscription! The good news is that Windows 11 has a built-in VPN function, which you can locate in Settings.
Here’s how to use it to manually configure a VPN on Windows 11:
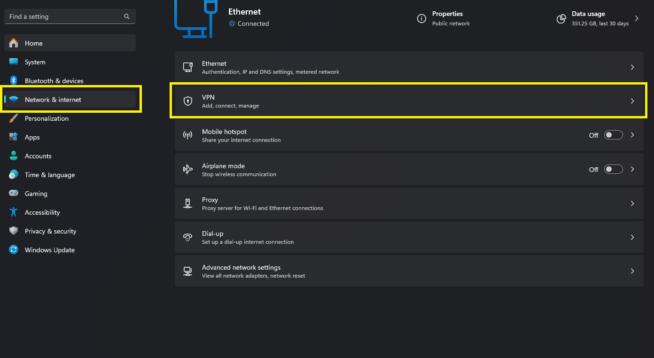
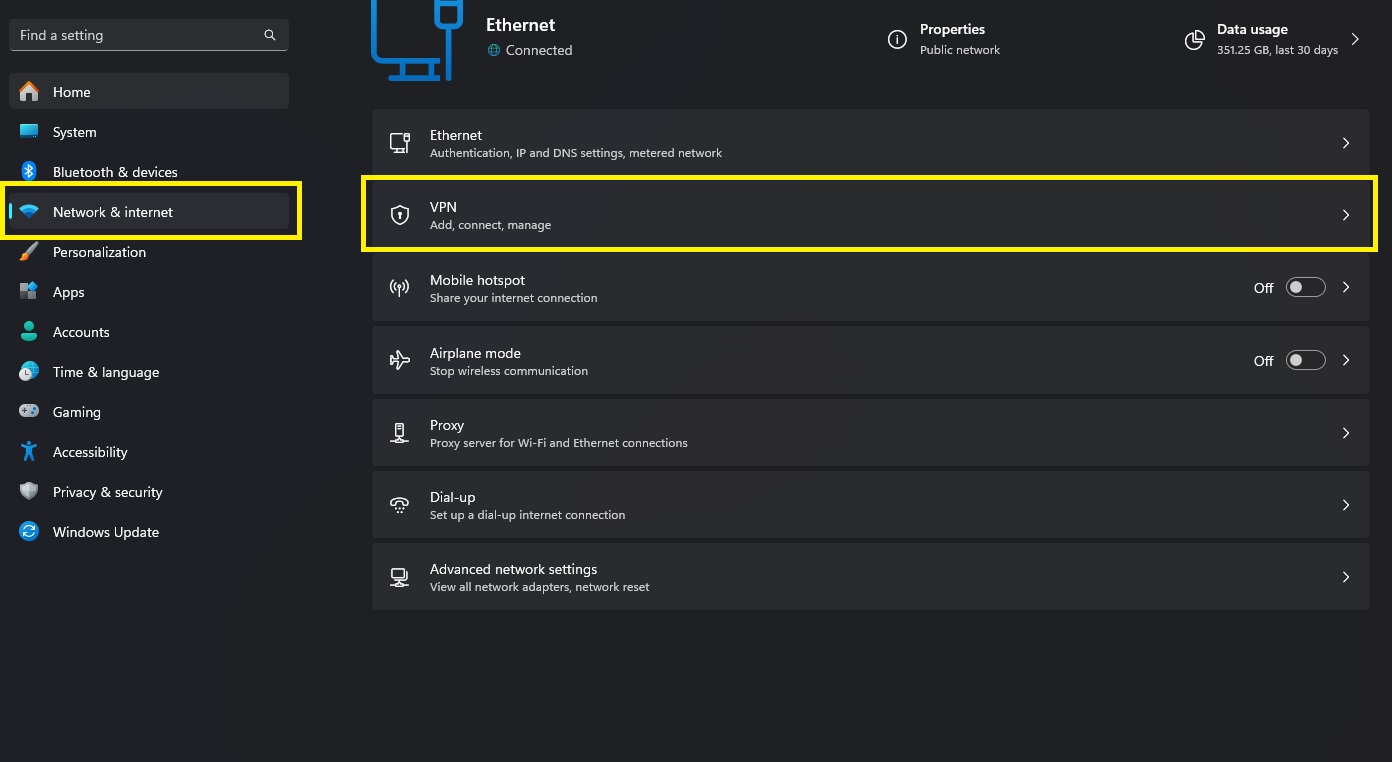
Open Settings and go to Network and Internet.
Click on the VPN (it should be the second option under Ethernet).
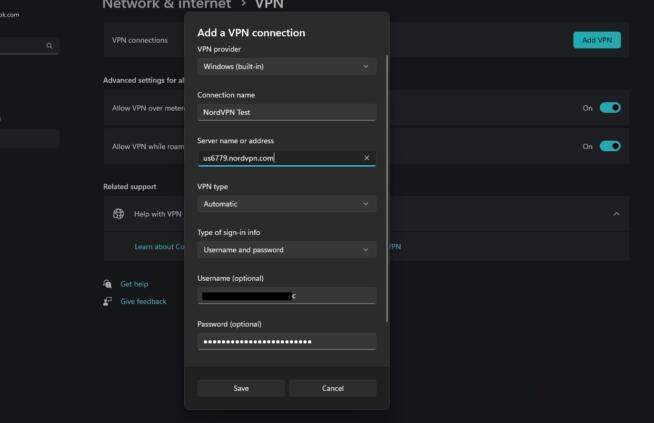
Next to “VPN Connections”, you’ll see the “Add VPN” button. Click on it.
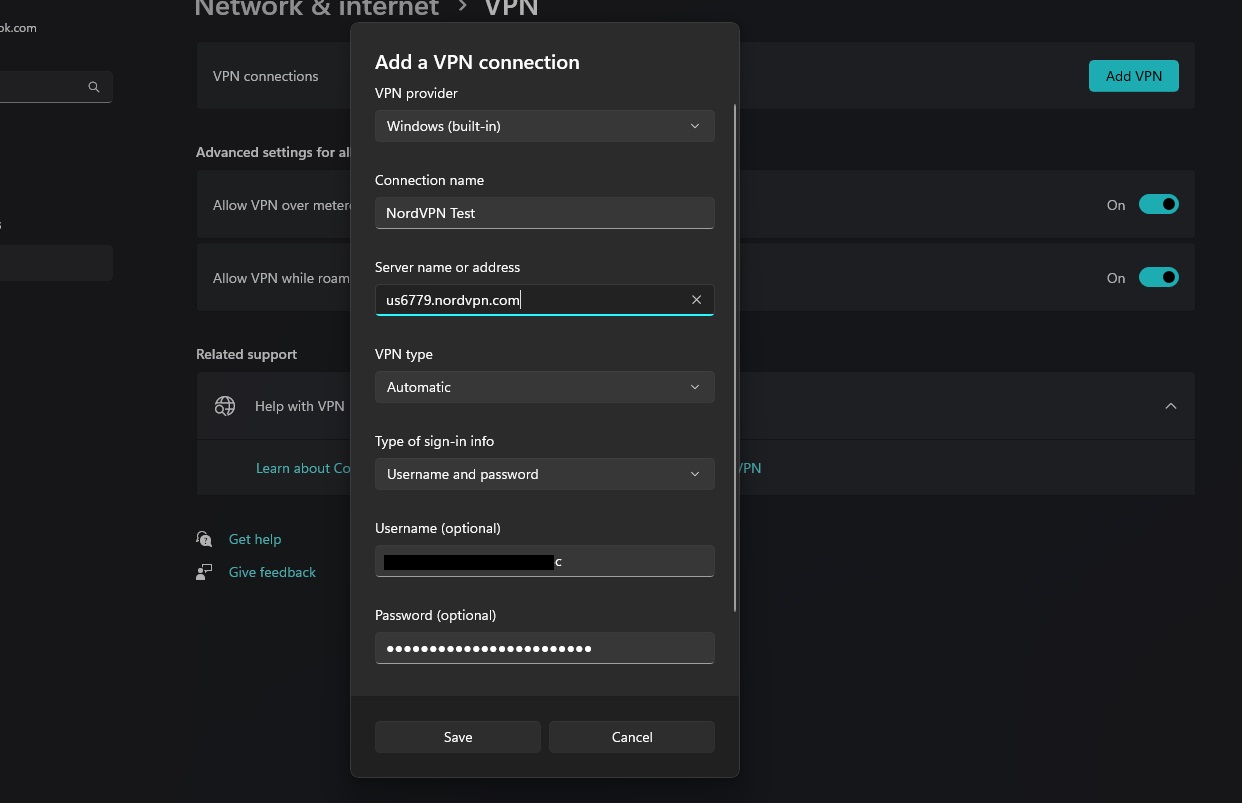
When the new menu opens, under “VPN Provider”, select “Windows (built-in)”.
Assign the connection name and then, under “Server name or address”, enter the IP or the URL of the VPN server you’ll use. Corporate VPN users will have this IP/URL provided by the IT manager. But if you’re using NordVPN, you can find servers for manual setup here.
Select the server from the list, copy its URL, and paste it into the “Server name or address” field in the Windows 11 VPN setup window.
Next, under “VPN type”, choose Automatic.
Choose the type of sign-in info, which is set to “Username and password” by default. Alternatively, you can use a certificate, a one-time password, or a Smart Card.
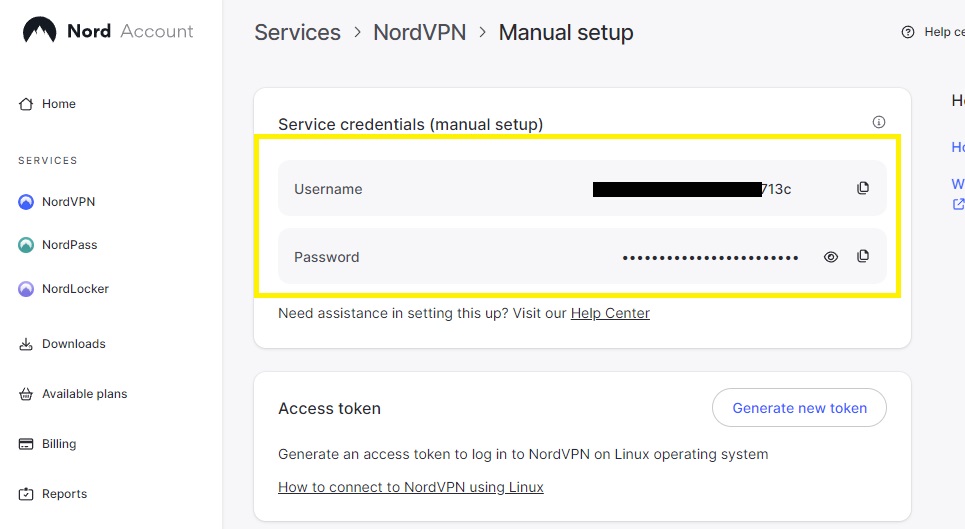
After that, provide your email and password. Corporate VPN users will have these provided by their network administrator. For NordVPN users, find your manual setup credentials here and enter them.
Click on Save and the VPN connection will be saved.
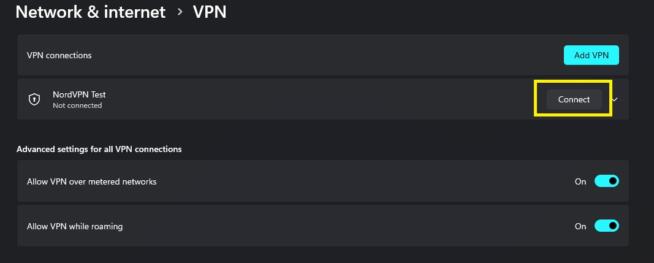
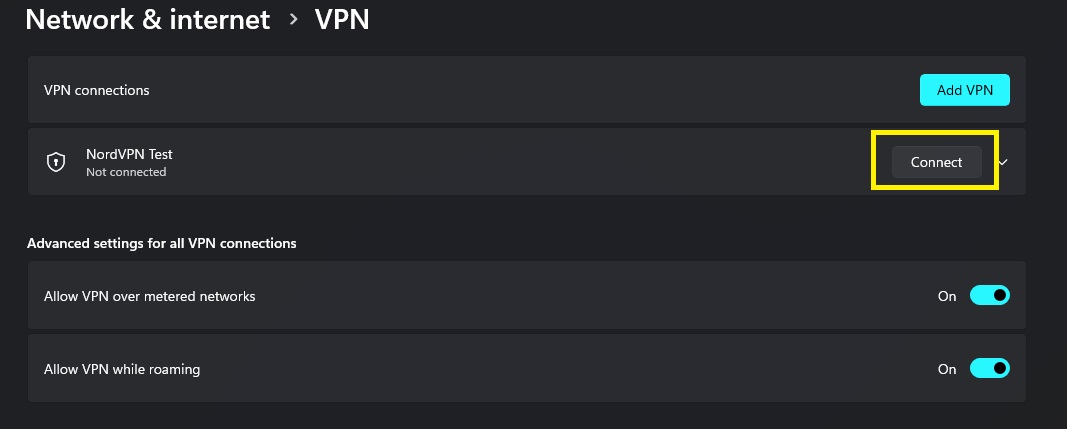
To connect to a VPN on Windows 11 manually, click on the configured VPN connection under “Network and Internet/VPN” and then select “Connect“. You’ll now be connected to the server and be able to use the VPN normally.
This process can be repeated for a few or more VPN connections if you want.
Manual Windows 11 VPN Setup With OpenVPN/WireGuard Clients
Another option for the manual Windows 11 VPN setup is to use OpenVPN or WireGuard client. This, of course, depends on which VPN protocol you want to use. OpenVPN and WireGuard are open-source protocols and their clients are free to download.
However, you’ll still need a VPN like NordVPN or a corporate VPN. Let’s see how to use OpenVPN first.
OpenVPN
To get OpenVPN, download it from the official website and install it on your computer. Above all, ensure it’s installed in the DEFAULT location. From here, follow these steps:
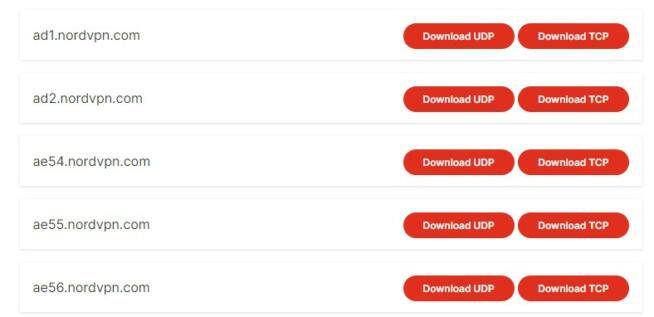
Get the OpenVPN configuration files from the VPN. Again, corporate VPN users will receive them from the IT administrator. For NordVPN users, you can get OpenVPN Config files from here. Download one config file per server location – either UDP or TCP.
Move the config file you downloaded to the OpenVPN’s “Config” folder. If you went with the default location during installation, it should be on your system drive in Program Files. Find the OpenVPN folder and then the Config folder inside. Paste the config file in this folder.
Now, run the OpenVPN app as an administrator and it will open in the background.
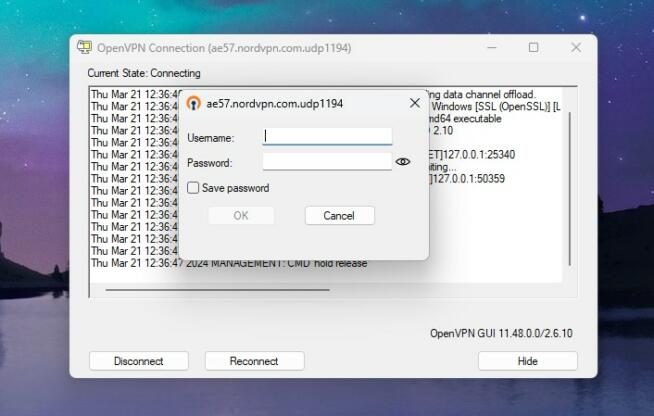
To access it, click the system tray icon, find the imported config file and press Connect.
When prompted, enter your email and username from NordVPN.
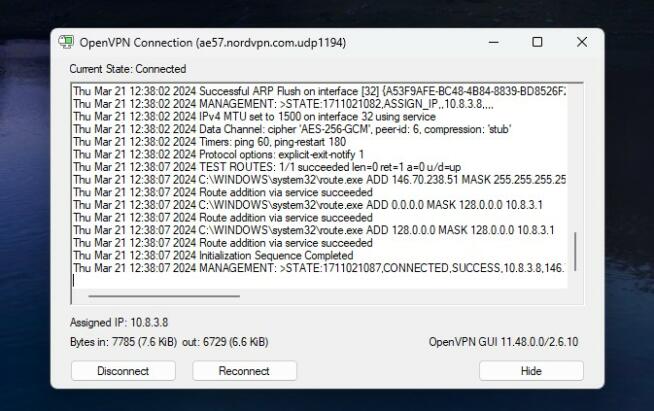
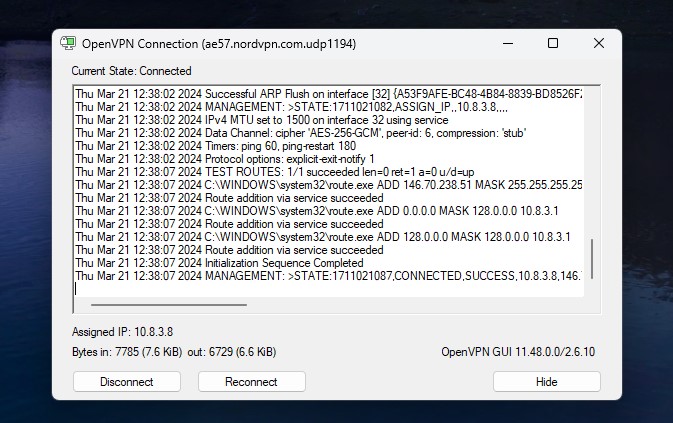
After a few seconds, you’ll be connected to the VPN server and ready to use the VPN.
To disconnect, click the system tray icon again, find your config file, and press Disconnect.
WireGuard
Using WireGuard is also smart if you want faster connections, better speeds, and superior connection stability. Bear in mind that NordVPN offers WireGuard (NordLynx) config files, so for this Windows 11 VPN setup guide, it’s also suitable.
If you’re using a corporate VPN, the IT administrator might offer these files. Also, some VPNs like ProtonVPN also have WireGurad config files that you can download from the site. Nevertheless, to begin the setup, download and install WireGuard from the official site then follow these steps:
Download the WireGuard configuration file from the IT administrator or NordVPN (for NordVPN, select the NordLynx security protocol from the list). The configuration file for WireGuard should have the “.conf” extension.
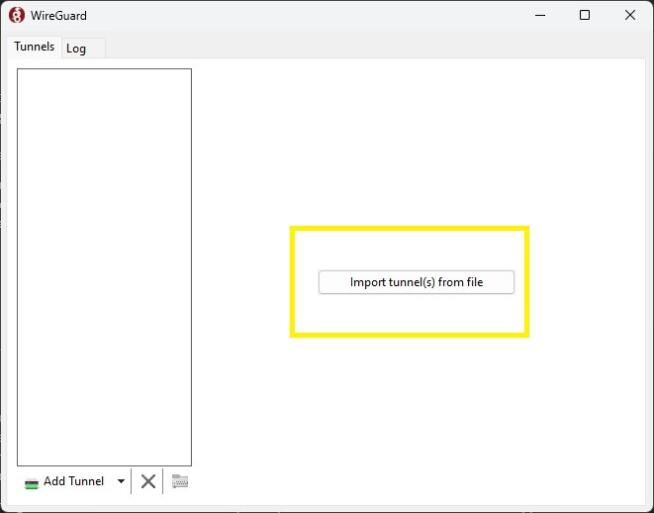
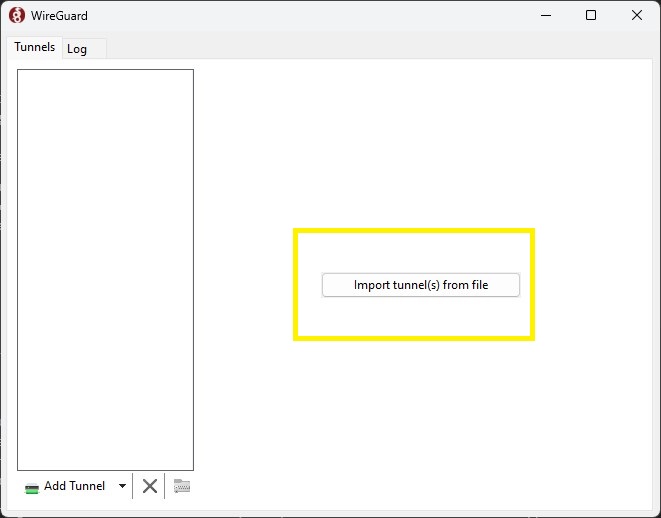
Open WireGuard and select “Import tunnel(s) from a file.“
Go to the downloaded configuration file, select it, and press Open.
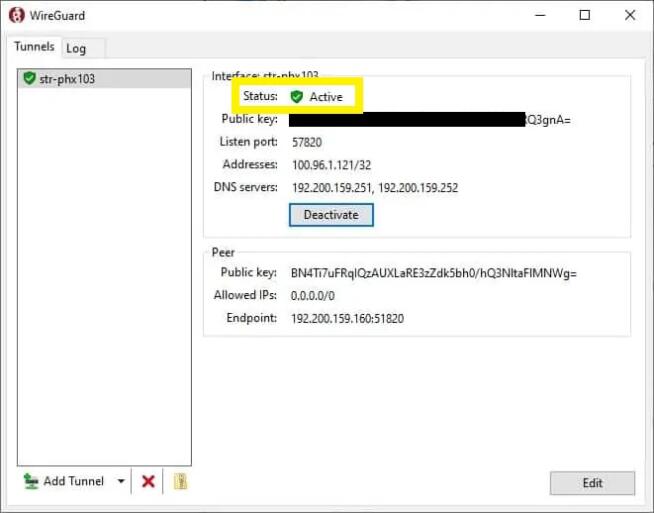
The file will now appear in the app, with parameters like DNS servers, public key, listen port, and so on. Click on Activate and the VPN will connect. Its status should be “Active”.
To disconnect, click Deactivate.
Manual Windows 11 VPN Setup With the IKEv2 Protocol
The last, and most complicated VPN setup on Windows 11 is for the IKEv2 protocol. This is a great alternative for those who don’t want to use OpenVPN. Unfortunately, IKEv2 is very advanced and complex, which is why its manual connection requires a bit of work.
For this guide, we’ll use NordVPN but as always, the process is identical for other VPNs that support this protocol. Before we do anything, we need to download the NordVPN Certificate through this link. With that in place, here are the required steps:
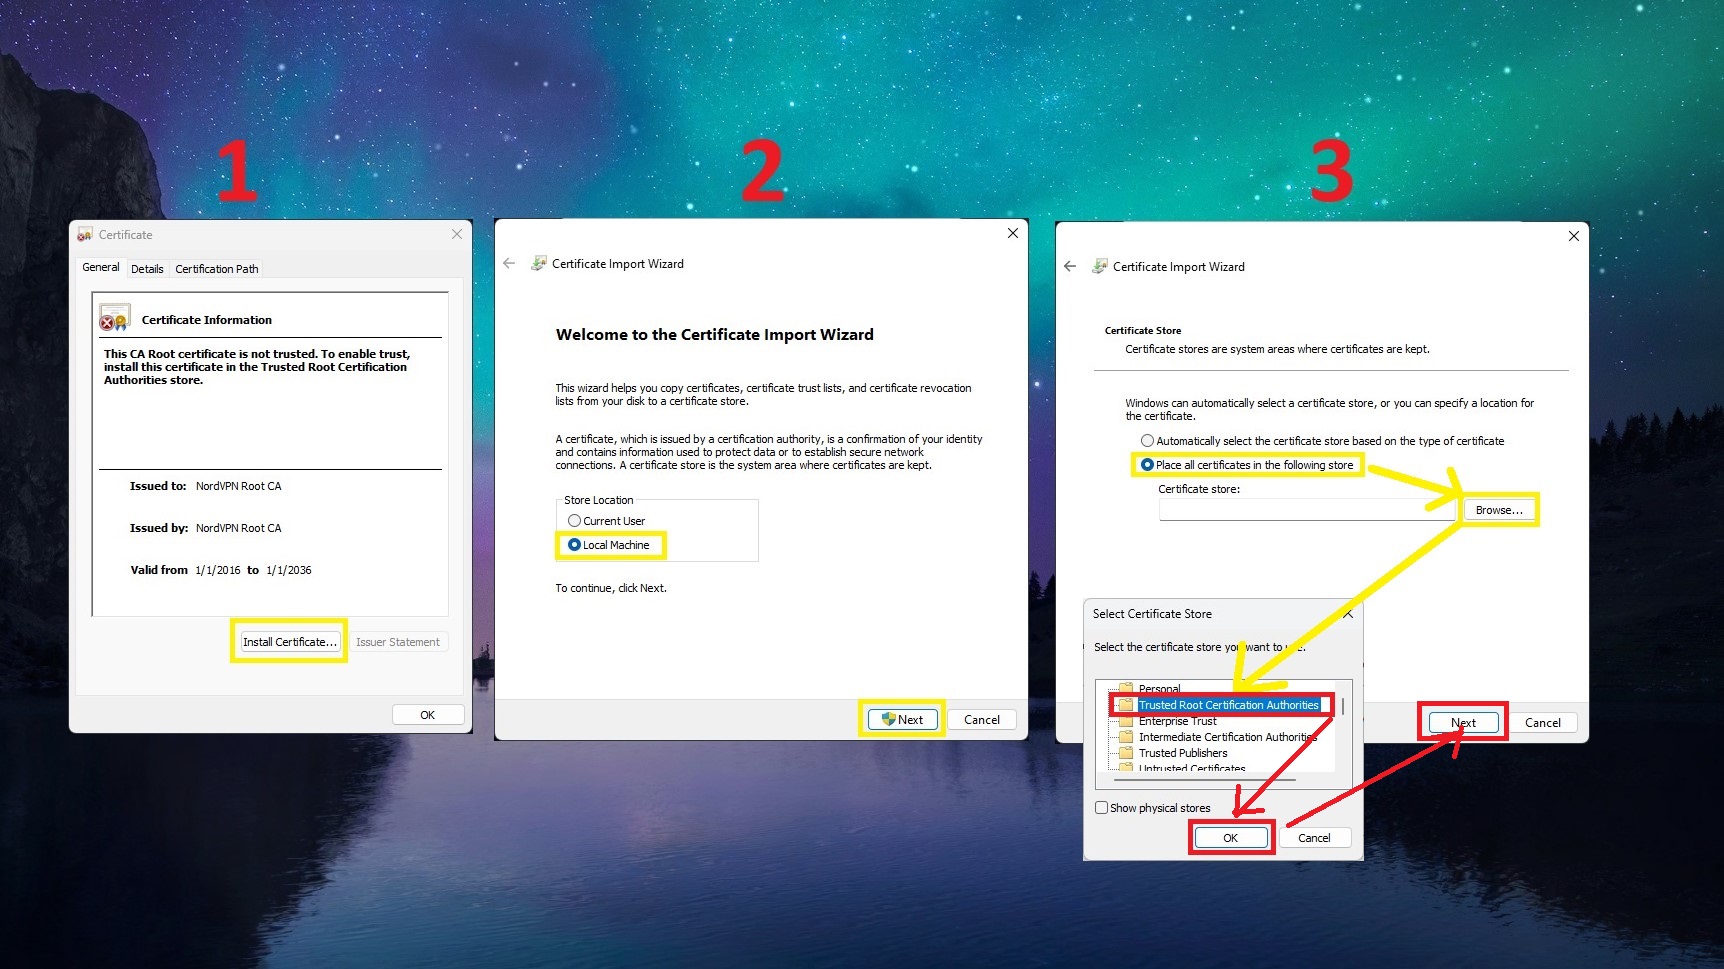
Open the NordVPN Certificate file and press “Install Certificate”.
In the next step, choose “Local Machine” and press Next.
Choose “Place all certificates in the following store” and click on Browse.
Now, find the folder called “Trusted Root Certification Authorities”, click on it, press OK, and then click on Next.
To end the setup, click Finish and select OK in both windows that appear.
Open the Run function on Windows by pressing Windows + R.
Type in “msc” and click OK.
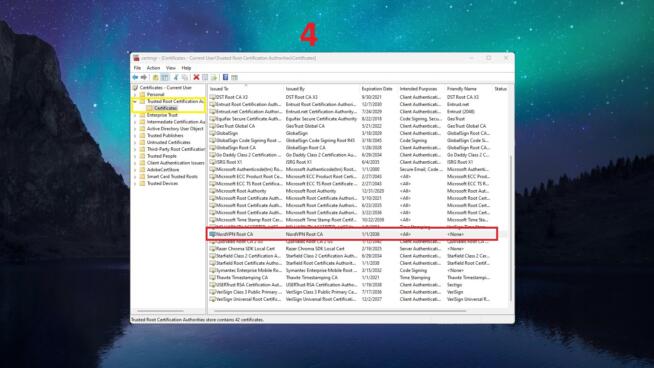
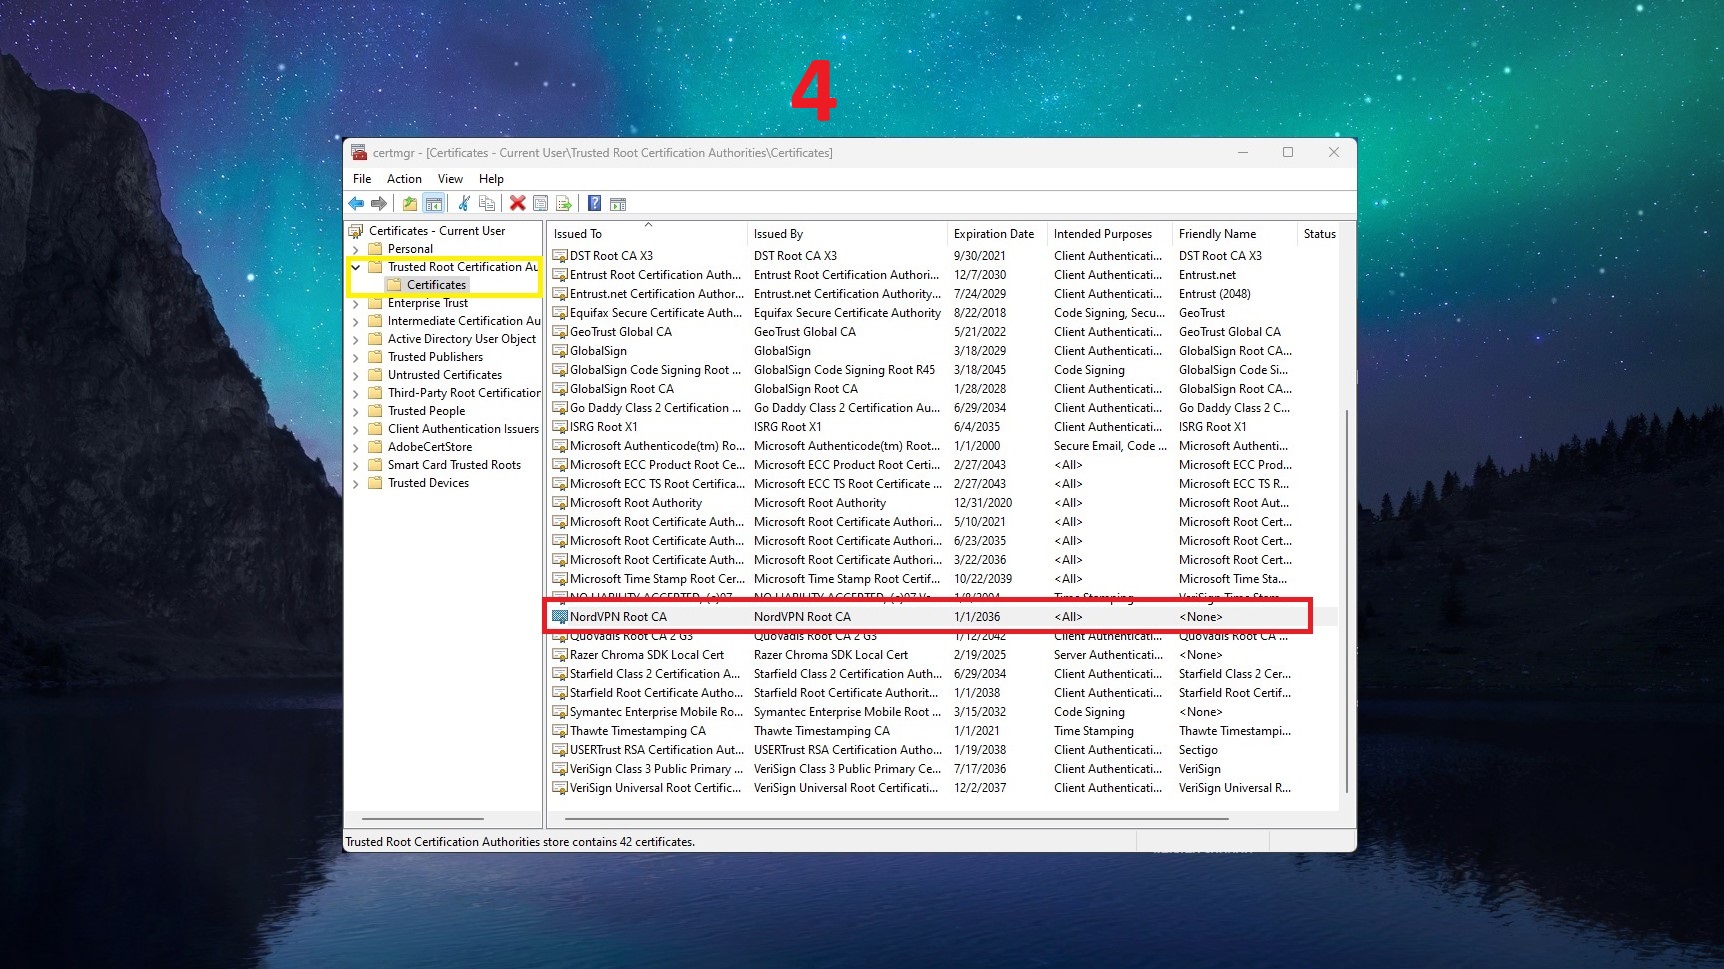
On the left side, find the “Trusted Root Certification Authorities” folder and then select the subfolder called “Certificates.”
On the right side, find “NordVPN Root CA”, right-click on it, and choose Properties.
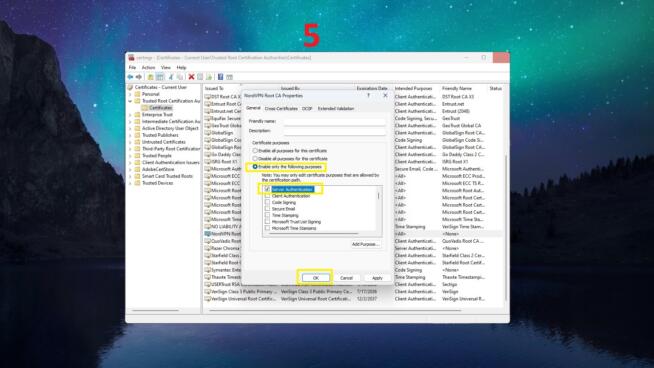
Under the General tab, select “Enable only the following purposes”, untick all boxes, and tick “Server Authentication”, then press Apply, and then OK.
With these 10 steps, we’ve installed the NordVPN Certificate needed to set up an IKEv2 VPN connection on Windows 11. However, let’s see how to set up the connection and connect to NordVPN.
Go to Control Panel and select “Network and Internet.”
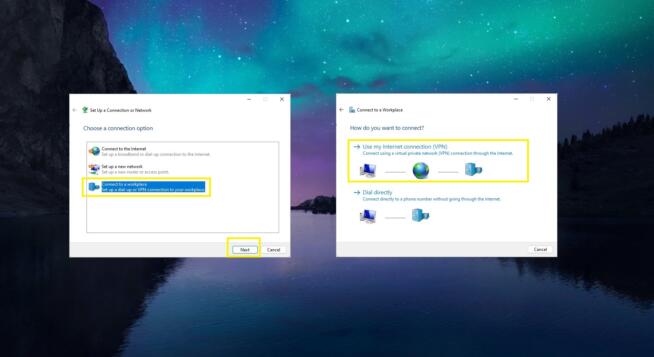
Click on “Network and Sharing Center” and select “Set up a new connection or network.”
In the new window, go for the “Connect to a workplace” option and press Next.
When asked how you want to connect, select “Use my internet connection (VPN).”
In the internet address field, enter the URL of NordVPN’s server (find the server for manual connection here and choose IPSec/IKEv2 to get a proper URL).
Under “Destination Name”, enter the connection name – it can be anything. Click on Create.
Go back to “Network and Sharing Center” and click on “Change Adapter Settings.”
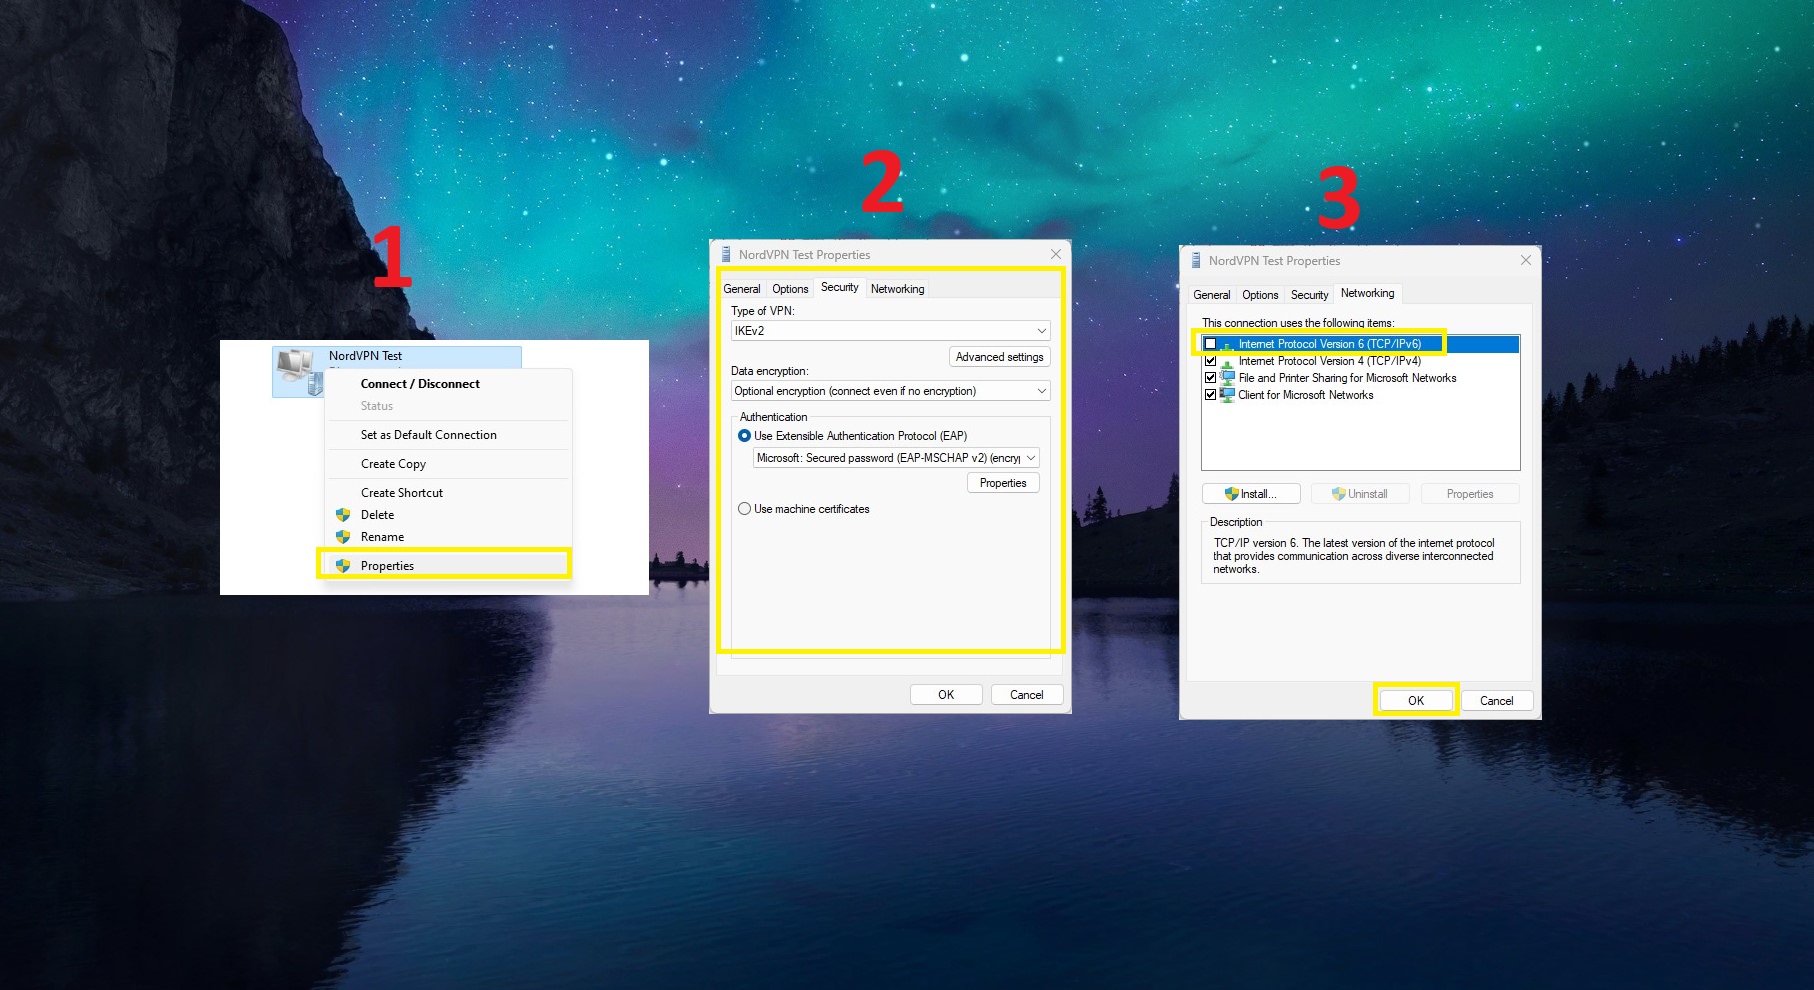
Find the created adapter, right-click on it, and choose Properties.
In the Security tab, the “Type of VPN” should be IKEv2, as well as other parameters displayed in the screenshot.
Now, go to the Networking tab and uncheck “Internet Protocol Version 6 (TCP/IPv6)” to prevent IPv6 leaks. Press OK.
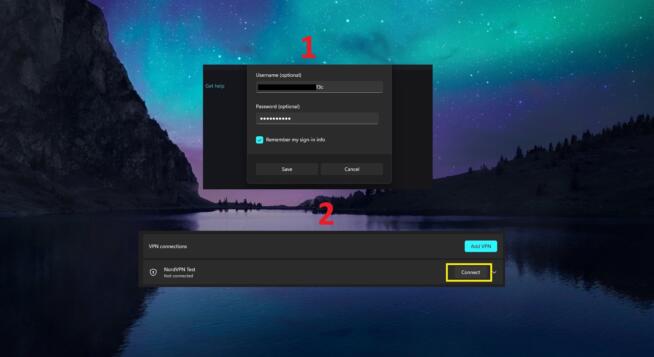
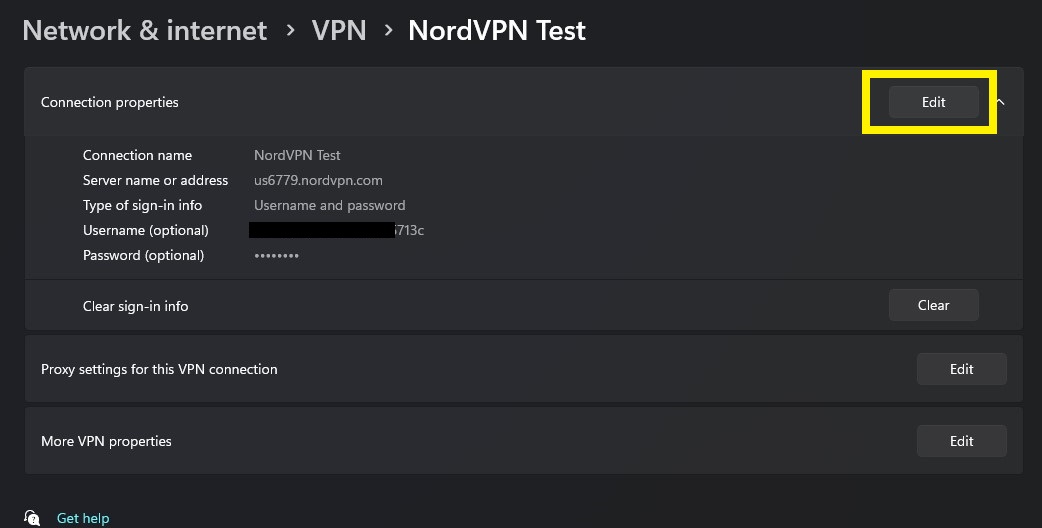
Finally, go to the VPN option under Settings/Network and Internet and find your created connection.
Click on it, select Advanced Options, and click Edit.
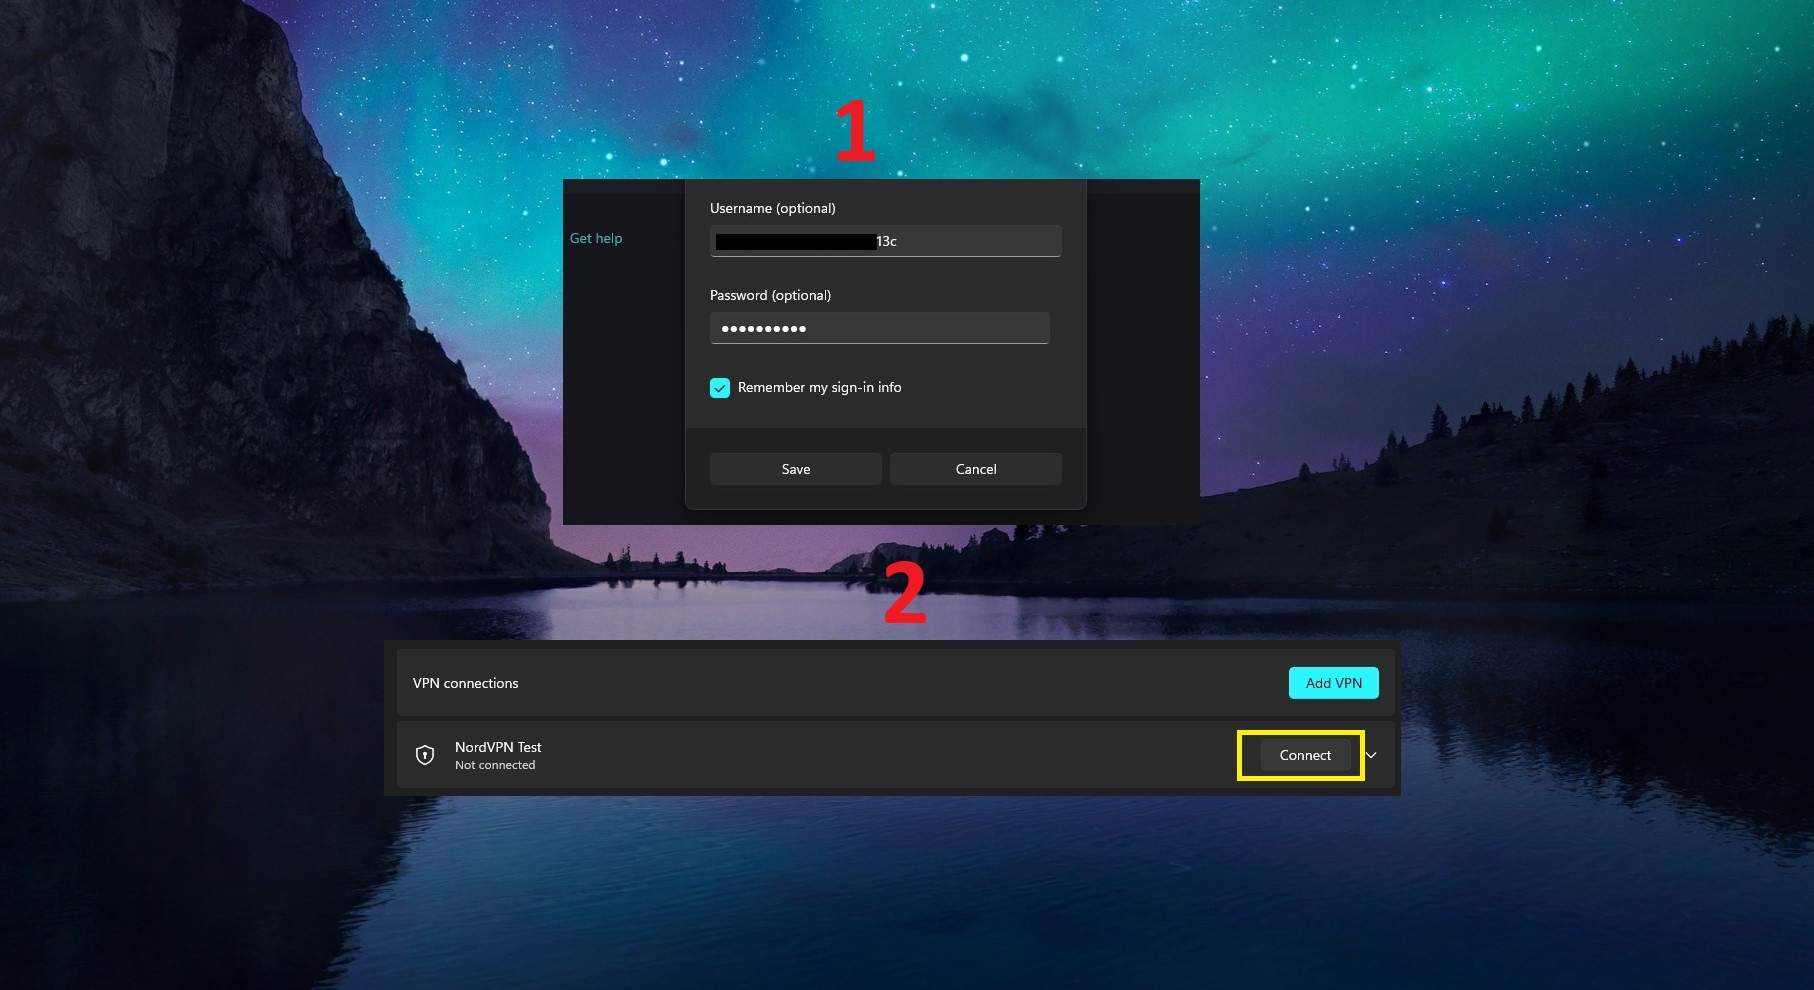
Enter your username and password for the manual connection (found here) and click Save.
Press Connect on the newly created VPN connection and you’re all set.
VPN Not Working on Windows 11? Try These Fixes
You now know how to set up a VPN connection on Windows 11. But what if you’re facing issues and the VPN won’t work or you have connection problems? Here are a few methods to fix them.
Monitor Your Internet Connection
To be able to connect to a VPN, you must have an active internet connection. You can go to Network & Internet under Settings and see if the internet connection is active. If not, try to restart the router. Do this by unplugging the router from the socket, waiting for around 20 seconds, then plugging it back in.
If this isn’t working, contact your ISP and see if the problem is on its side.
Use Another VPN Server
VPNs will, from time to time, update and maintain their servers, in which case, they’ll be non-functional until updates are done. In some cases, servers can malfunction and the repair process impairs their usability. For this reason, you can try using another server, which should work.
Try Another Protocol
Some protocols can create connection instabilities with Windows 11. Thankfully, you can alter the protocol easily from the app or in the manually created VPN connection. Instead of OpenVPN, try IKEv2 or WireGuard and see if this improves the situation.
Restart the VPN Client
You can do this by restarting your computer or completely disabling the VPN from Task Manager. Ensure you disable EVERY process associated with the VPN and run it again. If this fails, a good option is to update the VPN client if needed. A new update should make the VPN work well again.
Turn Off the Firewall
Sometimes, a built-in Windows Firewall can mess up the VPN and prevent it from working. Open your Windows Firewall and ensure it doesn’t block the VPN connection. If it does, allow the VPN in the Windows Firewall and try to connect again.
Also, if you have an antivirus or anti-malware app, sometimes, these can be problematic. You can turn them off or make an exception for the VPN to prevent discrepancies.
Contact Customer Support/IT Administrator
If everything fails, the best thing is to let experts do their job. NordVPN has 24/7 live chat support for this purpose and it’s pretty effective at fixing VPN problems. An IT administrator will also know what to do for a more complex and obscure issue. You know what to do!
Summary
In today’s guide, you’ve learned how to set up a VPN on Windows 11. For the simplest method, use the VPN app from NordVPN to connect. This will take merely a few seconds and you can easily switch to another server or protocol if the problem arises.
A more advanced manual method is recommended in the case of VPN restrictions or when using corporate VPNs. This method is far more complex but allows for more control and customization. Now that you’re familiar with both methods, choosing one that works for you should be simple.
Marcus is a cybersecurity analyst with a focus on VPN and proxy services. As the founder and driving force behind a prominent VPN and proxy website, Private Proxy Guide, Marcus has emerged as a trusted authority in the digital realm. With a passion for staying ahead of evolving cyber threats, he has played a pivotal role in educating and empowering individuals and businesses to safeguard their online presence.
![How to Set Up a VPN Connection on Windows 11 [Full Guide]](https://www.privateproxyguide.com/wp-content/uploads/2024/03/How-to-Set-Up-a-VPN-Connection-on-Windows-11-Full-Guide-700x368.jpg)


 [3 Easy Steps]")
")
 [3 Easy Steps]")
 [3 Easy Steps]")


