If you’re like most people, you use your Wi-Fi to connect to the internet and check your email. But maybe you don’t know your Wi-Fi password. Or maybe you forgot it. This article highlights how to find out your Windows 10 Wi-Fi password step by step.
Method 1: View the Wi-Fi password in Windows settings.
If you are the PC administrator and have no constraints, this can be a go-to approach for getting the Wi-Fi password.
This is how you can do it:
Select Network & Internet from the Start menu, then click Settings.
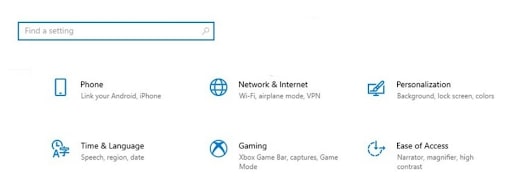
Scroll down to the Network and Sharing Center in the Status column.
In the List of the existing networks section, click on the Wi-Fi name.

Under start menu scroll down to the Network and Sharing Center in the Status column.
In the List of the existing networks section, click on the Wi-Fi name.
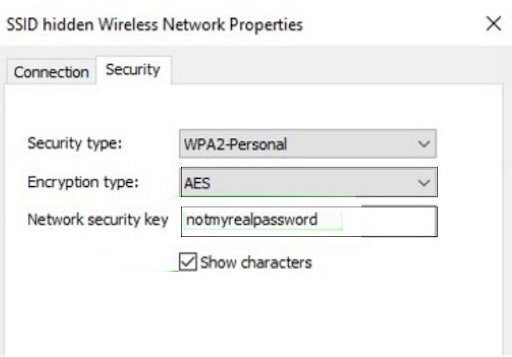
Whenever the Wi-Fi Status window appears, select Wireless Properties from the drop-down menu.
Next, go to the Security page and tick the Show characters checkbox to see your Wi-Fi password.
Method 2. View the Wi-Fi password from your control panel.
Although the procedure described above works, what if you cannot access Windows 10 settings?
Perhaps you prefer a quicker technique and are willing to remember a little command. You can easily use the Run command to locate your Wi-Fi network settings, and this technique should work as long as you access your network settings.
Press the Windows+R keys to open the Run dialog, then type ncpa. Cpl in the text field and click OK.
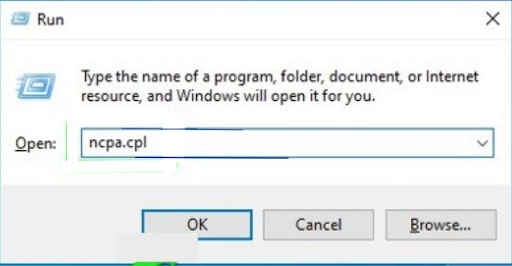
Right-click on the Wi-Fi network here and choose Status in the context menu to access your network connection straight in the control panel.
In the Wi-Fi Status window, select Wireless Properties.
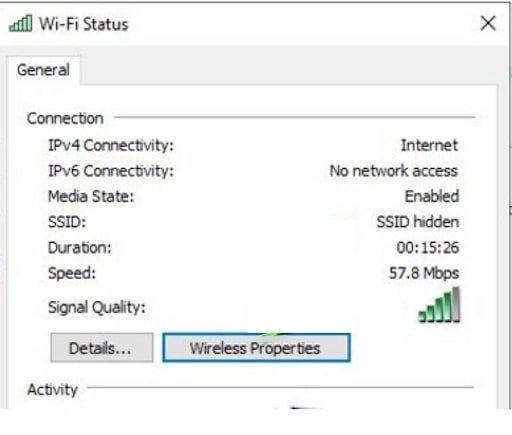
Choose the Security menu and then Show characters to see your Wi-Fi password.
Method 3: Use a Powershell command
Moving on to a bit more complex way, you can use the Network Shell (Netsh) command in the PowerShell to access various information about the network and its password.
You may also use this technique to examine the passwords of all the connections your PC has previously joined. For example, use this method to find your workplace network password while at home without logging in to the business network. If you have selected the Forget button to forget a network’s details, this will not function.
You must first know the identity (SSID) of the Wi-Fi network to use the netsh command. If you’re already connected to a network, this isn’t a problem because you can see the name, but it is a slight issue if you need to see the password for a previously connected network. Thankfully, a Powershell function may show you a list of all connections you’ve previously connected to.
If you don’t have access to PowerShell, you can use these commands in Command Prompt instead.
Select Powershell from the menu by right-clicking on the Start menu.
Enter the command netsh WLAN display profiles here and click Enter. Under the User accounts area, you’ll find all of your saved networks’ names.
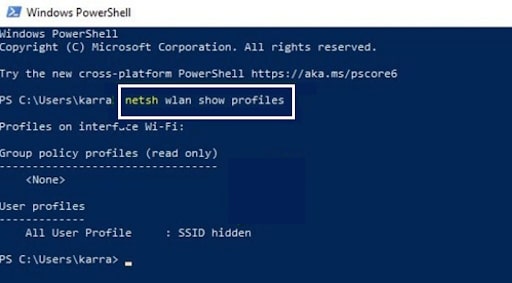
Copy the network(s) name from here so you can use it in the following command.
Use the command below, replacing the Wi-Fi name component with the real name of the network, to find out the password for any of the saved networks.
“netsh wlan show profile “name=wifi name” key=clear”
For example, the command will be netsh WLAN show profile “name=SSID hidden” key=clear.
When you click the Enter key, a plethora of data about this network will appear. The password will be put next to the Key content on the Security preferences page.
Method 4: Use a Wi-Fi password viewer from a third-party service
Wi-Fi passwords can be a security risk. If they’re not protected, people who access the passwords can access your personal information, like bank accounts and email addresses. Many third-party services offer password viewers, and some of these viewers are free, while others require a subscription.
However, not all third-party password viewers are equal, some are better than others, and some may even be dangerous. Before you make any decisions, know which Wi-Fi password viewer is right for you.
If you want to see a list of your Wi-Fi passwords, you can use a third-party service like WirelessKeyView. WirelessKeyView is an excellent option because it’s free and works with most browsers. Once you have it installed, please open it and enter your Wi-Fi password. The program will display all of the connected websites to your network and their passwords, and you can also see which users are accessing which websites.
Other Methods
Through Router web interface: If you want to find out your Windows 10 Wi-Fi password, you can do so through the router’s web interface. To access the web interface, go to your router’s address (usually found in a blue “router info” window on your computer) and enter the login information. The web interface will show you all of the Wi-Fi networks in your home and their passwords.
Resetting the Router: Resetting the router may be the solution if you have forgotten your Windows 10 Wi-Fi password. This process will erase all of the passwords associated with the router, so make sure you back up any important data beforehand. There are a few easy ways to reset your router. You can remove the batteries, wait 10 minutes, and reinstall the batteries. Or just hold down the reset button for 30 seconds. If that doesn’t work, you can try resetting the router by deleting all of its files and configuring it again from scratch.
Conclusion
Now that you know how to find out your Windows 10 Wi-Fi password, it’s time to change it. If you don’t want anyone else connecting to your Wi-Fi, now is the time to set a new password. We hope our guide helped you solve the issue. If you have any further queries, please feel free to drop in a message, and our experts will help find a solution.
We earn commissions using affiliate links.


![How to Jailbreak a Firestick [year] Step by Step (With Pictures) How to Jailbreak a Firestick 2021 Step by Step (With Pictures)](https://www.privateproxyguide.com/wp-content/uploads/2018/08/How-to-jailbreak-a-firestick-150x150.jpg)
![How to Update Kodi: Step-by-Step Guide for [year] How to Update Kodi for Different Platforms in 2021](https://www.privateproxyguide.com/wp-content/uploads/2018/09/how-to-update-kodi-150x150.jpg)


![Best Password Managers for Windows, iOS & Android [year] best password managers 2021](https://www.privateproxyguide.com/wp-content/uploads/2021/03/best-password-managers-2021-150x150.jpg)

![7 Best VPN for School WiFi [year]: Secure & Private Browsing Best VPN for School WiFi in 2021 - How to Bypass VPN Bans](https://www.privateproxyguide.com/wp-content/uploads/2018/08/Best-VPN-for-School-College-150x150.jpg)


![Is Airport WiFi Safe in [month] [year]? Is Airport wifi safe](https://www.privateproxyguide.com/wp-content/uploads/2021/12/Is-Airport-wifi-safe-150x150.jpg)
![7 Best VPN for Eero WiFi Routers [year]: Fast & Secure Network Best VPN for Eero](https://www.privateproxyguide.com/wp-content/uploads/2022/04/Best-VPN-for-Eero-150x150.jpg)
![Best Mesh WiFi Systems in [month] [year] Best Mesh WiFi Systems](https://www.privateproxyguide.com/wp-content/uploads/2022/07/Best-Mesh-WiFi-Systems-150x150.jpg)