Today, I’m going to teach you how to setup a private proxy server from your home. There are a lot of situations when you may require using a proxy server. For example, you are using free Wi-Fi in a hotel or in a cafe with free WiFi. There is no guarantee that the network is secure and scammers don’t try to scan and intercept your bank card data or logins and passwords to your personal pages.
Or you would like to hide your current IP address because accessing the resource you use requires anonymity. Or you got a search engine ban because of frequent connection requests. In any of these situations using the proxy server is the best solution. There are two options to launch a proxy server: find a private proxy service (paid or free) or create your own private proxy server.
The first option is not always safe and no one can be sure that no one else uses the same IP address with you. In this case, someone’s spam activity can lead to a proxy server ban. So, using your own private proxy is a good solution.
1. Find hosting with SSH support
This step is necessary in order to provide a high level of security. Search online for a hosting provider with SSH support. Most modern providers support SSH connection by default and without additional payments. Good hosting costs about several dollars a month. Theoretically, you can find free service, but paid ones will work better and safer. Contact tech support on how to use SSH connection.
Attention! Make sure that the hosting provider allows creating a proxy server. If it’s forbidden, your account can be banned!
2. Run the PuTTY application
After getting the hosting with SSH, you require the PuTTY program to create a local proxy server. PuTTY is an open-source client for various remote access protocols (SSH, Telnet, rlogin, TCP). Used to connect to a remote computer (for example, a web server) and execute various commands on it.
PuTTY logs and allows you to customize fonts, colors and resolution of the console, allows you to store keys of authorization in your memory, supports working through a proxy server. In addition, PuTTY is free and does not require any special configuration, except for passwords for accessing the server, username, and password. Download the program for free from the official website of the program: www.putty.org.
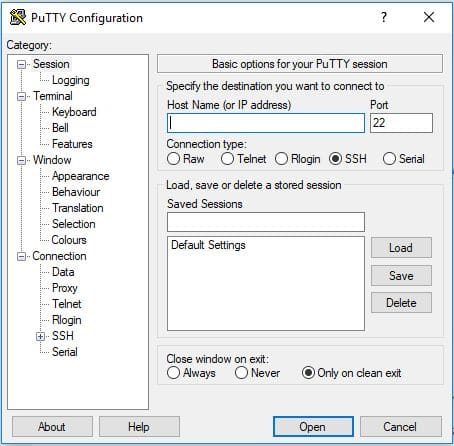
3. Configure PuTTY
Having launched the program, you will see a settings window. In the Host Name field, enter the domain address or IP address of your server. You may take this information from your hosting provider control panel. In the Port field, enter the port, for example, 22.
Now go to Connection — SSH — Tunnels and add a port number. To do this, in the Source port field, enter the port of the future local proxy server, for example, 8888. Check the Dynamic option and click the Add button. After that, the port will be displayed in the Forwarded ports field and will look like D8888. In order to avoid configuring the app each time, save the current settings. To do this, go back to the Session category in the left sidebar, select Default settings and click the Save button.
4. Open the session
Having configured the program, open the session to create a local proxy server. To do this, click the Open button in the right bottom corner. If you connect to the server for the first time, PuTTY will notify you that it does not have information about this server. To confirm the connection click Yes.
Attention! We strongly recommend connecting to your server for the first time through a reliable network.
Then the program will ask for your login and password (when entering the password, the cursor will not move, and the asterisks will not appear — this is normal).
5. The proxy server is ready!
When you enter your login and password, the information about the server appears on the screen, and your proxy will be available at 127.0.0.1:8888 or localhost:8888. Enter the address in any browser to make if everything works correctly. In most cases, you will see “localhost” written in the corner. At the end of the work, you may close the black window of the PuTTY, confirming shutting down the server.
6. Configuring the browser and other programs
To use the created private proxy server in the browser, you need to configure the connection through the SOCKS5 proxy server, specifying 127.0.0.1:8888 or localhost:8888 in the settings. Other programs in most cases can be configured in the same way. For example, let’s try to configure Google Chrome.
Select Menu — Settings — Advanced — System — Open proxy settings.
In the Internet Properties window select the Connections tab and click the LAN Settings button. In the “Configure LAN Settings” window, check “Use a proxy server for your LAN” box (in the future, to quickly turn on and off the proxy, you can simply check or uncheck this box) and click on the “Advanced” button. In the “Proxy server settings” window, fill in Socks field: address — localhost, port — 8888. Leave all the other fields empty.
Now close all the windows by clicking on the “OK” button. Your browser is ready to work through a proxy.
7. Testing
To check and make sure that you actually go online through a server, open your browser and go to any service that determines your IP address and shows the detailed information about it. For example, one of the most popular services is WhatIsMyIP.com®. Compare the IP address with the proxy server turned off and on. As you see, creating and using your own private proxy server is not so difficult as it may seem. Just follow the tutorial and you will be successful.
Marcus is a cybersecurity analyst with a focus on VPN and proxy services. As the founder and driving force behind a prominent VPN and proxy website, Private Proxy Guide, Marcus has emerged as a trusted authority in the digital realm. With a passion for staying ahead of evolving cyber threats, he has played a pivotal role in educating and empowering individuals and businesses to safeguard their online presence.
2 thoughts on “How to Setup a Private Proxy Server”
Roman
Thank you for the information. What should I do if I need many different proxies? Could you advise please?
It depends on what you need the proxies for. I would suggest that you take a look at dedicated (datacenter) proxies or residential proxies. You can find reviews and lists on the site. I would suggest SSLPrivateProxy if you need regular datacenter proxies or SmartProxy if you need residential proxies.


Thank you for the information. What should I do if I need many different proxies? Could you advise please?
Hi Roman,
It depends on what you need the proxies for. I would suggest that you take a look at dedicated (datacenter) proxies or residential proxies. You can find reviews and lists on the site. I would suggest SSLPrivateProxy if you need regular datacenter proxies or SmartProxy if you need residential proxies.