As a rule, most home users use the routers based on the “set up and forget” principle.
Their main purpose is to share the Internet for the home network, but in some cases, there is a need for something more exotic, for example, you may require the file server or VPN for all your home devices at the same time.
In the default firmware, there may not be such features. But, since the software of the majority of modern routers for home use (apart, perhaps, from Huawei, which designed their own operating system) is based on the Linux kernel, and some companies once even discovered a part of the sources, it is possible that there is a custom firmware for your router as well.
One of the best and the most popular alternative firmware is DD-WRT. In this guide, we are going to review how to install it on your router. Also, we will provide a step-by-step guide on how to install the VPN on the DD-WRT router.
First, it should be noted that the DD-WRT firmware is an operating system based on the Linux kernel. Even with the default settings, it has very wide functionality, much wider than the default firmware.
There are a lot of embedded components such as the FTP server, Samba, WOL, and much more. Through the web interface, you can get detailed statistics and the channel load in the local, wireless network, and the Internet. In addition, you can see the processor load and the available memory of the router.
If you configure the router to install additional packages, you can turn your router into a home media server: connected hard drive with an installed torrent client, IPTV broadcast over HTTP protocol for viewing via Wi-Fi. If you have a TV with DLNA support, you can connect the TV to the router and view IPTV, as well as watch movies from your hard drive. However, the more significant benefit is the ability to set up and configure the VPN service.
There are a lot of VPN providers who offer the configuration for DD-WRT routers. In most cases, the default firmware does not allow the correct functionality of the service, but it is much better with DD-WRT.
Price: FREE
Servers: 11 countries
Simultaneous connections: Unlimited
Jurisdiction: Canada
Torrenting: OK
Unblocks Streaming: Yes
Traffic: 10 GB Free TrustPilot Score: 4,8/5
Speed: Fast
Now, let’s try to install this alternative firmware for the router. We are using the TP-Link WR740N router as an example. Even if you use a different router, the procedure is very similar. The only possible difference is the alternative web interface menu.
How to install DD-WRT on a router
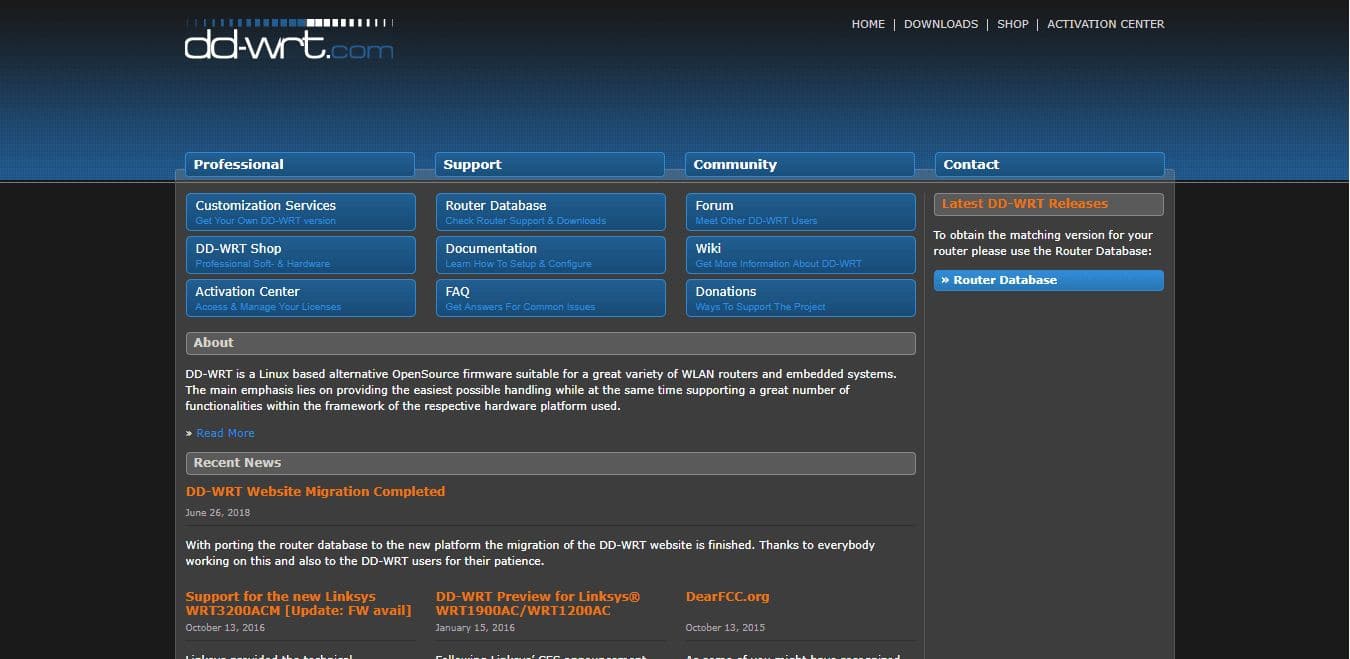
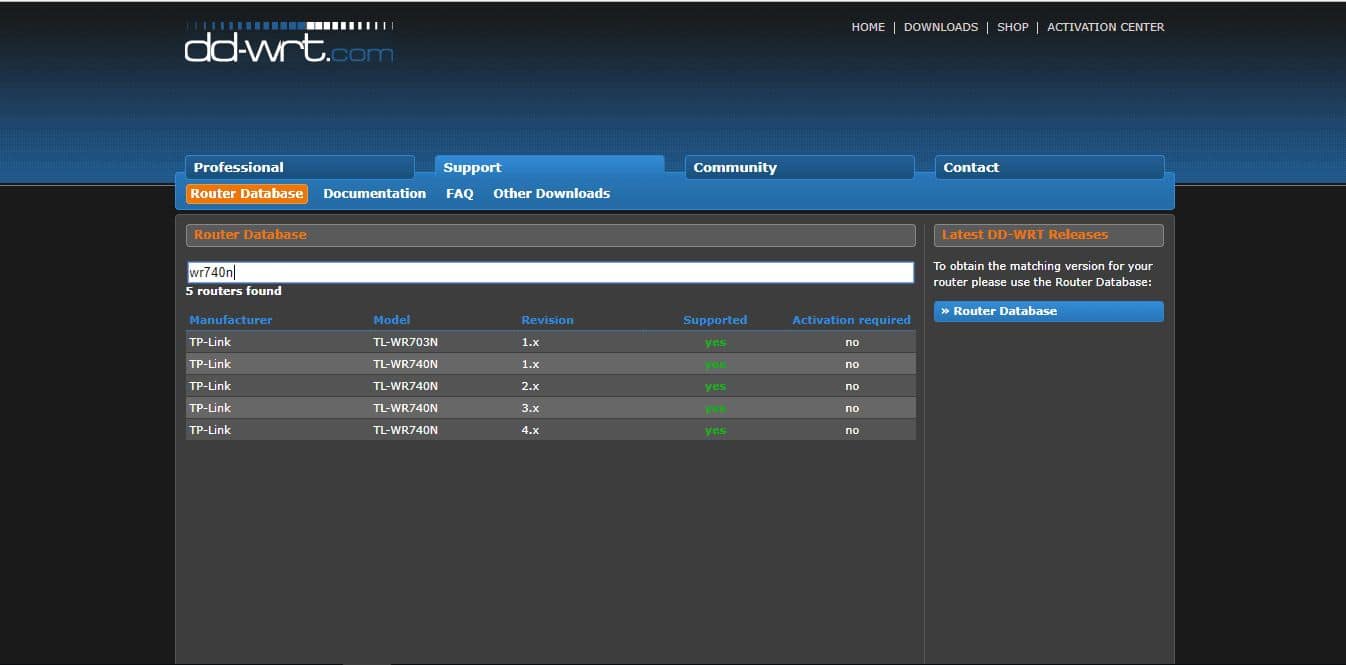
First of all, you have to download the firmware file from the official DD-WRT website. Open the homepage, then choose the Router Database section, and type your router model. Three symbols are enough.
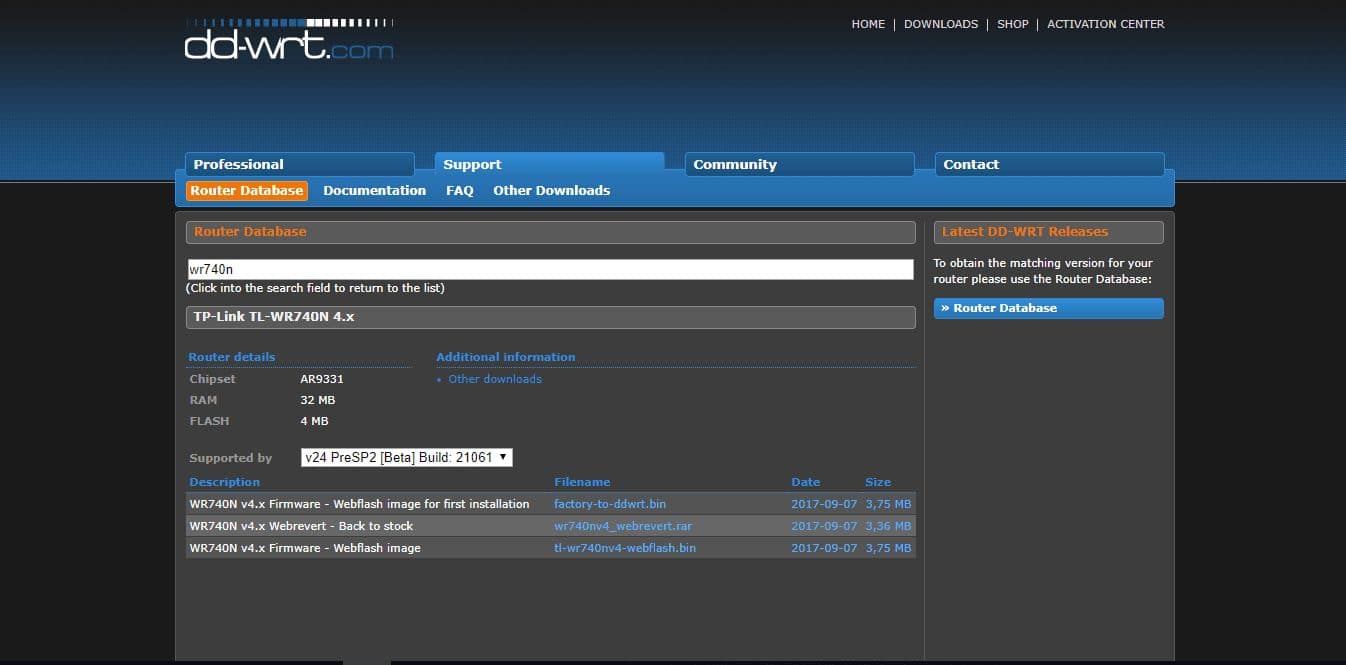
As you install the firmware for the first time, you will need the factory-to-ddwrt.bin file. Download and save it to the hard drive of your computer or mobile device.
Reset the router settings by pressing the Reset button for several seconds. This button is usually located on the back of the router. Also, connect the router to a reliable power supply and disconnect the internet cable and other cables, if any. It will save you from unnecessary issues during the blackout and the second will exclude possible conflicts of IP addresses that can make your router unavailable over the network.
Connect the router to the computer via the LAN cable.
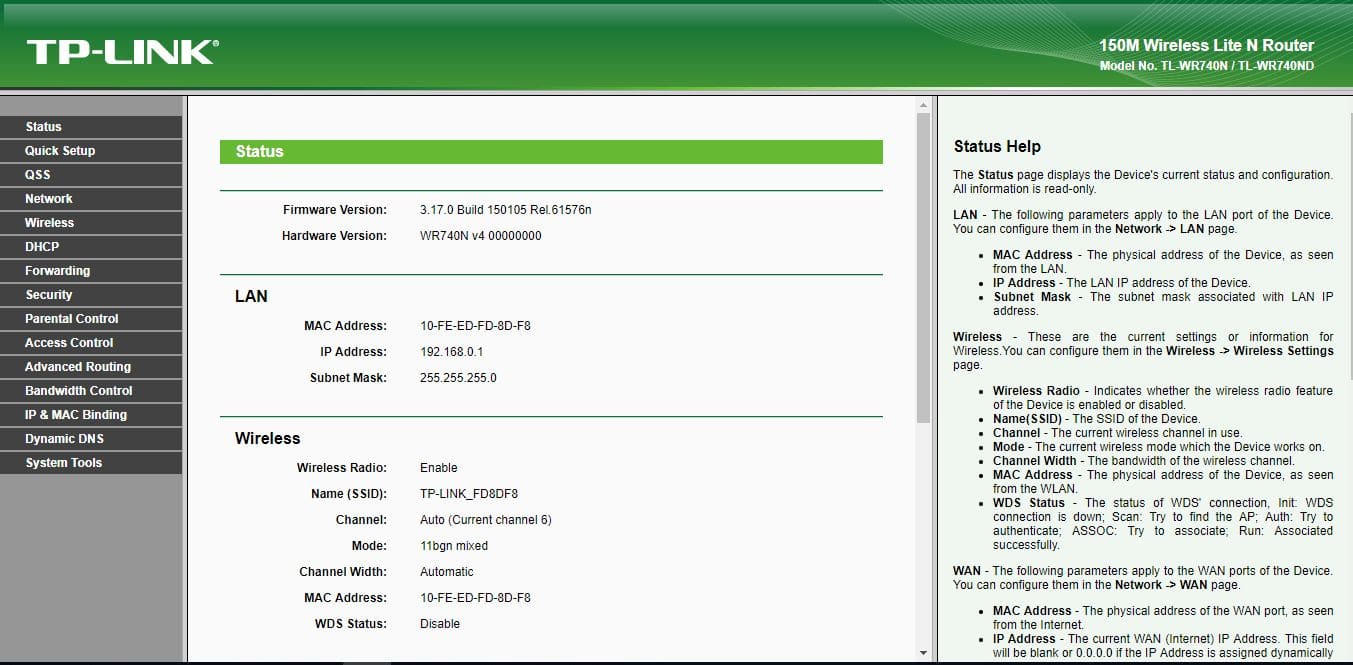
Open the Internet browser, and go to the web interface at https://192.168.0.1 or https://192.168.1.1, depending on your router. The default login and password is admin. To learn more, read the tutorial for your device.
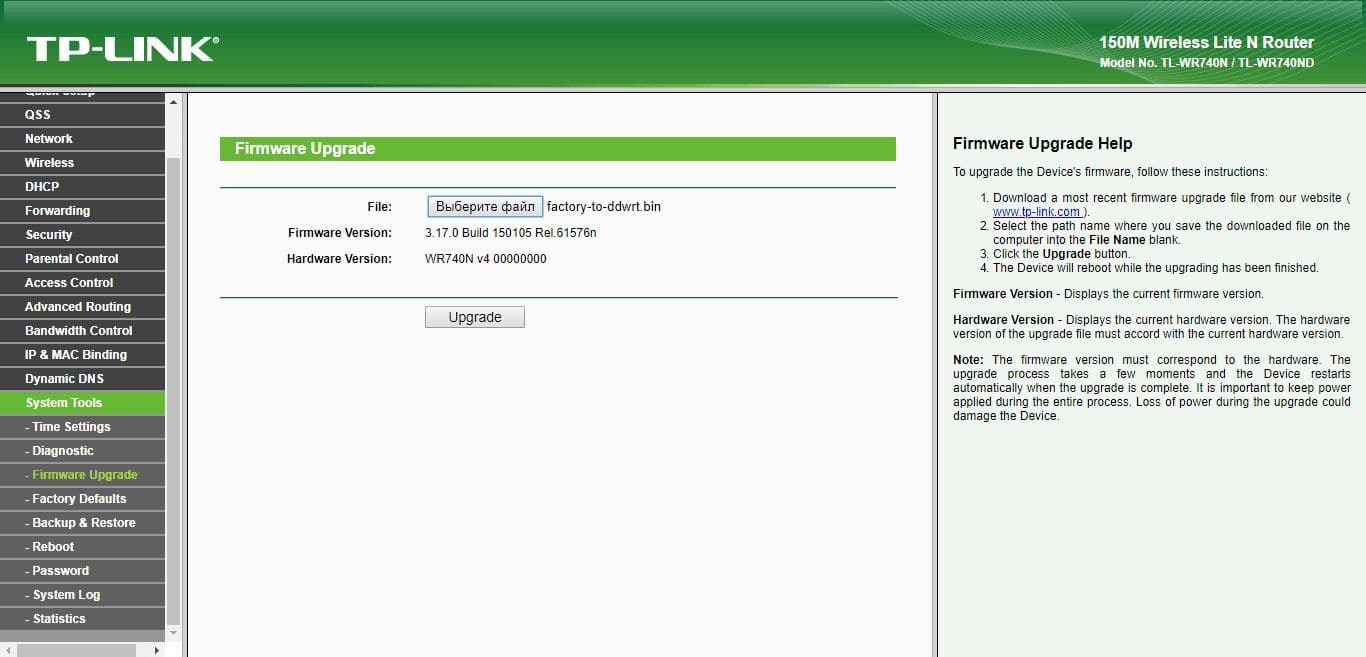
Go to System Tools — Firmware Upgrade. Again, this may differ, based on the router vendor.
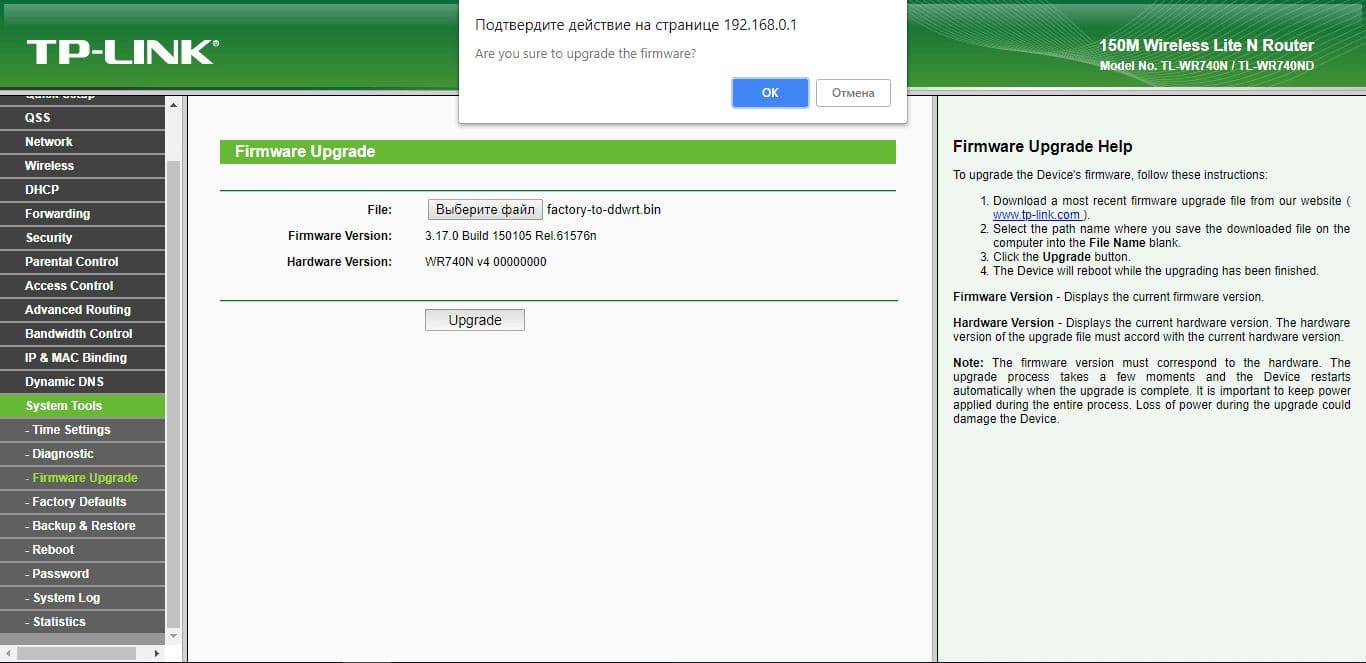
Then click on the File field, click the Browse button, and select the factory-to-ddwrt.bin file. We check that we have specified the required file. If it’s all right, flash it by clicking “Upgrade”.
The entire upgrade process will be displayed in the window. But do not rush, and in any case, do not touch the power of the router for 5 minutes. In most cases, the router will be flashed in 2 or 3 minutes. In the end, you will see the following window.
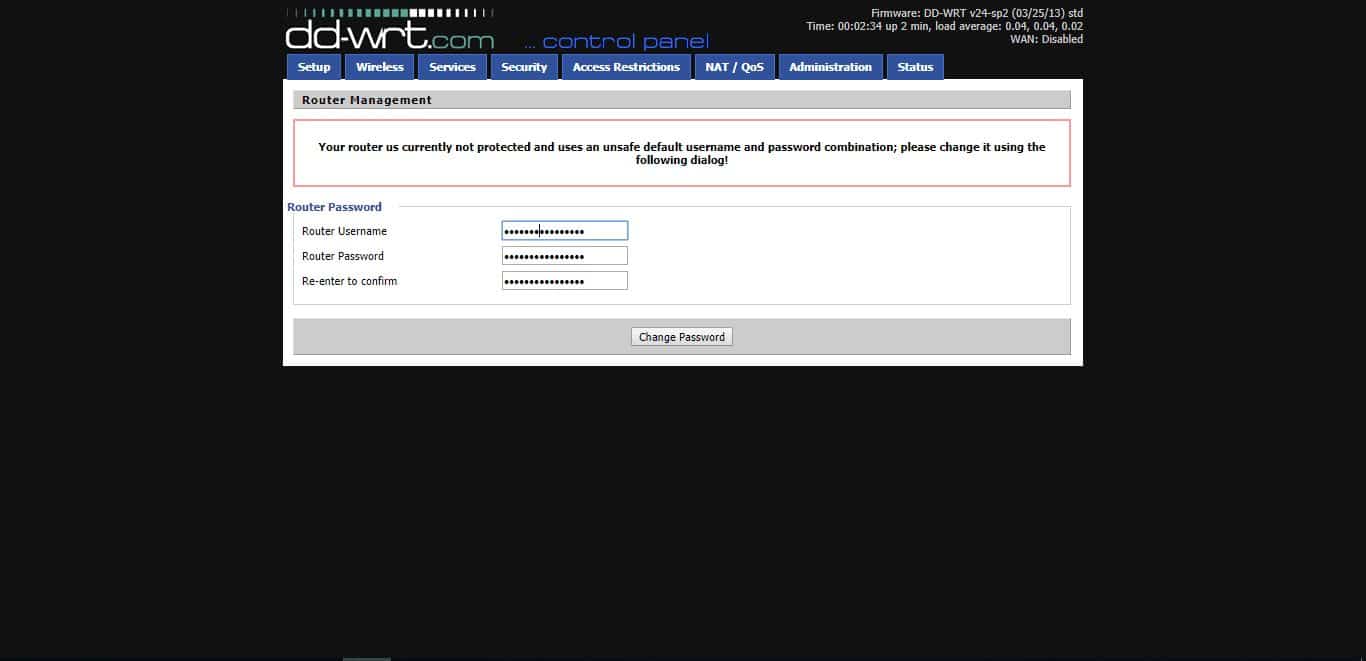
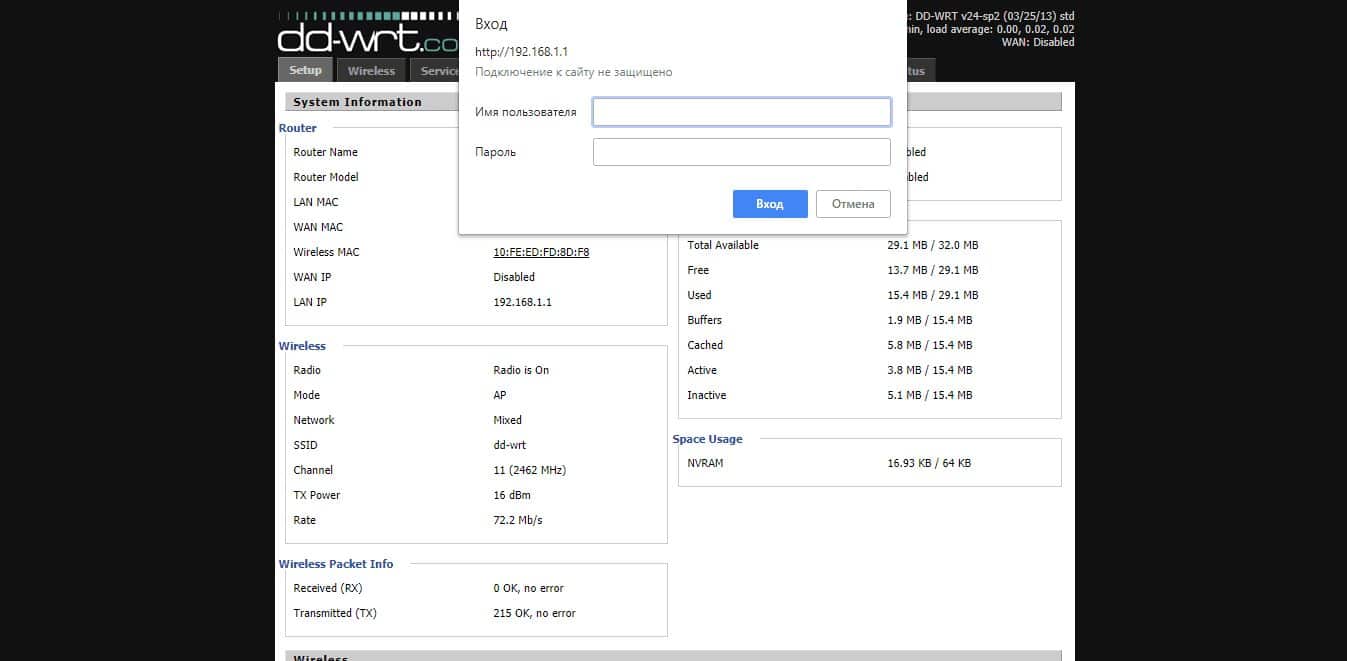
After the update is completed, open the DD-WRT web interface at https://192.168.1.1 where you will see the following page. If it does not work, reboot the router by disabling/enabling its power.
The router warns that the device is not password-protected, and asks us to fill in the appropriate fields. Fill them in, entering username, password, and password confirmation. Press “Change Password” to save it.
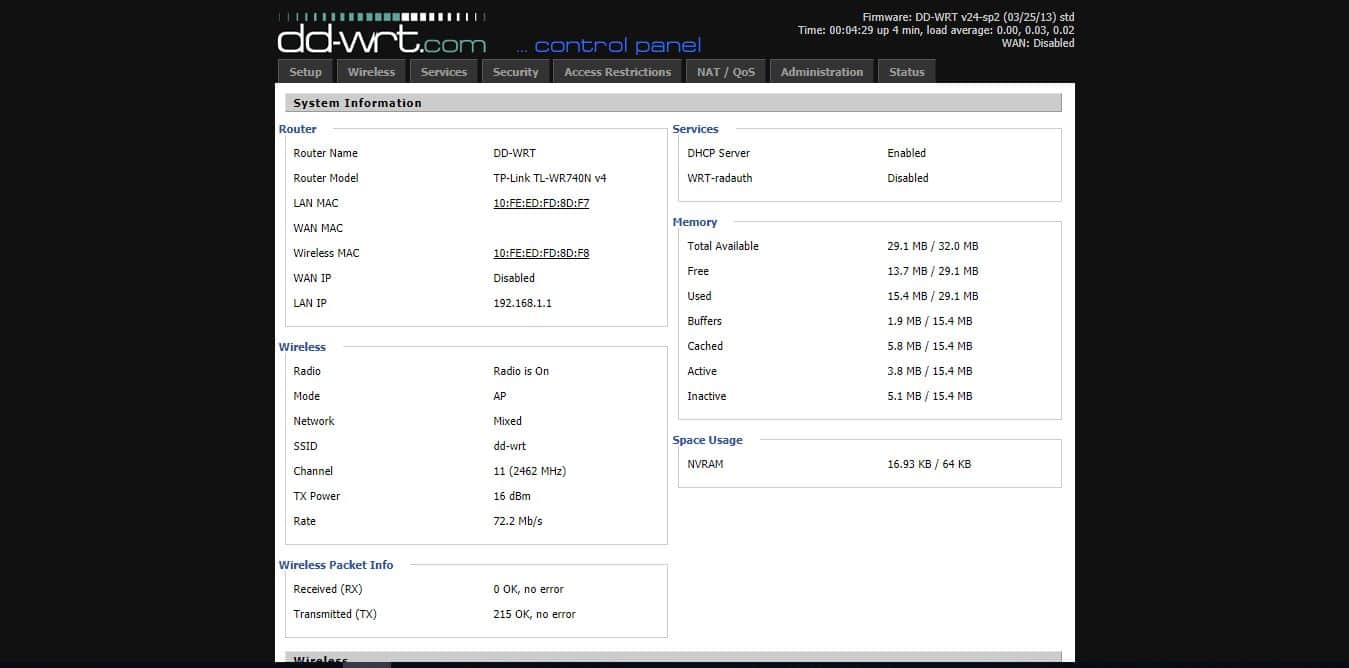
That’s all, we can see the main face of the DD-WRT interface and we are ready for the subsequent configuration and use of the router.
How to setup and configure PPTP on DD-WRT
It is very easy to configure a VPN on DD-WRT. By default, most VPN providers offer the PPTP protocol. Let’s see how to set up and configure it.
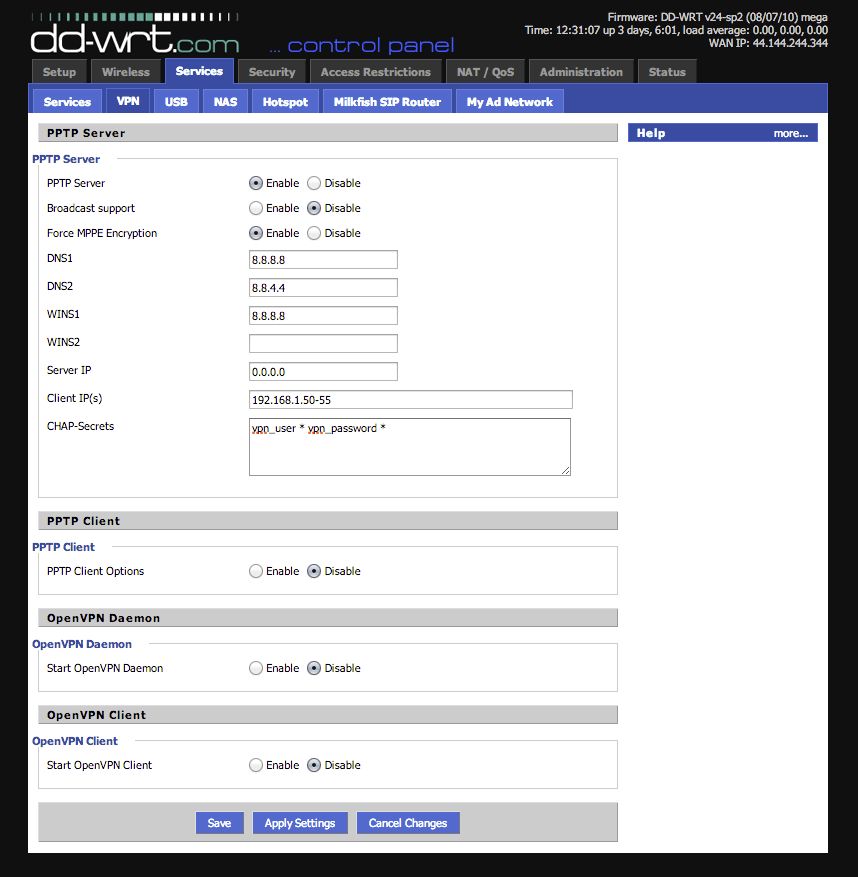
First, you need to go to Services — VPN in the web-interface of the router.
The box in front of the PPTP Server must be in Enable mode.
Disable Broadcast support.
Enable the MPPE Encryption.
Leave the DNS1 and DNS2 fields empty, if your Internet service provides a dynamic DNS address. You may also list the Google DNS servers: 8.8.8.8 and 8.8.4.4. If your internet provider gives you a specific DNS address, enter it in the field.
WINS1 will be equal to DNS1. WINS2 can be left blank.
Server IP is 0.0.0.0, although, you may specify the address given by your internet provider. Contact its customer support to learn more details.
Client IP is the range of IP addresses that are assigned to VPN clients.
CHAP-Secrets is the login and password for connecting to the VPN server. It is written like this: vpn_user*vpn_password*.
Apply the changes and establish a connection.
How to setup and configure OpenVPN on DD-WRT
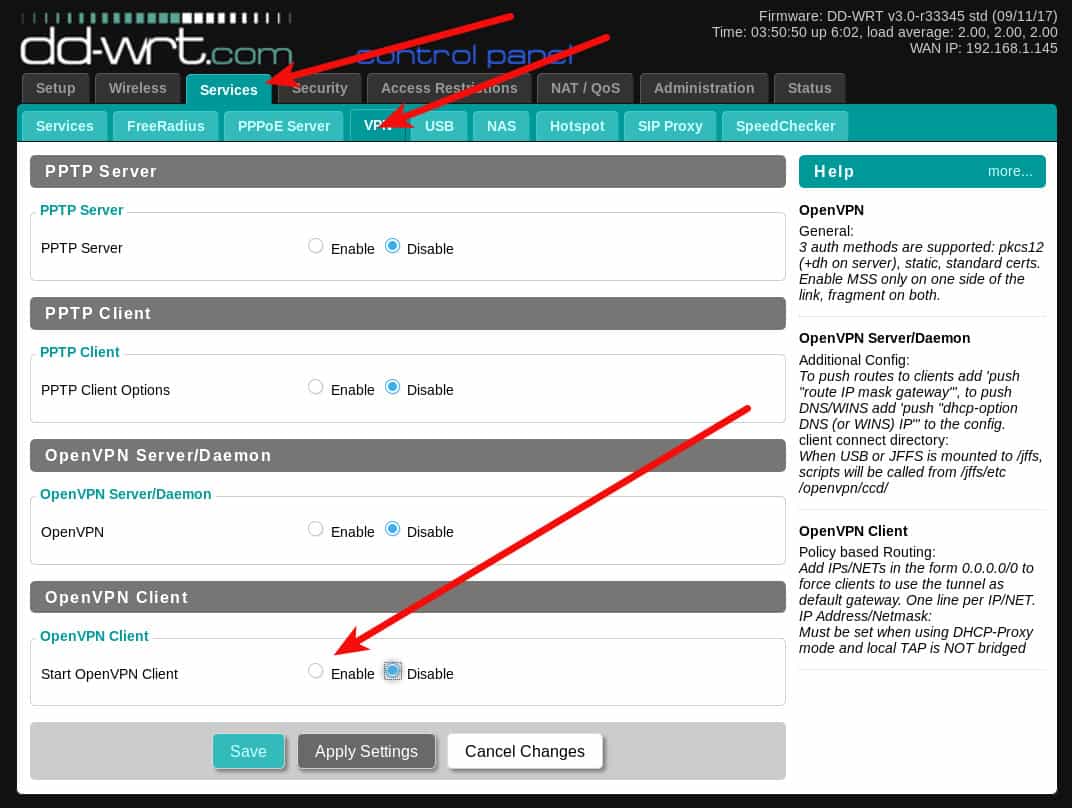
Go to the control panel of the router (usually the address is 192.168.1.1). Go to the Services — VPN tab. There should not be a significant difference in setting up a connection to different VPN providers.
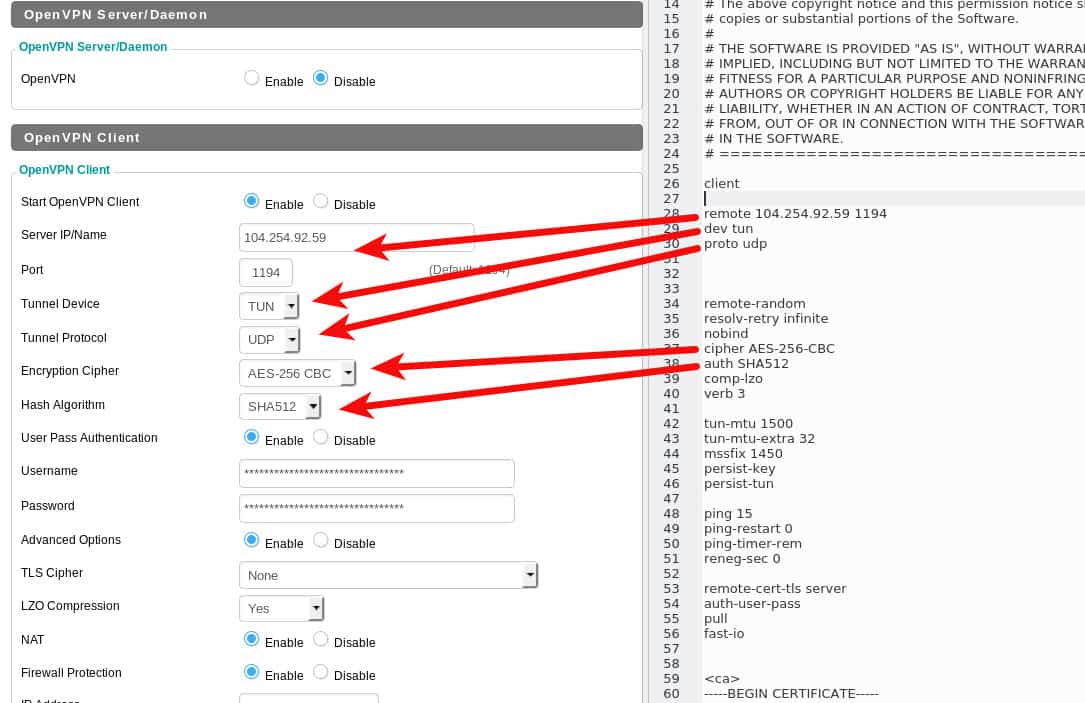
Activate the OpenVPN client configuration. Most VPN providers that use OpenVPN provide a configuration file for the connection. Of course, the contents of the OpenVPN client configuration files may differ, for example, the encryption mode, the use of data compression, authorization etc., but the principle remains the same everywhere. Here is an example of the OpenVPN settings file, and the respective fields on the DD-WRT router can be seen in the screenshot.
You must additionally enter the username and password in the appropriate fields. The remaining settings must be copied and pasted into the Additional Config field of the DD-WRT router.
Save the settings by clicking the Save button. Now all your traffic passes through the VPN connection and will be encrypted. Some VPN services also provide their own DNS. You can configure the router and use any DNS servers. Change the settings in Setup — Basic Setup.
To run the VPN, go back to the Services — VPN tab and click the Apply Settings button. On the Status — OpenVPN tab, the Client: CONNECTED SUCCESS message should appear. Note that the OpenVPN status tab does not appear until the OpenVPN service is enabled.
As you can see it is not difficult to set up the DD-WRT firmware on almost any router.
Also, it is not a lot difficult to use a VPN service on such a router. Even if you have any trouble, contact the VPN provider customer support to ask for specific help.
Marcus is a cybersecurity analyst with a focus on VPN and proxy services. As the founder and driving force behind a prominent VPN and proxy website, Private Proxy Guide, Marcus has emerged as a trusted authority in the digital realm. With a passion for staying ahead of evolving cyber threats, he has played a pivotal role in educating and empowering individuals and businesses to safeguard their online presence.
4 thoughts on “DD-WRT VPN Setup Guide”
Charles
Hello Markus,
Thank you very much for your tutorial, the dificulty I have is in configuring the 3 options of openVpn Client First Data Cipher, Second Data Cipher, Third Data Cipher which appear on DD-WRT v3.0-r45592 std (01/28/21). I did not find how to configure them, and the default does not work for NordVpn. Is it possible that you complete your instructions for the recent version of DD-WRT ?
Kind Regards,
Charles.
Here is the extract that I implemented :
OpenVPN Client
Set a value for the Data Ciphers 1,2 and 3.
Set the first data cipher the same as your Encryption Cipher, set the second Data Cipher at AES-128-GCM and the third Data Cipher at AES-256-GCM
If your client cannot connect, you can force the use of the Encryption Cipher instead of the Data Ciphers by adding the following to the Additional Config of the OpenVPN client:
Code:
ncp-disable
(this setting will be deprecated in the future)
To provide the best experiences, we use technologies like cookies to store and/or access device information. Consenting to these technologies will allow us to process data such as browsing behavior or unique IDs on this site. Not consenting or withdrawing consent, may adversely affect certain features and functions.
Functional
Always active
The technical storage or access is strictly necessary for the legitimate purpose of enabling the use of a specific service explicitly requested by the subscriber or user, or for the sole purpose of carrying out the transmission of a communication over an electronic communications network.
Preferences
The technical storage or access is necessary for the legitimate purpose of storing preferences that are not requested by the subscriber or user.
Statistics
The technical storage or access that is used exclusively for statistical purposes.The technical storage or access that is used exclusively for anonymous statistical purposes. Without a subpoena, voluntary compliance on the part of your Internet Service Provider, or additional records from a third party, information stored or retrieved for this purpose alone cannot usually be used to identify you.
Marketing
The technical storage or access is required to create user profiles to send advertising, or to track the user on a website or across several websites for similar marketing purposes.


 & Setup Instructions")
 + Setup Instructions")
 + Setup Instructions")
 & Setup Instructions")
 + Setup Instructions")
![How to Set Up a VPN Connection on Windows 11 [Full Guide]](https://www.privateproxyguide.com/wp-content/uploads/2024/03/How-to-Set-Up-a-VPN-Connection-on-Windows-11-Full-Guide-150x150.jpg "How to Set Up a VPN Connection on Windows 11 [Full Guide]")


")
")
![List of VPN Port Numbers Used for VPN Protocols [Guide]](https://www.privateproxyguide.com/wp-content/uploads/2020/10/List-of-VPN-Port-Numbers-150x150.jpg "List of VPN Port Numbers Used for VPN Protocols")
 [PC, iOS, Android]")


Hello Markus,
Thank you very much for your tutorial, the dificulty I have is in configuring the 3 options of openVpn Client First Data Cipher, Second Data Cipher, Third Data Cipher which appear on DD-WRT v3.0-r45592 std (01/28/21). I did not find how to configure them, and the default does not work for NordVpn. Is it possible that you complete your instructions for the recent version of DD-WRT ?
Kind Regards,
Charles.
Hi Markus, a complement I found on :
https://forum.dd-wrt.com/phpBB2/viewtopic.php?t=326913
Here is the extract that I implemented :
OpenVPN Client
Set a value for the Data Ciphers 1,2 and 3.
Set the first data cipher the same as your Encryption Cipher, set the second Data Cipher at AES-128-GCM and the third Data Cipher at AES-256-GCM
If your client cannot connect, you can force the use of the Encryption Cipher instead of the Data Ciphers by adding the following to the Additional Config of the OpenVPN client:
Code:
ncp-disable
(this setting will be deprecated in the future)
Hi Charles,
Good digging on your part! I assume that fixed the issue?
Yes, it fixed the issue. Thank you.