You might be looking for the best free VPN services for Kodi, but here are some good reasons why that’s a bad idea:
- Remember that free VPNs are very restricted when it comes to bandwidth. You will experience buffering issues since they usually only offer a few servers and a lot of people are using them for all kinds of things.
- Most free VPNs are unable to remove geo-blocked content because they have too few servers, and the servers they have are usually banned.
- Free VPNs are less safe when it comes to privacy. They will instead sell your data – If you don’t pay for the product then YOU become the product.
That’s why you should avoid free VPNs for Kodi. Instead, go with a reputable premium VPN provider and enjoy fast and safe streaming on your Kodi device. Why not stream Netflix on your Xbox One using Kodi?
1. Best VPN for Kodi in in July 2024
1.1 NordVPN – Overall best VPN for Kodi
NordVPN is just a great VPN for Kodi for so many reasons. First, security is flawless. Even the jurisdiction is based in Panama, outside of the 14 eyes. There is really nothing to complain about. Absolutely top-notch security. Unlike AirVPN, the download speeds are also excellent. On average, the download speed decreased by only 6% and the upload speed decreased by only 4% making it one of the fastest services.
Where this service does suffer is customization. It’s geared towards a simple experience with very few settings. For some users, it is not that big of an issue, but even a positive. Usage is also great. The UI, layout, and design are just beautiful. The same goes for the mobile client. The only downside is that there is no Linux client which is very unfortunate for the Linux users out there.
Stability is also rock solid. They had some minor connection issues some time ago but they have fixed everything. Nord is going to offer over 3300 servers in 60 countries, making it the service with the best service selection on this list. And if all of that didn’t have you loving them, maybe your full wallet will. They offer a three-year plan for only $2.75 a month making it the cheapest option on the list.
We recommend NordVPN to a huge majority of users out there. Its casual usage is fantastic, its speeds are great making it an awesome option for gaming, streaming, and downloading P2P traffic. Also, the security is top-notch. The only people we wouldn’t recommend NordVPN to are those looking for a Linux client and those of you looking for a lot of customization in your VPN connection.
1.2 ExpressVPN – Fastest VPN for Kodi
ExpressVPN is a fantastic VPN for Kodi and it provides more than 1700 servers in 148 locations across 94 countries. They are well known for offering some of the fastest VPN speeds with no restrictions on what you download or stream which is great for Kodi. ExpressVPN is focused on privacy. No activity or connection logs are kept. Also, they offer a kill switch to keep your IP address concealed if your network drops.
They also have a no-hassle 30-day money-back guarantee. You can get a full refund with no questions asked. The only limitation of the service is that you can only connect three devices to the service at the same time while most other services allow you to connect five or six. It is not usually an issue unless you plan to share your service with others in your family. They offer three pricing tiers. If you pay annually, you can get a subscription for as low as $8.32 per month. ExpressVPN has apps for many devices including Windows, Mac, Linux, Android, and iOS.
1.3 VyprVPN
Based in Switzerland, VyprVPN has more than 700 servers in 73 locations around the world. They own and manage their own VPN servers so they have no restrictions or download caps and don’t use third parties. VyprVPN also has a large bank of more than 200,000 IP addresses which is the largest of any server-side we have used.
One of the key features is their Chameleon technology which in short makes it so that users can bypass restricted networks put in place by governments, ISPs, and corporations which makes this a great VPN for Kodi. VyprVPN offers two pricing plans, each coming with a three-day free trial. The better of the two with Charmeleon included is the one at $5 per month that is billed annually. Otherwise, it’s $12.95 per month. VyprVPN is available for Windows, Mac, Android, and iOS along with other platforms.
1.4 Cyberghost – Cheapest VPN for Kodi
Security is OK: they don’t keep logs, jurisdiction is outside the 14 eyes countries, encryption is OK, and they didn’t pass our security and DNS leak tests we put them through. However, we wouldn’t recommend this service for its speed: it was nothing amazing but nothing bad either. The customization offered by Cyberghost is pretty extensive and unique in comparison to other services.
I absolutely loved the wizard setup, especially when connecting to a server. Moving to usage. They implemented a black-style UI geared towards what activities you want to perform in that instance. All the clients are good but light on customization. When it comes to stability, Cyberghost is rock solid and had zero issues. The server selection is decent offering over 1300 servers in over 30 countries. The lowest price point offered is the two-year plan which comes down to $3.50 per month. The Cyberghost VPN service is geared towards what most users generally want: a VPN for web browsing and for any general usage. If you want something with a broad amount of settings but still simple and easy to use with somewhat OK security, Cyberghost is definitely a good option.
1.5 Private Internet Access
Private Internet Access provides extremely good security with the only downside being that is under the jurisdiction of the United States which is under the 5 eyes of the 14 eyes program. Moving on to the speed, PIA did phenomenally in our testing with only a slight drop-off in the P2P traffic. The customization is also fantastic. We believe that it demonstrates one of the best balances between simplicity and features within the program.
Usage: PIA excels here as well. We liked all the clients offered, and they even have a Linux client. The only complaint we have is that the desktop client relies on the notification-based UI rather than a centralized program. We had no issues with stability using PIA, so that is perfect. As for the server selection, they offer over 3000 servers in 28 countries. It is a really great amount.
Price: The cheapest plan on PIA is the two-year plan that works out at $2.91 per month, making it the second cheapest plane on this list. When it comes to whom PIA is geared towards, its audience is the majority of the VPN users out there. It’s designed for streaming and gaming, has a very high download speed as well as offering a ton of customization and a Linux client. PIA definitely nails the majority of the requirements that people look for in a good VPN.
Private Internet Access review
1.6 IPvanish
IPvanish provides the greatest security with no issues, except for the fact, like PIA, the jurisdiction is based in the United States which is in the 14 eyes.
Speed: This VPN service provides one of the best speeds on the market which is good news for gamers and streamers. However, we think you’re not going to find a very extensive amount of customization.
Moving to overall usage. The desktop client doesn’t have the most beautiful user interface but it gets the job done. Unfortunately, there is no Linux client. The mobile clients of IPvanish are amazing, we really love them. Stabilities are also fantastic. We had zero issues so huge props to them. Additionally, let’s not leave out the fantastic server selection with over 1000 servers in over 60 countries.
Unfortunately, the IPvanish price is pretty high. The cheapest plan is the one-year plan at $6.49 a month making it the most expensive on this list. So, who is IPvanish for? Well if you play a lot of games, stream, and download a lot, you really will hardly find a better alternative VPN. Speed and security are absolutely fantastic. Just keep in mind that you aren’t going to be able to fully customize your VPN connection to maximize your security.
Taking everything into account, we can conclude that IPvanish is an outstanding service.
1.7 AirVPN
AirVPN is almost tied with IPvanish, but the former scored higher with regards to security, and security is the number one thing we look at when evaluating a VPN. Security doesn’t get much better than Air VPN. The service is built by activists who are passionate about keeping their users secure. The only part of their security which raises an eyebrow is the jurisdiction based in Italy which is in the 14, not the five eyes like the United States. However, speed is the biggest issue with Air VPN. It has been above average but it’s still the slowest on this list.
Moving to the VPN settings. There is no VPN that offers the sheer amount of settings Air VPN has to offer and still be able to lay it out in a simple interface.
Usage has pros and cons. Their desktop clients are pretty hideous and outdated, yet functional and easy-to-use. But the biggest highlight is their fully-fledged Linux client. If you use Linux-based distributions or devices, this is the service you need in your life. This comes at the cost of not having any mobile client, forcing you to use OpenVPN on your mobile devices. So close to perfect! From what we found, they have 215 servers in 19 countries which is a pretty weak server selection but they are continually expanding.
Their pricing is also not the best. The cheapest plan is the one-year plan which costs $5.59 per month. This VPN will be a great solution for a very specific group of people. If you use Linux and you want a very good GUI VPN option, this is it. If you are reaching for high security and want a lot of customization in your connection, this is the service for you. If you are not tech-savvy and want something simple that just works, then you’d better stay away from this service because you are not going to enjoy using it.
Bringing it all together, Air VPN is the absolute best option for the high-security users out there or anyone that has a Linux client or just wants a lot of customization in the connection.
2. Why you may need a Kodi VPN
How does the Virtual Private Network (VPN) work in general? Its basic idea is the following: all your online data is transferred through a third-party VPN server that encrypts them. This provides the greatest security of the data and the user. As a result, with the help of VPN-services, you can bypass government website blocking and protect your data from hackers when working through public WiFi access points, it is safe to use the P2P protocol, and access blocked content.
Kodi is becoming more and more popular as a streaming platform, and therefore the development team has to deal with more and more questions. For example, in Britain, using Kodi to stream the Premier League matches can bring a person to court because of a “copyright infringement”.
Another problem is that some streams and applications such as iPlayer and Netflix, for example, are not available in certain regions; that means that you will not be able to watch them through Kodi. Finally, Kodi has serious security problems, so serious that the user data can be easily hacked by hackers. It is possible to avoid all these problems and enjoy all the features of Kodi if you use a reliable VPN service. Such a service will create a secure tunnel between your device, where the Kodi application is installed, and VPN servers, which will bypass geographic locks and hide your real IP address.
All this will solve all the Kodi problems concerning the security and privacy of user data. Wherever you are, the best VPN services for Kodi will give you the opportunity to watch the most popular channels including ESPN, Channel 7, 4oD, HBO, BBC, and Fox, and provide reliable access to streaming services such as Hulu and Netflix. In addition, there is another significant advantage of using a VPN service when working with Kodi: the VPN provider servers can be optimized to work with streaming content and downloading files through the P2P protocol, which will provide you access to high-quality content at exceptionally high speed.
3. VPN setup with Kodi
Using a VPN service with the Kodi application is not difficult if you are going to get a great VPN service. In fact, almost all VPN providers offer applications that can be used on various devices and operating systems, allowing you to download and configure a VPN in a few clicks. There are two basic ways to use a virtual private network with the Kodi media center. What are they?
3.1 Method 1. Using a separate application to encrypt the connection on the device.
All you have to do is to get, install and configure the VPN on your device. When you launch the application, it will be running in the background, encrypting and protecting all the traffic of your device. Parallel to that, you can run Kodi and use it as usual. This is the easiest and the most common way on almost any operating system. Additionally, this way provides better security because it protects your connection from leaks. How to install the VPN on different platforms?
Basically, no matter what device you use, you need to take the following steps:
- Buy a VPN service subscription. We will review some of the best VPNs for Kodi below.
- Install the application. Each provider gives all the necessary instructions on how to do this. In most cases, it is enough to download and run the setup file. If you use a mobile device, go to the app store, find the app, and tap the Install button.
- Run the app, log in, choose a server and connect to it. Many providers offer hundreds and thousands of servers in dozens of countries.
- Run Kodi and enjoy watching the geo-restricted content. All the traffic will be transferred to the VPN servers and absolutely protected and secure.
Windows
- Download and save the installation file.
- Double click it and follow the setup wizard.
- Run the app.
macOS
- Download the installation file.
- Copy the file to the App folder.
- Run the app.
Linux
Not every provider allows installing the app on Linux. In some cases, you will have to follow the detailed guides or contact tech support.
Android and iOS
- Launch the Play Store or AppStore.
- Find the app through the search box.
- Install the app and run it.
Raspberry Pi 3
- Find the Zomboided repository on GitHub, download the zip archive, save it to the local drive.
- Run Kodi, open Add-ons — Enter add-on browser — Install from zip file — Find the archive with the Zomboided Repository.
- Install from repository — Zomboided Add-on Repository — Services — VPN Manager for OpenVPN.
- Click Add-on Settings — choose the VPN provider — type in the login and password — choose the server — OK.
- Enjoy the unblocked services.
Android-based Kodi Boxes
Install the app the same way as on any Android device: find the app in the Play Store, install, and run it.
Amazon Fire TV
You will only require an Amazon account. Even a trial account is allowed.
- Find the downloader app in the built-in app store.
- Enter the address and go to the VPN app download page.
- Download the installation file, install it, and run the app.
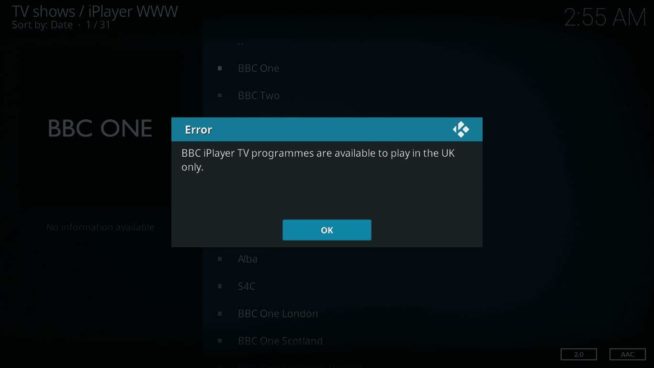
This way is really working. It is the most popular and efficient way to use a VPN on Fire TV. We checked how it works with the latest version for Windows.
We looked at the BBC iPlayer extension. First, we checked it without a VPN:
After that, we used NordVPN to connect to a server in the UK:
As you can see, it works successfully.
3.2 Method 2. Using a VPN with a native Kodi add-on
Unfortunately, this method is not acceptable for most devices as it is limited only to Linux-based operating systems including Mac OS, and also Raspberry Pi 3 devices. But there is an advantage: this way, only the Kodi traffic is encrypted, while all the other applications use the standard internet service provider configuration. We already described the way of installing the native Kodi add-on. It is absolutely identical to what is described in the Raspberry Pi 3 section.
4. What is Kodi?
Imagine a world where you can watch all your favorite TV shows, sports, and movies anywhere and anytime, in a program with a beautiful interface. And all this being completely free. This is real, it is exactly what Kodi provides.
Kodi is a full-fledged platform for playing video and music, watching TV and IP television, and even streaming, which can be installed on various devices, from computers to Raspberry Pi or Android. It is a very powerful and multifunctional environment and new users cannot immediately understand how to use the app, what to do with it and how to configure it.
Kodi, formerly called XBMC, is a piece of software or an application that acts as a media player. The program is distributed as open-source, so you can download it completely for free. Kodi can play all kinds of drives and all media formats. There is also the ability to listen to music and even manage photos.
Kodi was designed for streaming and broadcasting movies, live TV shows, music, and games. This platform does not have its own content; users must add streaming channels and files to the Kodi application from the network or local drives. The Kodi application is compatible with all major platforms, including Linux, Android, iOS, Mac, and Windows. In addition to desktop computers, Kodi can work with Amazon Fire Stick, Chromebox, Google Nexus Player, Nvidia Shield, and other devices.
The main advantage of Kodi is that the application is very easy to use. You can simply buy a device where this program is already installed, or download the application and install all the add-ons necessary for running the streams you want without any problems. Besides traditional TV channels and video files, you can also watch the IPTV and even torrent TV. This means that you will be able to watch any content from any part of the world.
5. How to use Kodi
5.1 Installation and the first launch
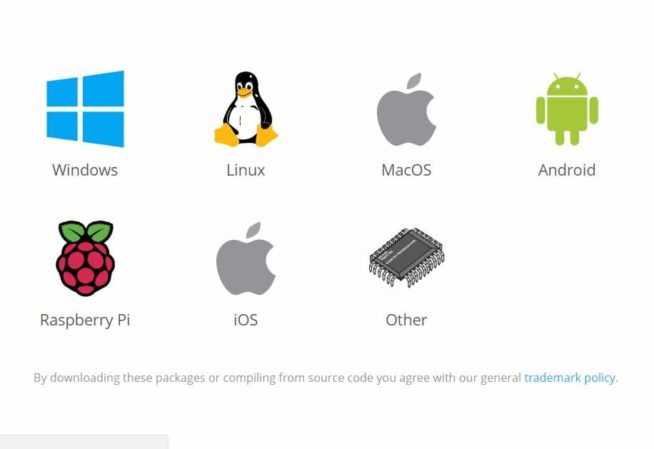
You can get the program on the official website, where you can find versions for all supported platforms. The official website offers installers or installing guides for Windows, Linux, macOS, Android, Raspberry Pi, iOS, BSD, and FREESCALE IMX6. On some platforms, you can easily install the application with the setup file or app store, while others will require additional actions.
For Windows or macOS, you can download the installer. If you use Windows 10, you can also get the app from the Microsoft Store, the Kodi website will redirect you to the page. The interface does not differ at all and is absolutely identical.
For Linux, you can find installation guides for various distributives. For example, to install the latest version of the program on Ubuntu, you must run the following commands:
$ sudo add-apt-repository ppa:team-xbmc/ppa
$ sudo apt-get update
$ sudo apt-get install kodi
In some cases, you will require a constant internet connection to complete the installation. This is because the required files are downloaded from the remote server. After the installation, you can run a program from the main menu. Their Kodi interface is very similar on all the different platforms. For example, on Windows, it opens in full window mode and you cannot change its size but you are able to minimize it. However, you will have to exit the application through the menu.
5.2 Basic configuration
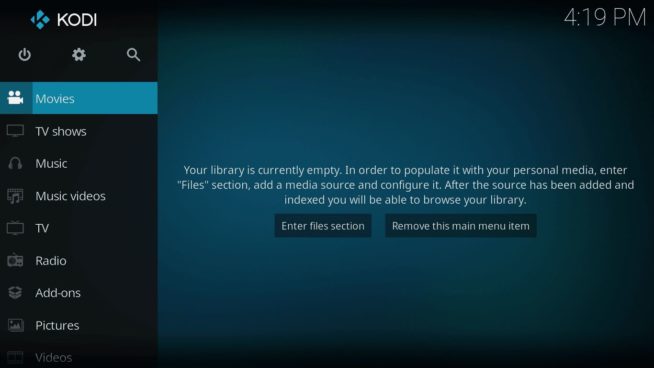
After the first start, you will see a nice interface.
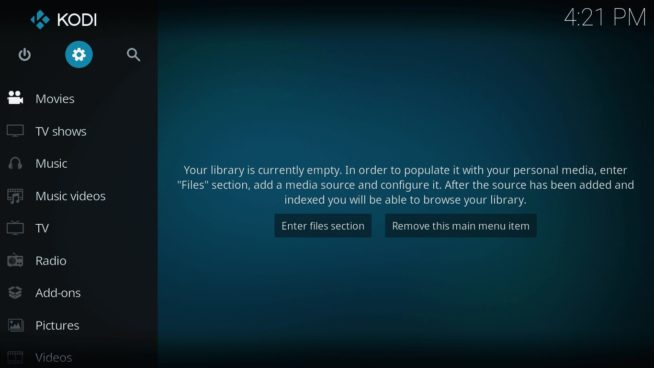
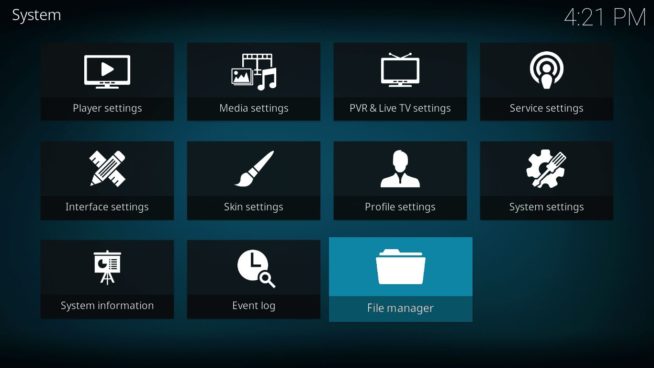
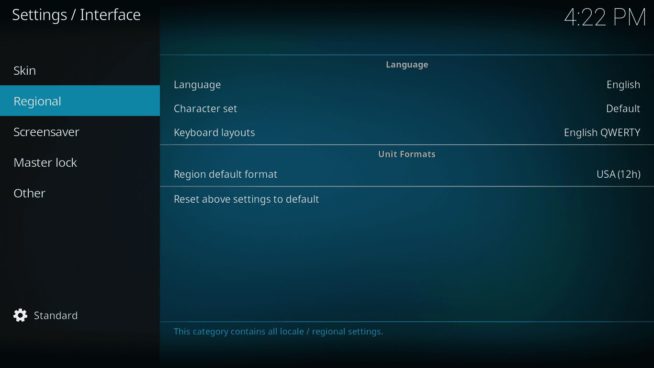
If you want to change anything, click on the Settings button on the left top corner, then choose Interface Settings.
There you can change the skin, language, region, keyboard layout, as well as the screensaver and master lock.
You can then check other settings. For example, you will be able to configure how the main menu will look like etc.
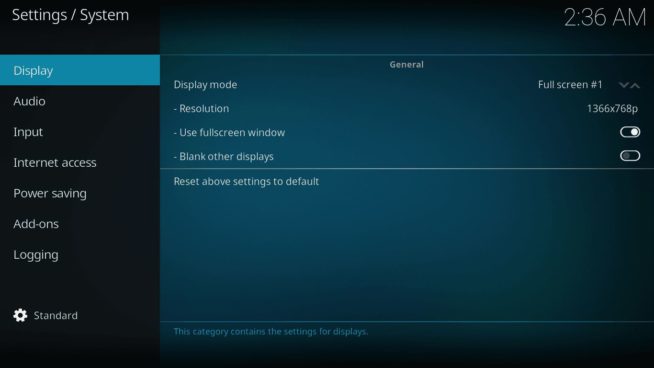
In Settings — System Settings, you can change the display and audio configurations according to your computer specifications.
For example, choose the correct number of audio channels and display resolution.
5.3 Adding and playing videos
Most often, people want to use Kodi to watch a video because the program presents a single and convenient interface for watching videos, TV shows, and movies. The program can open a video in two ways: you can watch locally stored videos or view them from the Internet.
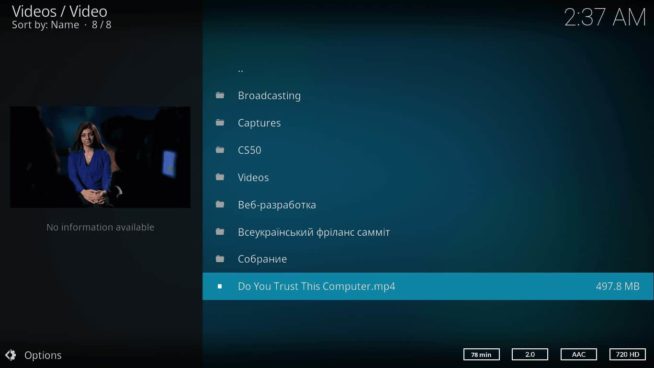
Let’s look at how to configure Kodi to work with video files. To open a video that is saved on your local storage, select Movies or TV shows, then choose Enter File Section.
The program displays the folders with the video files and you can choose the one you want. For each video file, you will see detailed information about it.
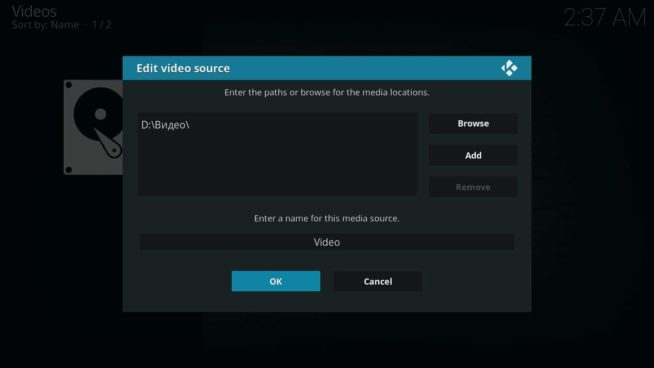
If the folder containing your video files has not been added to the library yet, you can add it by simply selecting Add Video. You will see the file manager, where you can select the folder you need. After that, click on the added folder and choose the file you want to play.
Watching a video in Kodi is very easy — just click on the file. If you want to open a video from the Internet, the process will differ a bit. Instead of choosing the Movie folder, select Add-ons, and install the add-on for the required resource. We will show you how to add and install the add-ons a bit later.
5.4 Adding and playing music
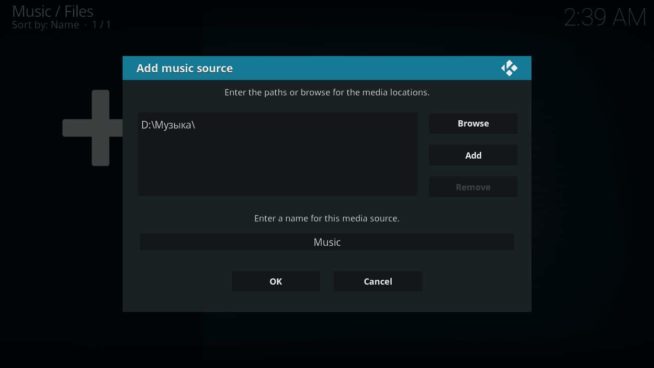
In addition to watching videos and TV shows, you can listen to music that is stored on your local computer. Setting up the music folder is the same as the video folder. You just need to select the Music — Enter Files section and then choose the music track or folder with the audio files.
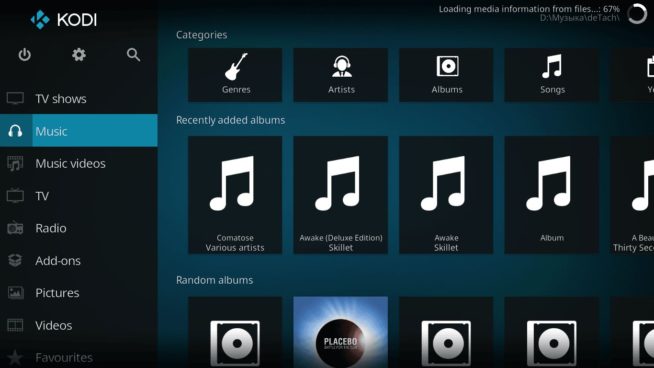
Right after that, the source will be integrated into the library and you will be able to view your favorite tracks, sorted by name and artist. To listen to tracks from the internet, you can install add-ons such as Spotify.
5.5 IPTV configuration
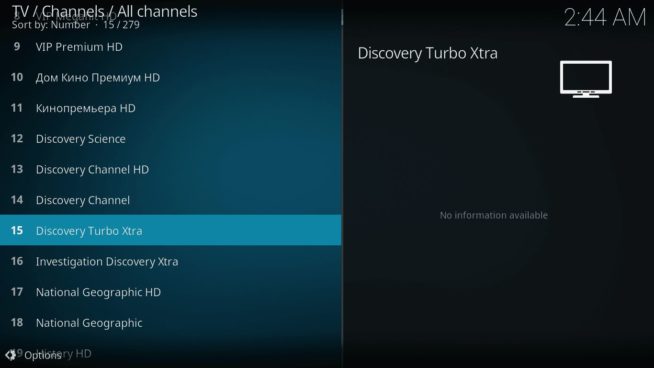
If you use the latest version of Kodi, you should see the TV menu in the main window. To configure the online television, click on this menu. As it is our first launch, we will require a special add-on that will allow us to watch TV channels.
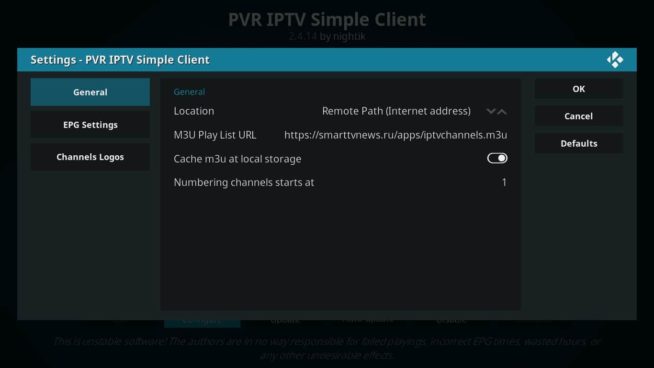
Click on the Enter Add-on browser button. After that, you will see the list of available add-ons. Find the PVR IPTV Simple Client add-on, then click Enable and Configure. In the PVR IPTV Simple Client add-on settings menu, you must configure two fields:
Location — select Remote Path (Internet Access) if you are going to use an online channel list or Local Path (include Local Network) if you plan to download a .m3u file with channel links.
M3U Play List URL (or M3U Play List Path) is the path to the .m3u file or online playlist.
When all the fields are filled, click OK. The application will ask to be restarted for the changes to take effect. Having restarted, you will see a list of IPTV channels from the loaded m3u playlist. Select the channel you want and enjoy watching.
5.6 DLNA network configuration
Kodi supports DLNA network (external UPnP/DLNA devices support) and can:
- act as a DLNA client — to receive and play content from other devices (UPnP/DLNA), add UPnP/DLNA devices to Kodi to play videos from the media library;
- act as a DLNA server — provide the ability to play content from Kodi to other devices in the DLNA network;
- share the library with other UPnP and DLNA devices;
- manage UPnP/DLNA devices.
Using the UPnP / DLNA configuration in Kodi, you can share the library with any DLNA device in your home network.
How to add UPnP/DLNA devices to Kodi
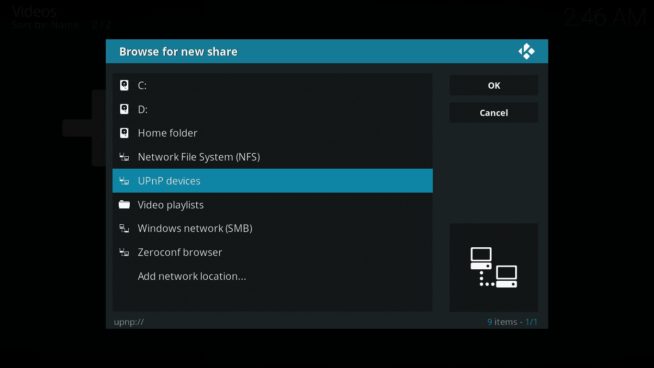
Open the Kodi Media Center and go to the Videos section, click Files, then Add Video — Browse — UPnP devices, and choose the device from the list.
How to share Kodi library with devices in DLNA network
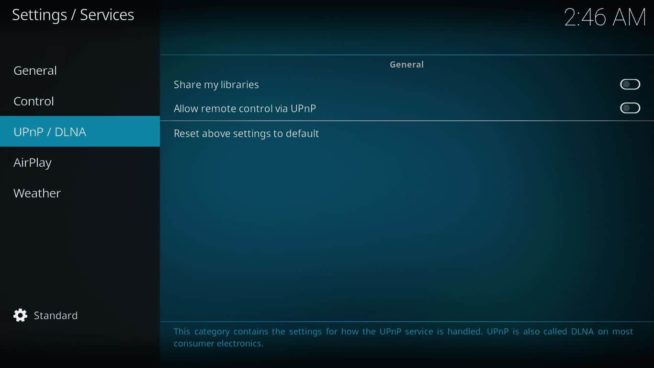
Click the Settings button, choose the Service Settings section, then choose UPnP/DLNA and tick Share My Libraries. After that, you will be able to play all the media files on any other device connected to your home network.
5.7 Add-ons
You already know how to use the Kodi app, but add-ons can greatly increase its capabilities. Kodi has a lot of default features, but add-ons let you expand this list. With the help of add-ons, you can change the interface, open online videos, audio files and other resources, and many more. There are several ways to install add-ons: from a ZIP file, a folder, a remote site, or the Kodi add-on store. The best way is by using the add-on store.
To extend Kodi’s functionality with add-ons, select the Add-ons section in the main menu where you will be asked to enter the add-on browser. Select Install from Repository.
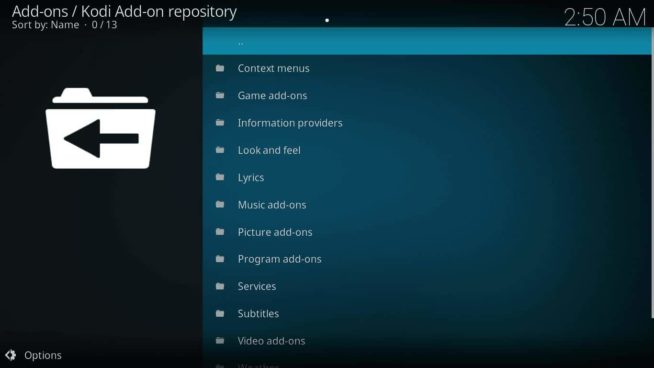
You will see a list of categories from which you can select audio, video, games, programs, lyrics, weather, context, and much more. When you select the category, you will be able to see all the available add-ons. When you choose an item, you will see the Install button. Click on it and wait until the item is installed. Next, you can find this add-on and open its menu in the Add-ons section. Add-ons for YouTube, LastFM, Spotify, and other services can be installed in the same way.
In addition to the official store, you can install add-ons from third-party repositories. To do this, first, open the Settings menu, go to the System Settings section, then open the Add-ons tab and tick the box next to “Unconfirmed Sources”. In the end, click OK to confirm the action.
Now you can add additional Kodi repositories, as well as extensions. Let’s try to add a repository. Go to the File Manager section in the Settings and double-click on Add Source.
In the window that opens, type the repository address. For example, to add a Neptune Rising repository, you must type or paste https://repo.mrblamo.xyz/. Name it Blamo and click OK.
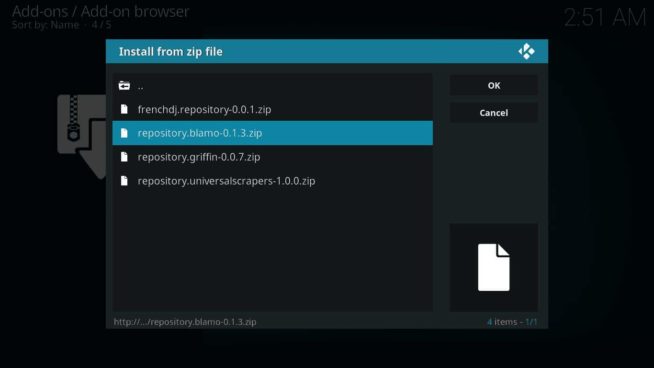
Now the source is added, but it is not yet ready to use, so you need to install the repository. In the main menu, select Add-ons — Enter add-on browser — Install from zip file — Blamo — repository.blamo-0.1.3.zip.
Only after this step, the repository is installed in the system and you can use it. Return to the package installation menu and click Install from Repository. Now, select your new repository, choose a category and install the add-on you need.
Click here to find a list of the best Kodi addons.
We earn commissions using affiliate links.








![Best Kodi Addons in [month] [year] 30+ Best Kodi Addons](https://www.privateproxyguide.com/wp-content/uploads/2018/06/best-kodi-addons-2018-150x150.jpg)
![Best Kodi Builds in [month] [year] 10+ Best Kodi Builds](https://www.privateproxyguide.com/wp-content/uploads/2018/09/12-best-kodi-builds-150x150.jpg)
![Best Kodi Boxes in [year] Best Kodi Boxes in 2021](https://www.privateproxyguide.com/wp-content/uploads/2019/04/top-10-best-kodi-boxes-150x150.jpg)
![Best VPN for DraftKings in [month] [year] Best VPN for DraftKings](https://www.privateproxyguide.com/wp-content/uploads/2018/07/Best-VPN-for-DraftKings-150x150.jpg)
![Best Fortnite VPN in [month] [year] Best VPN for Fortnite](https://www.privateproxyguide.com/wp-content/uploads/2018/07/Best-VPN-for-Fortnite-BattleRoyale-150x150.jpg)
![Best Showbox VPN in [month] [year] Best VPN for Showbox](https://www.privateproxyguide.com/wp-content/uploads/2018/08/best-vpn-for-showbox-150x150.jpg)
![Best VPN for School WiFi in [month] [year] Best VPN for School WiFi in 2021 - How to Bypass VPN Bans](https://www.privateproxyguide.com/wp-content/uploads/2018/08/Best-VPN-for-School-College-150x150.jpg)
![Best Popcorn Time VPN in [month] [year] BEST VPN for Popcorn Time](https://www.privateproxyguide.com/wp-content/uploads/2019/01/best-vpn-for-popcorn-time-150x150.jpg)
![Best Nvidia Shield TV VPN in [month] [year] Best VPN for Nvidia Shield TV](https://www.privateproxyguide.com/wp-content/uploads/2019/03/best-vpn-for-nvidia-shield-tv-150x150.jpg)
![Best UAE & Dubai VPN in [month] [year] Best VPN for UAE & Dubai 2021](https://www.privateproxyguide.com/wp-content/uploads/2019/03/Best-VPN-for-UAE-Dubai-150x150.jpg)
![Best Tor Browser VPN in [month] [year] 5 BEST VPNs for Tor Browser 2021](https://www.privateproxyguide.com/wp-content/uploads/2019/11/Best-VPN-for-Tor-Browser-150x150.jpg)
![Best Overwatch 2 VPN in [month] [year] 3 BEST VPN for Overwatch 2021 [No Lag & Remove IP Ban]](https://www.privateproxyguide.com/wp-content/uploads/2020/09/best-vpn-for-overwatch-150x150.jpg)
![Best Cleveland VPN in [month] [year] Best Cleveland VPN 2021](https://www.privateproxyguide.com/wp-content/uploads/2021/06/Best-VPN-to-use-in-Cleveland-150x150.jpg)
![Best Nashville VPN in [month] ([year]) Best VPN for Nashville 2021](https://www.privateproxyguide.com/wp-content/uploads/2021/07/Best-VPN-for-Nashville-150x150.jpg)
![Best VPN for Idaho in [month] [year] Best VPN for Idaho 2021](https://www.privateproxyguide.com/wp-content/uploads/2021/07/Best-VPN-for-Idaho-150x150.jpg)
Could you also make a list of VPNs that offer free-trials. I know PureVPN and tunnel bear do but a more extensive list would be nice.
Hi Simit,
Thanks for your suggestion. I will add that to future research.