You are a content creator who uploads top-notch content online, but it takes a lot of time to get it done. Turns out the upload speed is not that great. The upload speed is the speed at which the data or information is sent from your device. Not only for content creation, but the upload speed also becomes a vital factor for video streaming, uploading large files online, attending meetings through video chat, etc.
The upload speed primarily depends upon the plan offered by the Internet Service provider. Beyond that is in your hands, and if you are not getting the promised upload speed, then there are things we can do to improve it.
1. Increase Upload Speed
1.1 Get wired(for WiFi users)
Many users rely on a wireless connection, WiFi, to connect to the internet. It is more convenient, and you can use it anywhere within the network range. But the problem begins when you want the optimal upload speed for exporting files to drive or sending them to someone over the internet. The speed of a WiFi connection depends upon the range and the frequency of the connection, which can be 24. GHz or 5 GHz. Even after ensuring everything is in place, there is a chance of network interference from surrounding WiFi networks.
If you are on a computer or a laptop, consider using the internet by connecting an ethernet wire to the router. It will ensure you get the maximum possible upload speed promised by the ISP(Internet Service Provider). A few slim laptops don’t ship with an ethernet port. In such scenarios, you can use a USB to Ethernet adapter that can be plugged into a USB port of the laptop.
1.2 Adjust Antennas and reposition the router
Generally, the antennas radiate the signal vertically and work the best with the same position for maximum coverage. Keep it at a higher height and a central position of the house and office, which is equidistant from the outer walls of the place.
Keep the router in an open place and not in some cabinets with walls, which can reduce the signal strength for the connecting devices.
1.3 Check the Internet’s plan
Even when you are on a wired connection, the upload speed might be underwhelming and not as fast as you need. Trying every solution on your end is futile after a point and it’s time to take a look at your internet plan. If the subscribed plan does not promise higher upload speeds, then it might be time to upgrade to a different offering. Talk to your internet service provider and discuss about your upload speed needs and which plan would be ideal for meeting your requirements.
1.4 Change the DNS server
You type in www.privateproxyguide.com in the browser’s address bar, and it opens up the website. It doesn’t magically appear out of nowhere. A lot goes behind the scenes, which also involves a DNS server. Basically, a DNS server acts like a phonebook that contains the address of all the servers with different websites.
A DNS server can indirectly affect the upload and download speeds. Suppose you are uploading to the OneDrive cloud, and the DNS connects to a server in Japan instead of connecting to a nearby European server. As a result, your upload speeds are affected, and it takes longer to send files to the cloud.
Popular DNS servers
Company
Primary DNS
Secondary DNS
Google DNS
8.8.8.8
8.8.4.4
Cloudflare
1.1.1.1
1.0.0.1
OpenDNS
208.67.220.220
208.67.222.222
Here is how you can change DNS on major platforms. The primary DNS server will be alone, but it can stop working in some scenarios, which is why we need a secondary as a backup.
Change DNS on Windows 10
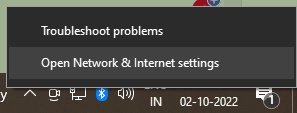
Head to the Network & Internet settings from the taskbar through the right-click menu.
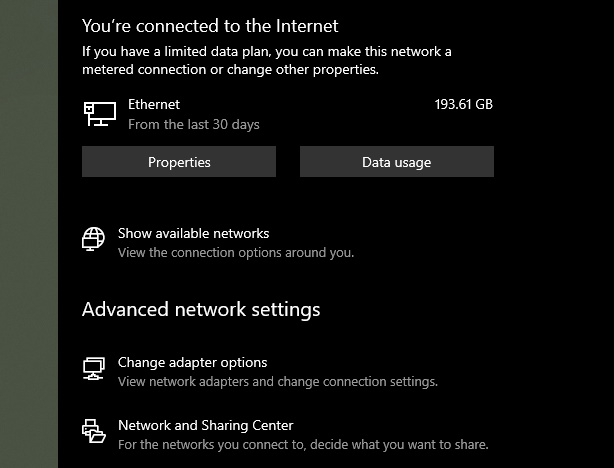
After the settings open up, click on Change adapter options which are given under Advanced network settings.
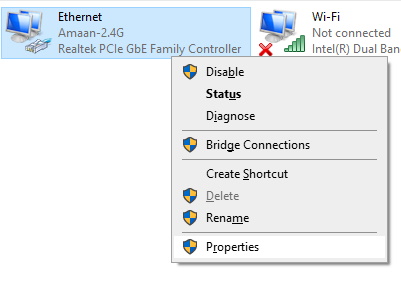
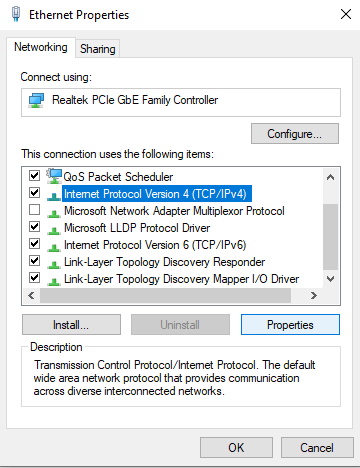
Right-click on the Ethernet icon and head to properties. If you are connected to the internet through wireless connectivity, then do this with that WiFi icon.
Select Internet Protocol Version 4 (TCP/IPv4) from the list and click on the properties
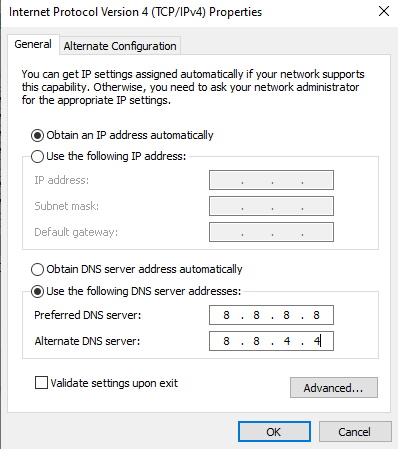
Tick Use the following DNS server addresses option and fill the preferred DNS server with the primary DNS and alternative DNS server field with the secondary DNS.
Tick Validate settings upon exit box and click OK to save the settings. It will take a couple of seconds, and the new settings will take effect.
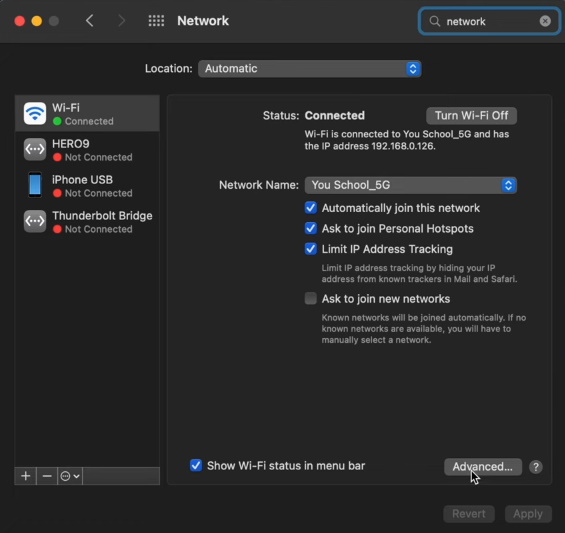
Change DNS on macOS
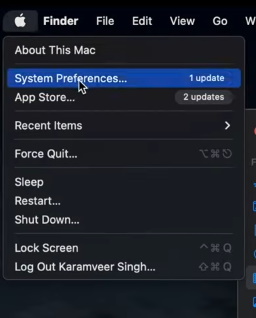
Go to the Apple Menu and click on System Preferences to open the menu.
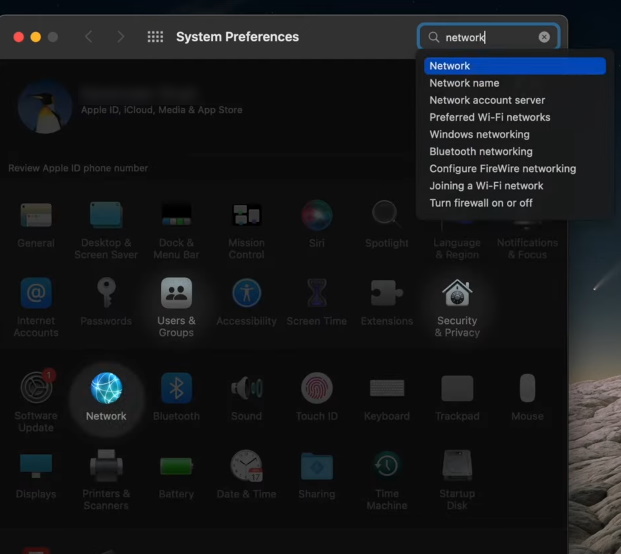
In this menu, head to Network. You can either find it in the options or search for it.
Since you are preferably connected to the internet via WiFi, select WiFi on the leftwards menu and then click on Advanced.
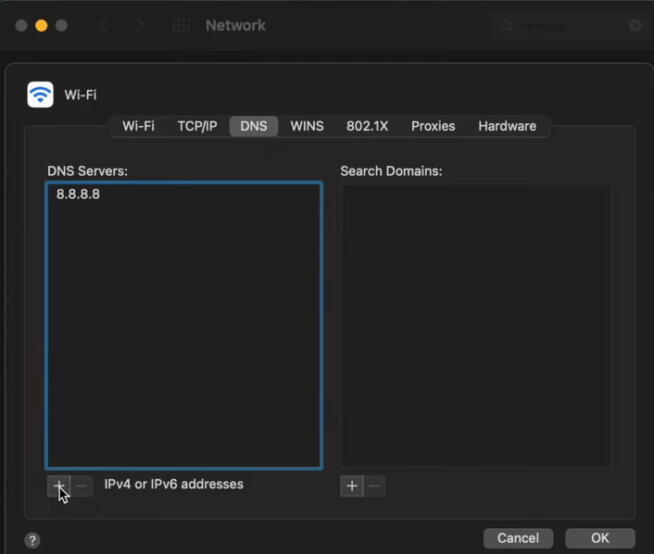
Go straight to the DNS tab and click on the plus button at the bottom for adding a DNS server. Click on it again to add a secondary server.
Click OK and then Apply on the network menu for applying the settings.
1.5 Check the router’s firmware and software
Your router’s firmware is important for two key reasons – performance and security. With new loopholes being discovered every week, it is important to stay on top of the router’s defense. With more devices joining the WiFi as everything becomes smart at home or the workplace, the load on a router increases manifold. A firmware upgrade on the router helps it handle more connections in a systematic manner without getting overwhelmed. Here is how you can update the leading router brand’s firmware.
Netgear
a. Connect an ethernet wire to the computer from the router.
Login using the credentials provided. If this is your first time on the login page, then your username is admin, and your password is password.
Go to Advanced/Settings > Administration, which will vary according to the model.
Click on Firmware Update or Router update and then click on the CHECK.
After a minute or so, the option will become available if a new firmware is available. Click Yes to update the firmware. Your router’s firmware will update after getting downloaded, so wait and let it do its thing. It will also require automatic restarts so your ongoing internet downloads and activities can get interrupted.
Asus
a.Head to router.asus.com from any device connected wireless to the router.
If that fails, then connect an ethernet wire to the computer and head to router.asus.com.
Go to the Asus Routers firmware page and find your model. If you can’t find it there, then head to the download center and find it there under the networking > wireless routers.
Unzip the files after downloading them on your computer.
After that, head straight to router.asus.com in your browser.
You will find Advanced Settings on the left menu. After that, go to Administration > Firmware Upgrade.
Locate the router firmware files you downloaded and click Open to begin the installation process.
D-Link
Connect the ethernet wire to the computer and then find the router model number. It is given on the back panel.
Reset the router, which is important for D-link routers for upgrading the firmware. A physical button is given at the back, which will also reset all the connected passwords and WiFi settings.
Find the router’s firmware on the official support page by typing the model number. Download the most recent firmware version from the list of options.
Unzip the download files onto the computer.
Go to dlinkrouter.local on your preferred browser. If this is your first time here, the username is admin, and there is no password. When the internet service provider has it, there is a chance that they might have different login credentials, so you should contact them.
Click on Management/Tools/Maintenance, then head to Firmware/Upgrade, depending upon the model.
After that, click on Browse or click on Check for New Firmware, and then you will be prompted to select the downloaded files. The installation will take a couple of minutes, along with the router restarting a number of times.
1.6 Update Network Drivers
Older network drivers on your newly installed Windows can be a culprit of the slower upload speed. You can update it through the settings and here how it is done.
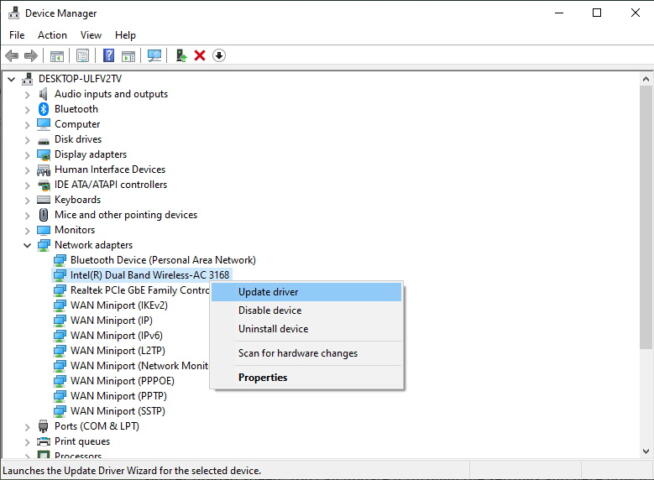
Search for Device Manager in the Start Menu search and head to the first result.
b. Find Network Adapters and double right-click to see the connected adapters.
Right-click on your computer’s network adapter, which is Intel(R) Dual Band Wireless-AC 3168 in this case. Click on the Update driver option to open the update wizard.
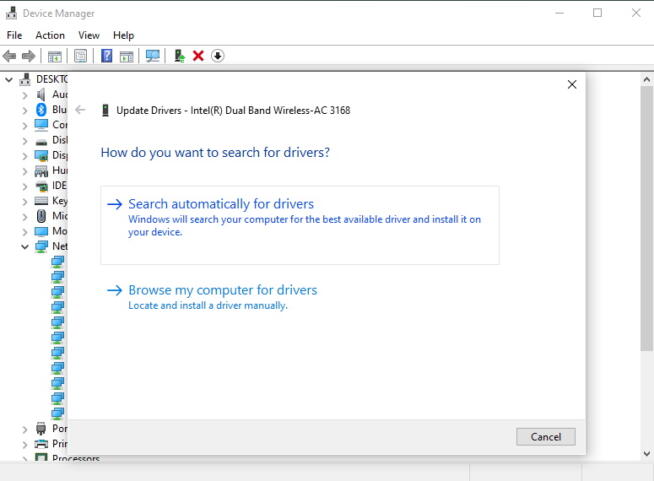
Select the first option, Search Automatically for drivers and the update wizard will start searching online drivers for the network adapter.
1.7 Check for Viruses and Malware
Viruses and malware can definitely affect the internet connection speed by hogging the speed for downloading unwanted programs or sending out private information about the user and their activities on the device.
Windows users can rely on the inbuilt Windows Security for keeping viruses and other threats at bay. It is more than enough in most cases and does not hog your machine’s resources, thus slowing down the computer in the process.
1.8 Use a VPN service
Many internet service providers have a blacklist of servers that they block either on the state’s orders or to save their bandwidth from being used for commercial purposes. In this practice, they sometimes end up banning servers that you require for hosting websites or streaming content online.
Bypass the block or censorship by using an effective VPN service that offers consistent speeds while offering reliable privacy measures. Good VPN companies offer almost the same speed as promised by your internet service provider.
1.9 Stop programs taking up the internet speed
Some apps and programs can hog the internet speed for updating or downloading necessary files for their running. You can find out the apps that are taking up all your upload and download speeds. Here is how we can stop such programs through the resource monitor.
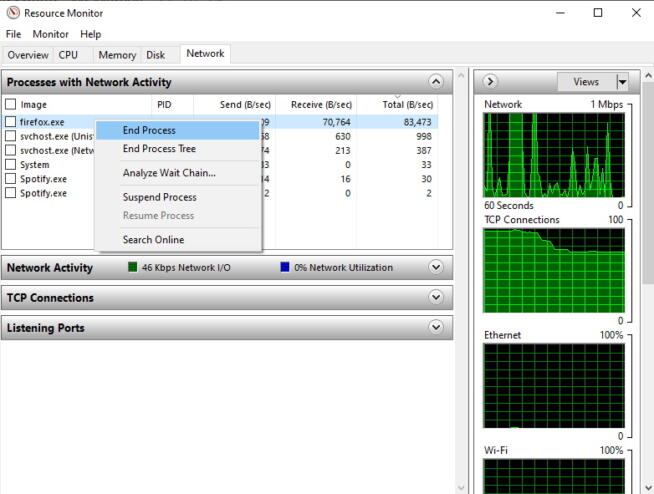
Press Window + R to open the run prompt and type resmon.exe. Press ENTER to open the Resource monitor.
Go to the Network tab to inspect the programs that are using the internet speed beyond reasonable limits. Right-click on such programs and end the process.
1.10 Replace the router
Did you try all the techniques mentioned above? Then you might need a new router. Your current router served you well and continues to provide consistent performance across most fronts, but if there is a dip in speed, then we have to upgrade. We are witnessing an exponential increase in the speeds offered by the ISP in recent times, and after a point, the router falls short in keeping up with the growing demand. The additional devices on the network using the internet can be overwhelming for older equipment with limited
Therefore, it is ideal to replace the router with a newer model with better specifications. Make sure it has the power to handle more connections and offer extra yet useful features such as MAC ID filtering, speed and data limiter for certain devices, guest WiFi connection, etc.
1.11 Conclusion
If you are in WiFi, You can improve upload speed by repositioning the router and antennas. Keeping it in a central place of the house or office can drastically improve performance. Once that’s settled, we can move on to the methods on a software level that can play a role in improving the upload speed without opening your wallet.
Marcus is a cybersecurity analyst with a focus on VPN and proxy services. As the founder and driving force behind a prominent VPN and proxy website, Private Proxy Guide, Marcus has emerged as a trusted authority in the digital realm. With a passion for staying ahead of evolving cyber threats, he has played a pivotal role in educating and empowering individuals and businesses to safeguard their online presence.


 Are Key to Cloud Gaming Scalability")


")


