In a hurry? A VPN kill switch functions by disabling your internet when the VPN connection drops. This results in keeping your original IP/DNS addresses private without unnecessary exposure. It’s handy for P2P activities, journalism, and working with sensitive data safely and securely.
A VPN kill switch is a must-have and can simply be enabled in your VPN’s Settings. As a team of security experts, we always vote for using it. Better safe than sorry!
A VPN or Virtual Private Network’s main purpose is to protect your online privacy. As long as you’re connected, your online activities are shrouded in a safe and secure VPN network. But then, with the first connection problem, the VPN disconnects and your privacy disappears in a split second.
Well, if you’ve used a kill switch, you avoided one of the most typical pitfalls. Why do you need a kill switch? To kill someone? No. A kill switch disables your internet if the VPN connection is lost, and by preventing you from going online, keeps your IP address private.
A VPN kill switch is incredibly simple to enable, yet, it’s a state-of-the-art security measure we recommend using. In this VPN kill switch guide, we’ll see how the kill switch can benefit you and how to turn it on to prevent unwanted IP or DNS leaks.
What Is A Kill Switch?
A kill switch is a built-in feature of almost every VPN that disconnects your device from the internet when the VPN connection drops. This drop can be a result of an unstable connection, server malfunction, or high latency that simply results in a connection time-out.
Why Should You Use a VPN Kill Switch?
When the VPN connection drops, your connection isn’t encrypted anymore. Instead, the VPN-given IP isn’t yours and you’re reverted to your old IP address. This means your original IP is exposed again and your ISP or the government can track your browsing history again.
A kill switch reacts in a split second after the VPN connection is lost. As a result, it prevents any information from leaking to the public, thereby, preserving your privacy. This feature will right away cut off the internet connection to prevent an alarming data leak.
At that moment, you won’t be able to go online until you:
Connect to a VPN server again (successfully!),
Disable the VPN kill switch in the VPN app,
Or shut down the VPN and its processes.
Who Should Use a Kill Switch in a VPN?
Exposing your IP for a minute or two isn’t as dangerous as some might think. Besides, most people go online without a VPN and are tracked by their ISPs and governments daily. However, in some instances, having a kill switch is CRUCIAL.
Journalists, activists, and whistleblowers absolutely need a VPN. Exposing their IP address even for a minute could be dangerous, as they could be tracked by third parties. When downloading torrents, a kill switch should be ON. Remember that P2P activities expose your IP to other users in the P2P network.
With a kill switch, even if the VPN connection falters, your IP will remain private. Most importantly, you need a VPN kill switch if you’re working with sensitive business files and information. A VPN will allow for added privacy so that hackers and snoopers can’t access this data.
By extension, a kill switch will prevent your IP from being tracked and this data from being stolen. For “ordinary” people, a VPN kill switch isn’t a necessity but we recommend using it nonetheless.
How to Enable a VPN Kill Switch? VPN Kill Switch Types
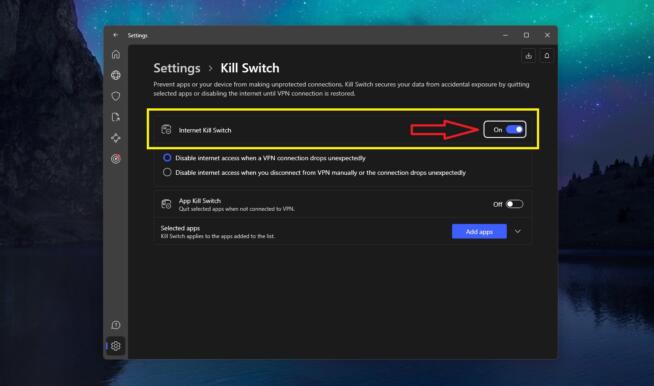
Enabling a VPN kill switch is simple. The entire “process” if we can call it that is done through the VPN app. Some VPNs have it ON by default, while some require you to go to Settings and turn it on. We’ll use NordVPN to show you how to use a VPN kill switch.
Open the VPN app.
Go to Settings and find the VPN Kill Switch or Internet Kill Switch option.
Make sure to toggle it ON and you’re all set.
Some VPNs, like NordVPN, have several types of VPN kill switch. For example, there’s the system-level kill switch, which disables ALL internet traffic if the VPN connection is lost. However, there’s the app kill switch, which does so only for selected apps.
In NordVPN, you can enable the App Kill Switch from the same menu and select apps that will be affected. Another thing to mention is the kill switch’s working principle. In NordVPN – and a few other VPNs – you can choose how the kill switch will react.
In one scenario, the VPN kill switch will react when the VPN connection drops. Another scenario is where the kill switch keeps your internet connection OFF until you connect to the VPN. As a result, you can go online only when your VPN connection is working.
Do All VPNs Offer a Kill Switch?
Almost all VPNs offer a kill switch, often called an automatic kill switch. These two are the same, as they both function by:
Monitoring your VPN connection for changes,
disabling your internet traffic if the VPN connection drops,
and restoring your VPN connection when the issue is no longer present.
Premium providers like NordVPN, CyberGhost, ExpressVPN, PureVPN, and other VPNs offer this feature in every plan. Because of our rich experience with an array of VPNs, we detected more than a few providers without these options. As you can guess, they were free.
Without the kill switch, a VPN is infinitely less secure. This instantly means the VPN can’t be used in work with sensitive information or P2P activities. Plus, if you’re in China where you need additional privacy and obfuscation, a simple VPN connection drop would ruin everything in a second.
With a VPN kill switch, you have a 100% guarantee that this won’t happen. Except if the VPN kill switch fails to work, which, again, only happens with non-audited, low-quality VPN services.
Summary
In summary, a VPN kill switch terminates your internet connection immediately after the VPN connection drops. This is done to prevent your IP from leaking to the public and ensuring your privacy is untouched. As a necessary VPN feature, we think you should always have it enabled.
Marcus is a cybersecurity analyst with a focus on VPN and proxy services. As the founder and driving force behind a prominent VPN and proxy website, Private Proxy Guide, Marcus has emerged as a trusted authority in the digital realm. With a passion for staying ahead of evolving cyber threats, he has played a pivotal role in educating and empowering individuals and businesses to safeguard their online presence.


![List of VPN Port Numbers Used for VPN Protocols [Guide]](https://www.privateproxyguide.com/wp-content/uploads/2020/10/List-of-VPN-Port-Numbers-150x150.jpg "List of VPN Port Numbers Used for VPN Protocols")