NVIDIA Control Panel is one of the best apps to control every aspect of your desktop and the in-app experience. And while it’s working perfectly fine for the majority of people, from time to time, we hear about its problems that render it unusable.
For some people, NVIDIA Control Panel crashing on Windows 10 and 11 is a pretty common issue, and for some users, it just fails to open. I’ll admit that I had one of these issues long ago and a simple reinstall fixed the problem for me.
However, this problem can be very complex so many solutions can be an NVIDIA Control Panel crashing fix on Windows 10 and 11. Don’t worry – we’ll go through all of them today and see how to overcome this annoying issue.
1. NVIDIA Control Panel Crashing: Windows 10/11 Fix
Here are the solutions that you can apply to fix NVIDIA Control Panel crashing on Windows 10 and 11.
1.1 Delete nvdrsdb0.bin and nvdrsb1.bin Files from NVIDIA Installation Folder
If your NVIDIA Control Panel won’t run or it’s crashing on Windows 10 and 11, you can try rebuilding the so-called “nvdrsdb“ files. Let’s see how to do that.
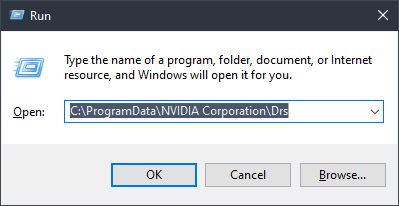
Click on the Windows button, type in “Run“, and press Enter.
In the empty text box, type in this path “C:\ProgramData\NVIDIA Corporation\Drs”.
Press Enter.
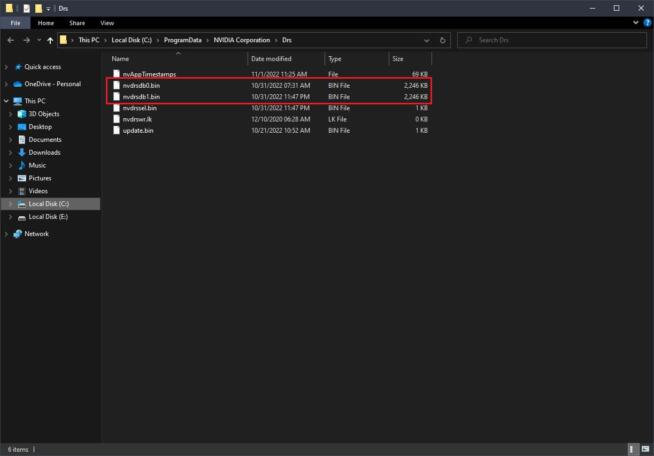
The folder will now open and you have to find these two files “nvdrsdb0.bin” and ”nvdrsdb1.bin”.
Select these files and delete them permanently.
Restart your computer to rebuild nvdrsdb files and try opening NVIDIA Control Panel again – it should work now.
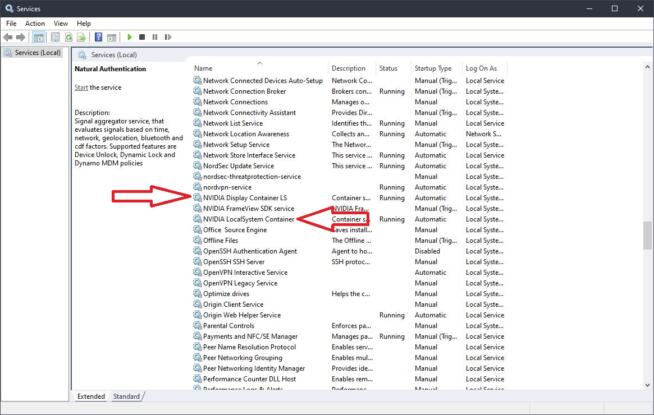
1.2 Restart NVIDIA Display Container LS and LocalSystem Container Services
Many users reported that NVIDIA Control Panel either crashes or won’t run at all because of the problem with NVIDIA’s container services. To fix NVIDIA Control Panel crashing, you can simply restart these services by following these steps.
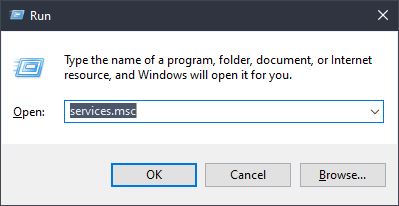
Click on Windows and open the Run command (step 1 from the previous solution).
Type in the following command “services.msc“ and hit Enter.
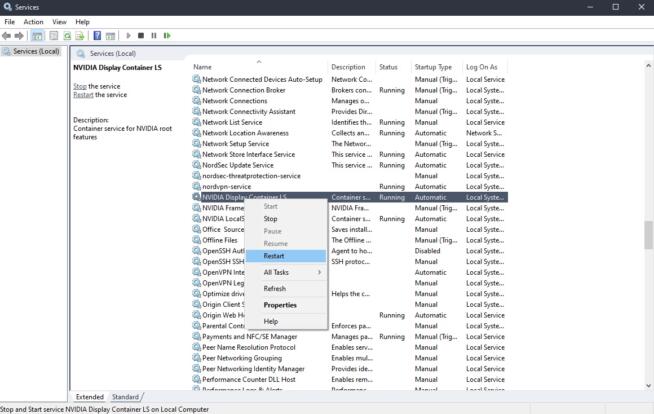
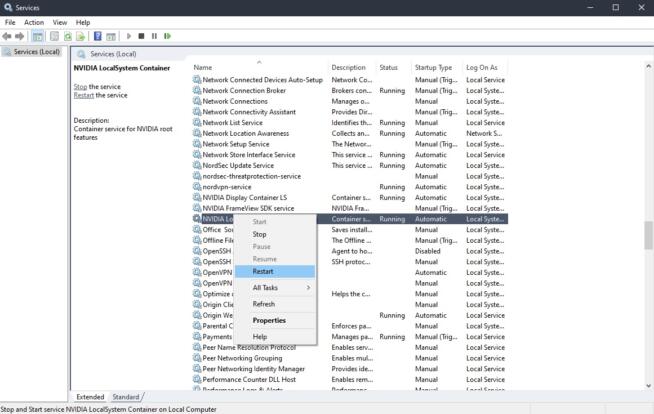
On the list of all services, find the services called “NVIDIA Display Container LS“ and “NVIDIA LocalSystem Container Services.“
Right-click on “NVIDIA Display Container LS“ and select Restart.
Right-click on “NVIDIA LocalSystem Container“ and choose Restart.
Close the Services menu and try to run NVIDIA Control Panel again. It should now open or stop crashing entirely.
1.3 Reinstall the NVIDIA Control Panel App
As said, many people will find the NVIDIA Control Panel crashing fix in reinstalling the application. This fix can work on both Windows 10 and 11 and is perhaps among the easiest solutions to apply. Follow these steps.
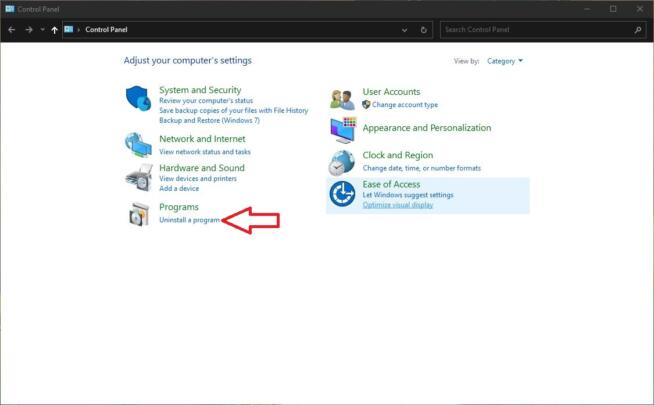
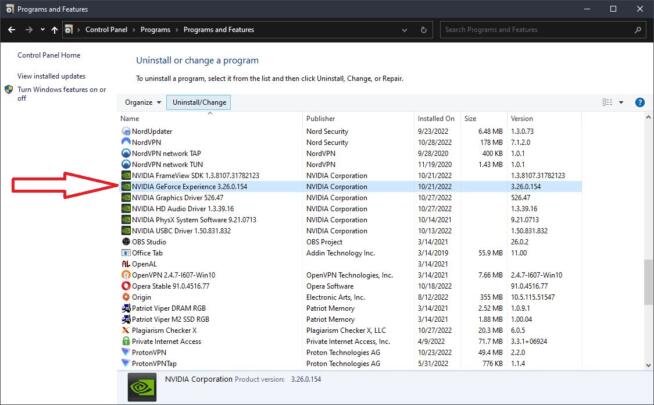
Click on Windows and type in “Control Panel.“ Press Enter.
Click on “Uninstall a program.“
On the list of your installed programs find “NVIDIA GeForce Experience.“
Double-click on it to start the uninstallation process.
Follow the steps on the screen, which will let you uninstall every NVIDIA application from your computer.
Restart your PC to make sure everything is uninstalled properly.
Install NVIDIA GeForce Experience again by downloading its setup file from the official site. NVIDIA Control Panel is a part of GeForce Experience, so it’ll be installed when you run the setup file and follow the on-screen steps.
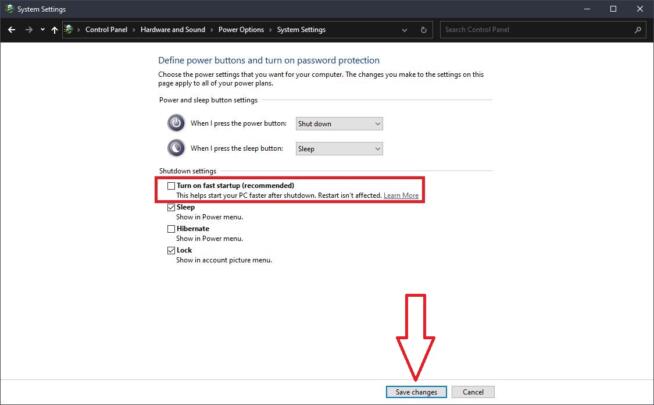
1.4 Disable Fast Startup
As much as Fast Startup boosts your boot process, it’s also not optimal for some applications. In fact, users online reported that the Fast Startup setting messed up their NVIDIA Control panel which started crashing or stopped running at all on Windows 10 and 11.
Disabling Fast Startup takes less than a minute, so here’s how to do it.
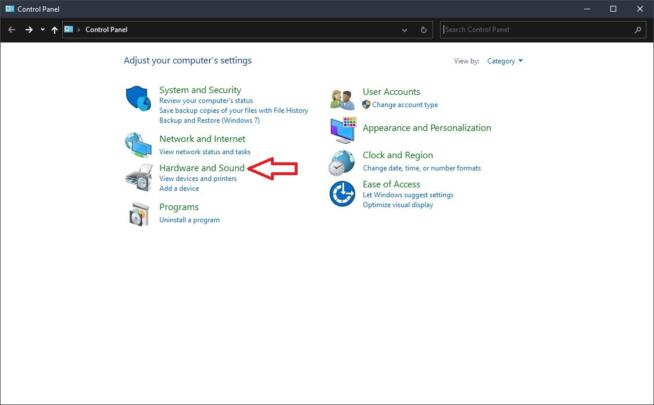
Open Control Panel.
Click on “Hardware and Sound.“
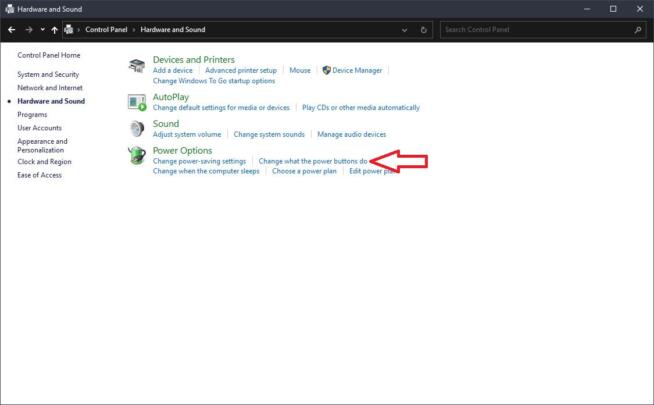
Select “Choose what the power buttons do.“
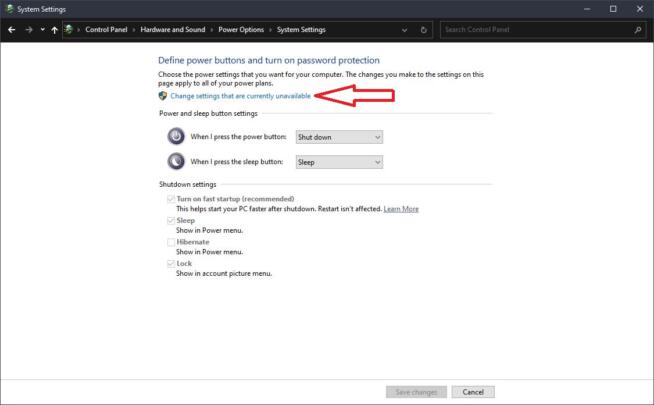
Click on “Change settings that are currently unavailable.“
Untick the box next to “Turn on fast startup (recommended).“
Click on “Save changes.“
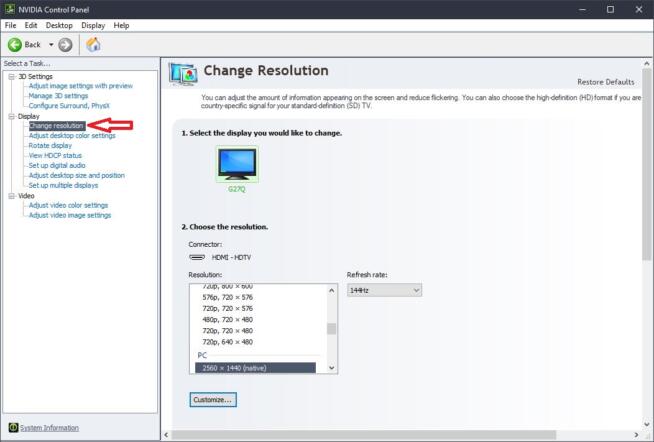
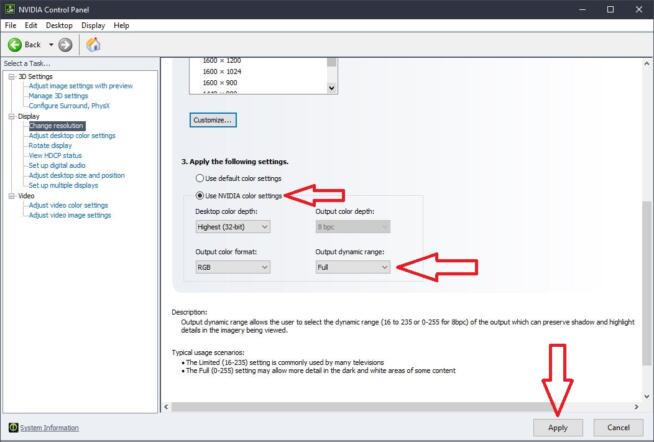
1.5 Change Your Output Dynamic Range
If you can still open NVIDIA Control Panel, yet, it’s crashing after a while, you can try this quick fix to resolve the issue of the NVIDIA Control Panel crashing.
Open NVIDIA Control Panel.
On the left side of the menu, under Display, click on “Change resolution.“
Now, click on “Use NVIDIA color settings.“
Under the “Output dynamic range“ drop-down menu select Full.
Click on Apply and close NVIDIA Control Panel.
Open NVIDIA Control Panel again and see if it continues crashing.
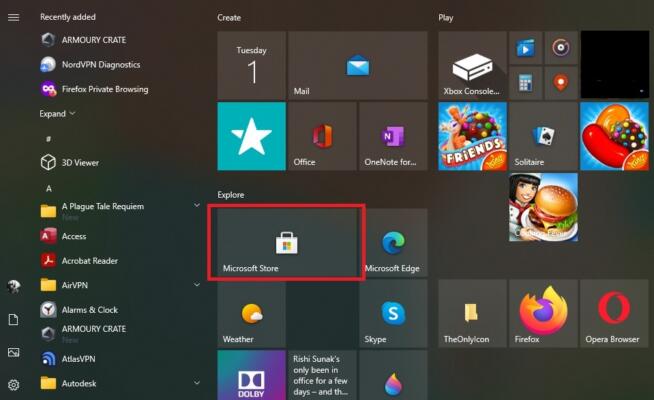
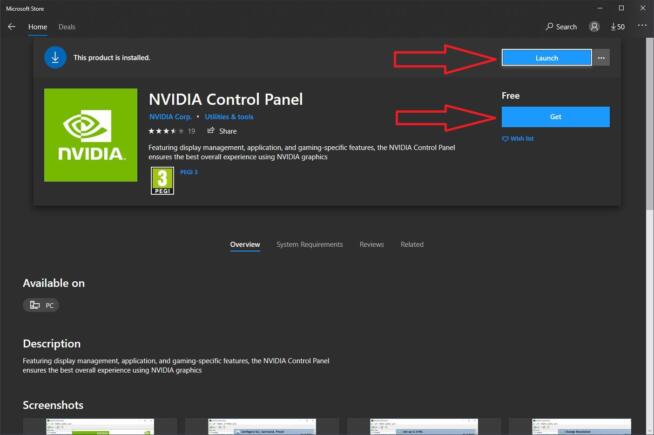
1.6 Download NVIDIA Control Panel from Windows Store
A very interesting NVIDIA Control Panel crashing fix on Windows 10 and 11 is to get the application from Microsoft Store. For some reason, people reported that this solution fixed the issue and made the application function again.
Click on the Windows button and select Microsoft Store.
In the search bar in the top-right corner of the app search for NVIDIA Control Panel.
Once you find the app, click on Get and it’ll be installed in a minute or two depending on your internet speed.
Click on Launch and NVIDIA Control Panel should now open with no problems in terms of crashing. This solution works even if NVIDIA Control Panel won’t open at all, so try it out.
1.7 Get NVIDIA GeForce Experience
If for some reason, you installed NVIDIA Control Panel and you don’t have GeForce experience installed on your system, this can cause a problem with NVIDIA Control Panel that’ll either crash or not launch at all.
Thankfully, the solution is pretty simple and requires you to install GeForce Experience.
Visit NVIDIA and find GeForce Experience.
Click on Download Now and wait for the setup file to be downloaded.
Double-click on the setup file to start the installation process and follow the on-screen steps.
Run NVIDIA GeForce Experience and sign in to make sure it’s working as it should.
Go back to NVIDIA Control Panel and see if it’s functioning properly.
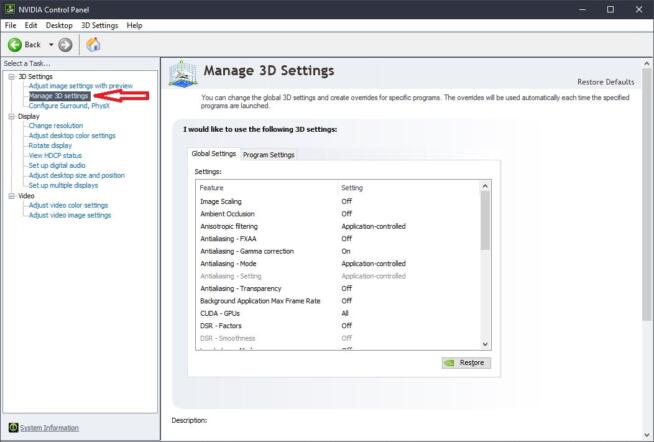
1.8 Disable Vsync and Enable Maximum Performance in NVIDIA Control Panel
Sometimes the graphics card is limited in performance by the power management mode, which is automatically set in NVIDIA Control Panel. Thankfully, you can change this setting and disable Vsync, which could help you fix the NVIDIA Control Panel crashing issue.
Open NVIDIA Control Panel.
In the menu on the left side, click on “Manage 3D Settings.“
Under the “Global Settings“ tab, find the option that says “Power management mode.“
If the setting is on Normal, switch it to “Prefer maximum performance.“
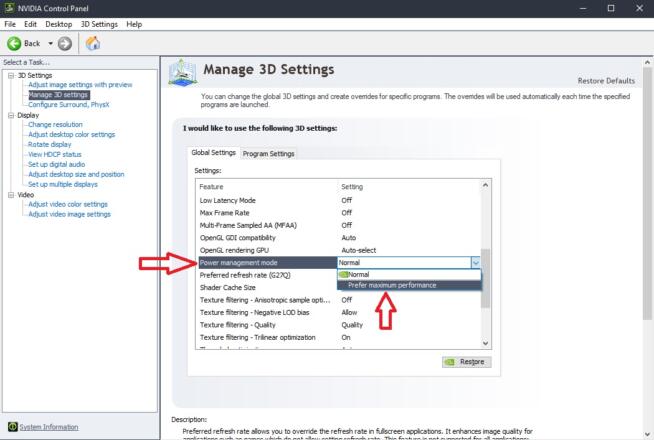
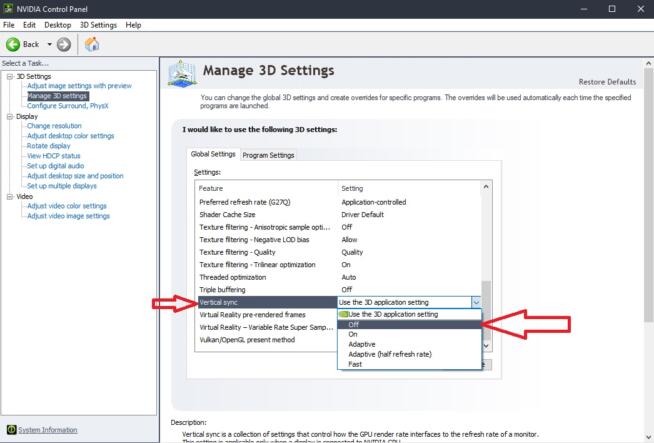
Next, scroll down and find “Vertical sync.“
Instead of “Use the 3D application setting“, simply switch it off.
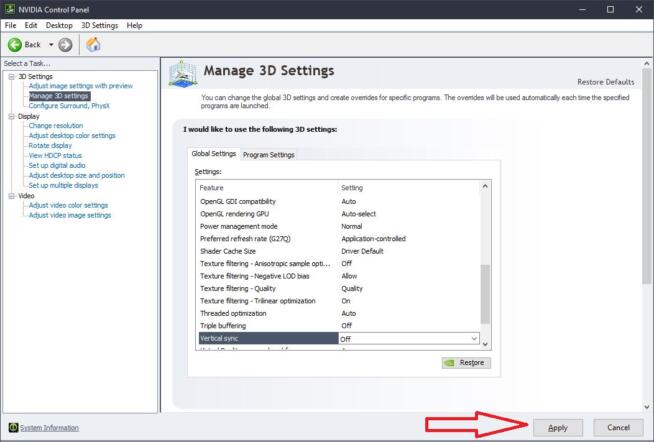
Click on Apply and close NVIDIA Control Panel.
Launch NVIDIA Control Panel again and see if the problem persists.
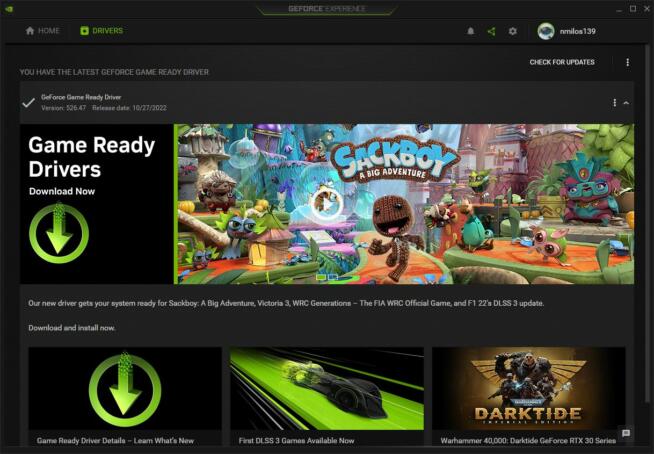
1.9 Update Your Graphics Card Driver
The fix for NVIDIA Control Panel crashing on Windows 10 and 11 can lie in your graphics card driver. It can be outdated or corrupted, which prevents the Control Panel app from functioning properly. Here’s how to update your GPU driver easily.
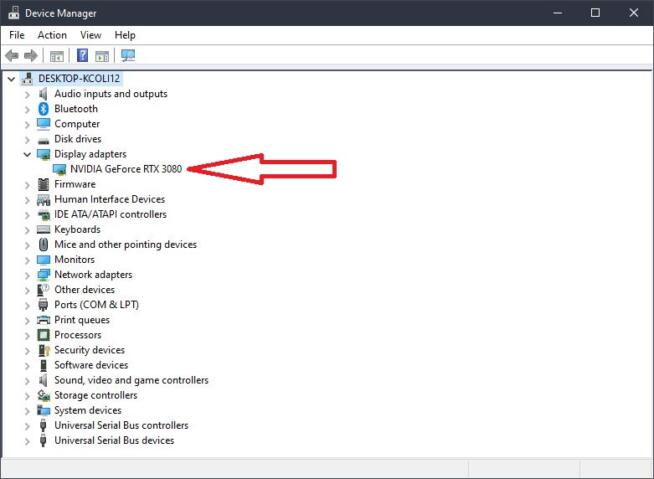
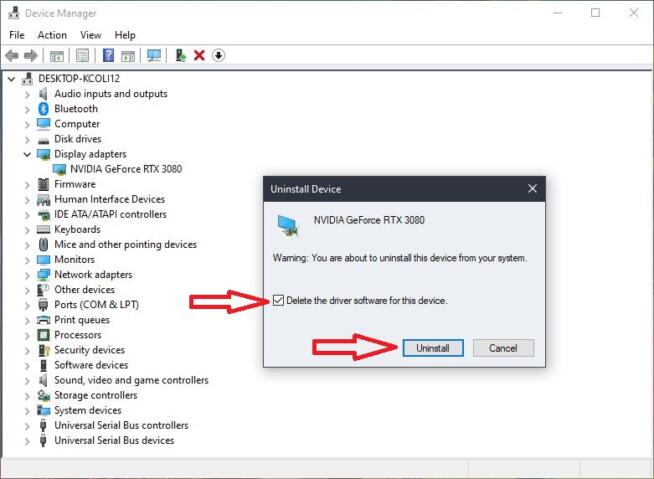
Open Device Manager.
Under “Display adapters“ find your graphics card.
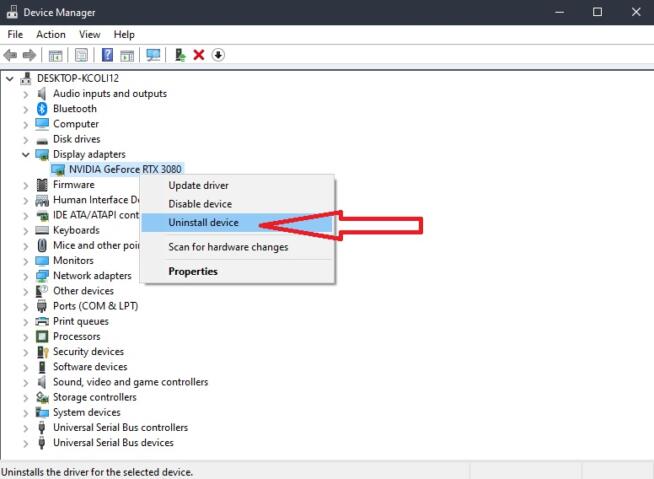
Right-click on it and choose “Uninstall device.“
Tick the box next to “Delete the driver software for this device.“
Click on Uninstall and the driver will be removed.
Download the latest NVIDIA driver from its official site. Simply select your graphics card on the website and click Search.
Download the driver.
Open the setup file and install the driver. In the process, tick the option that says “Perform a clean installation.“
Once the driver is installed, restart your computer and try to open NVIDIA Control Panel again – it should work properly.
1.10 Make Sure NVIDIA Control Panel Launches on Windows Startup
Since the problem of NVIDIA Control Panel crashing is so prevalent, NVIDIA came up with an official solution to make the Control Panel app launch as soon as you boot up your Windows PC. Here’s what to do.
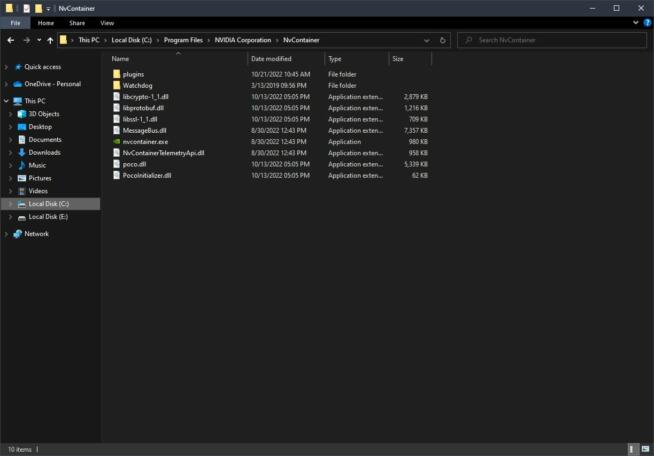
Go to the NVIDIA Control Panel installation folder. Its path should look like this “C:\Program Files\NVIDIA Corporation\NvContainer.“
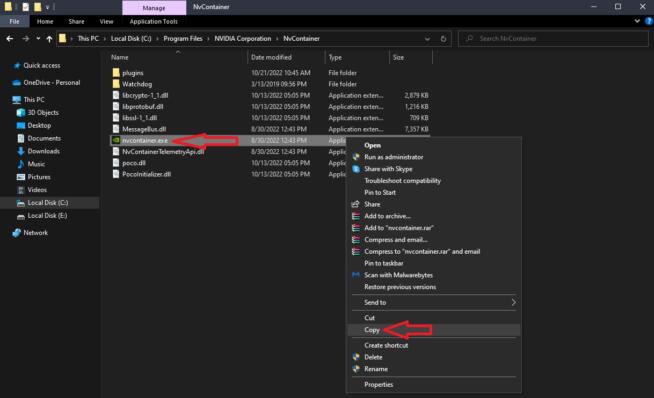
Find the “nvcontainer“ file and copy it.
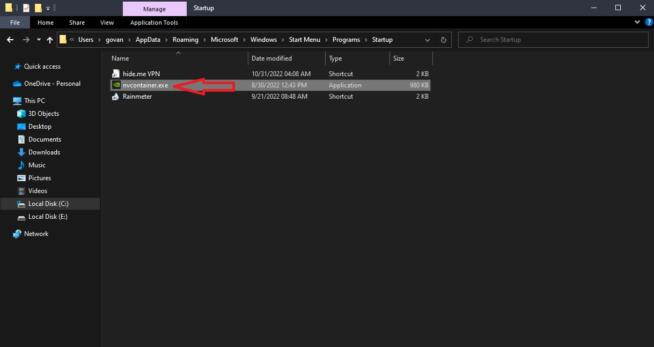
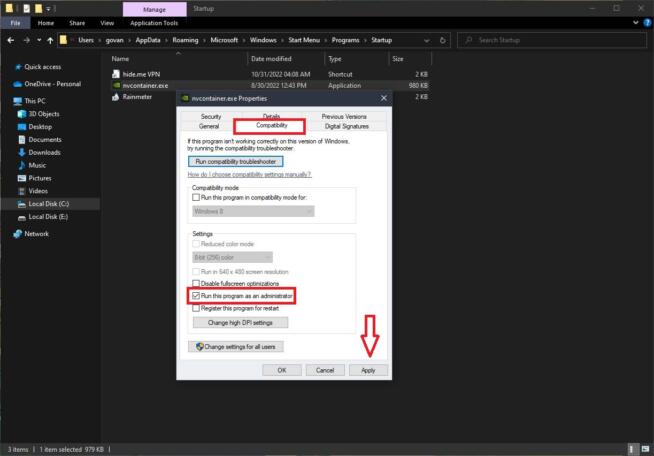
Now, it’s time to find the Startup folder. Follow this path to find it “C:\Users\Username\AppData\Roaming\Microsoft\Windows\Start Menu\Programs\Startup.“
Paste the “nvcontainer“ file to this folder.
Right-click on “nvcontainer“ and select “Run this program as an administrator“ under the Compatibility tab.
Click on Apply and restart your computer. NVIDIA Control Panel should now launch at startup, which should make it work properly without crashing.
2. Summary
With the 10 solutions to fix NVIDIA Control Panel crashing on Windows 10 and 11, I think it’s safe to say that you’ll be able to find a solution to your problem. NVIDIA Control Panel can be troublesome, but now that you know how to fix it, you’ll be able to alleviate your problems with it.
Marcus is a cybersecurity analyst with a focus on VPN and proxy services. As the founder and driving force behind a prominent VPN and proxy website, Private Proxy Guide, Marcus has emerged as a trusted authority in the digital realm. With a passion for staying ahead of evolving cyber threats, he has played a pivotal role in educating and empowering individuals and businesses to safeguard their online presence.


")


