When browsing the web using Google Chrome, a typical error you’ll see is when the site can’t be reached. This error can indicate that your internet connection is lost for a myriad of reasons or that Chrome is trying to access a website that is shut down.
However, since the error message is so vague, people have a problem understanding how to fix the issue “the site can’t be reached” on Chrome. Possible causes include outdated DNS settings, problems with your router, issues with the ISP, or the website is overwhelmed with traffic.
If you are experiencing this error for quite some time and you’re desperate to fix it, don’t worry. Today, we’ll talk about a quick fix for this issue and see what to do if the site can’t be reached on Chrome.
1. The Site Can’t Be Reached Chrome Error Fix
Now that you know what can be the possible causes of this error, let’s talk about the ways of fixing it. Thankfully, there are lots of possible solutions, so try them one by one and see if they have an effect.
1.1 Checking if Your ISP Is Causing the Problem
The first thing I always do if I can’t reach a site on Chrome is contact my ISP. Of course, that is done after checking your cables and making sure everything is connected well. In most cases, your ISP will be able to fix the issue since it has complete insight into your connection status.
However, if your ISP isn’t behind the problem and it can’t help you fix the issue, you can try more solutions that are displayed below.
1.2 Clearing Browsing Data
One of the simplest workarounds to try is to clear the cache and the entire browsing data on Google Chrome. That’s very simple to do and requires 30 seconds of your time. Here are the steps:
- Launch Google Chrome.
- Open Settings.
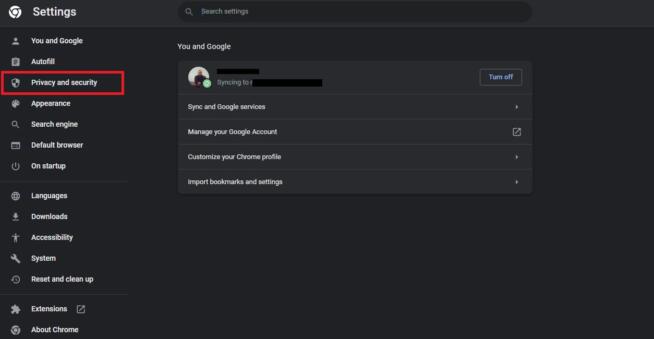
- Click on “Privacy and Security.“
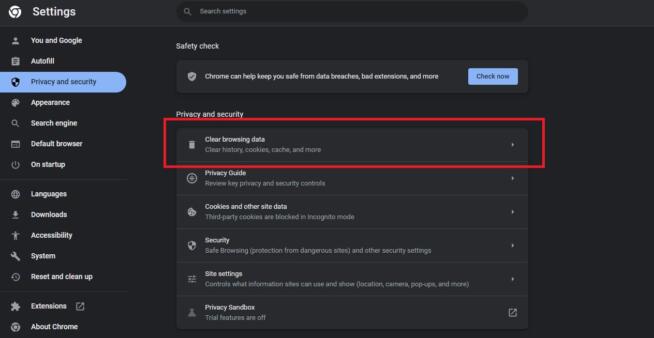
- Select “Clear browsing data.“
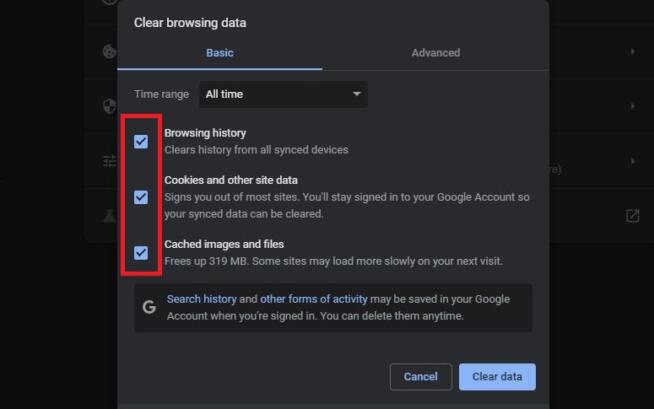
- Under the “Time range“ menu select “All time“ and make sure all 3 choices are ticked.
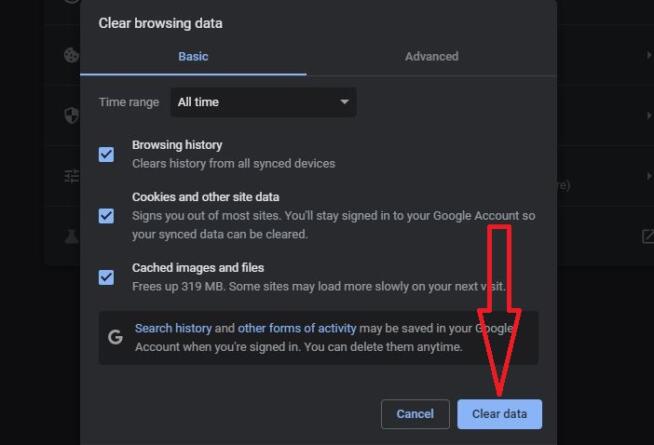
- Click on “Clear data.“
- Try revisiting the site. Does it work now?
1.3 Resetting Chrome to Default Settings
If the “the site can’t be reached“ Chrome error isn’t fixed, you can try another simple solution. That is to return your Chrome browser to its original, default settings. Here’s how to do that:
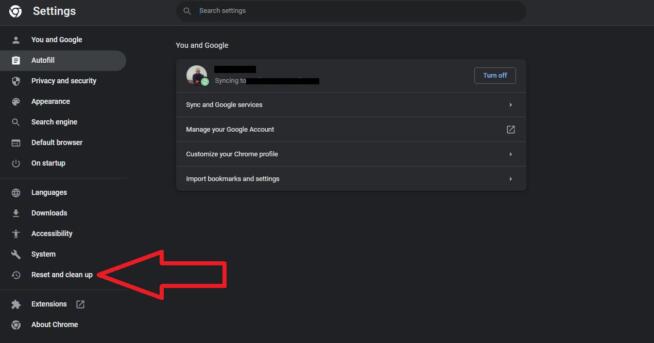
- Open Chrome and visit Settings.
- On the left-hand side, choose “Reset and clean up.“
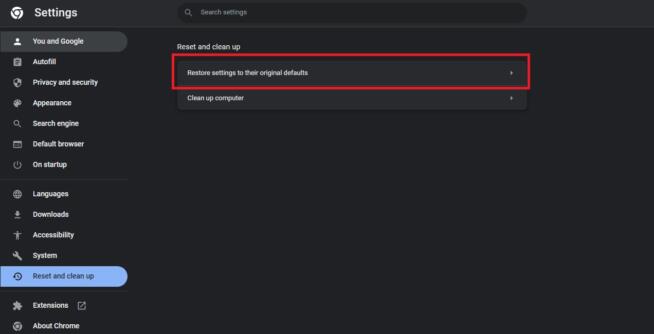
- Click on “Restore settings to their original defaults.“
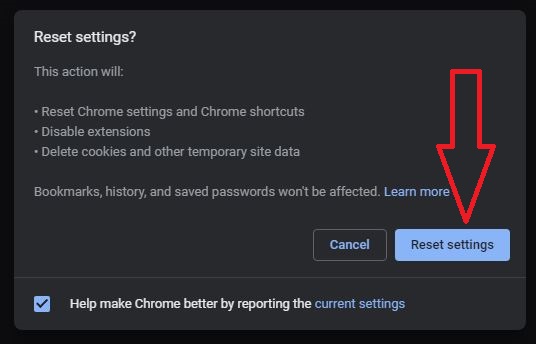
- Click on the “Reset settings“ button.
1.4 Changing Your DNS Server Address
Are any of the two fixes working? If not, changing your DNS server address might make the issue of “the site can’t be reached“ on Chrome go away. I tried it multiple times when this happened and more often than not, it worked with no problems. The steps to this solution are below:
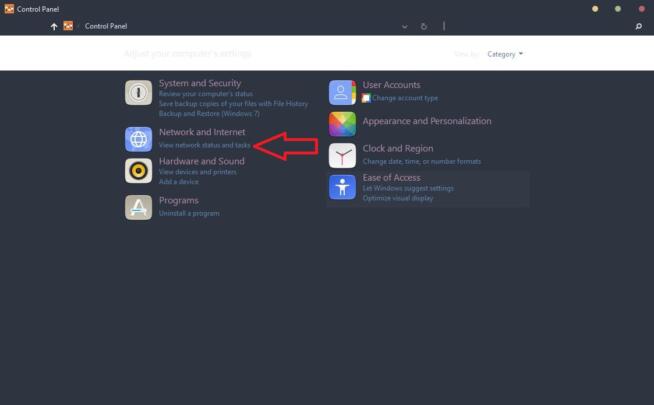
- Open Control Panel on your PC.
- Click on “View network status and tasks.“
- Choose “Change adapter settings.“
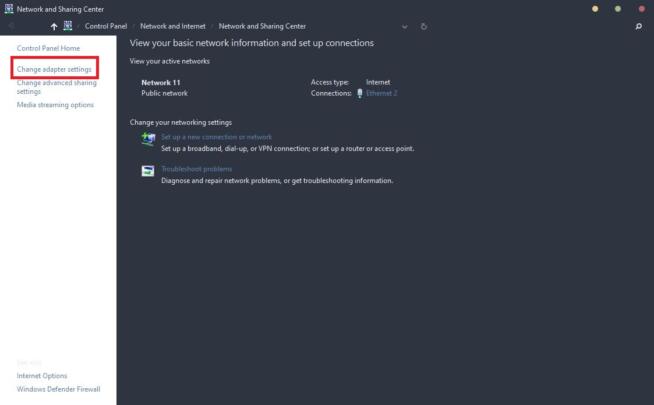
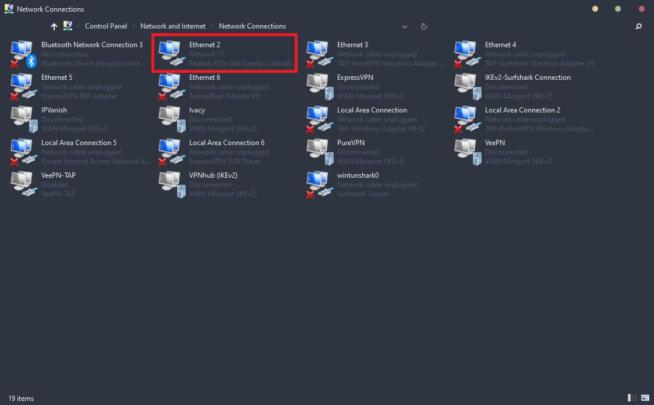
- Find the internet connection that you’re using and double-click on it.
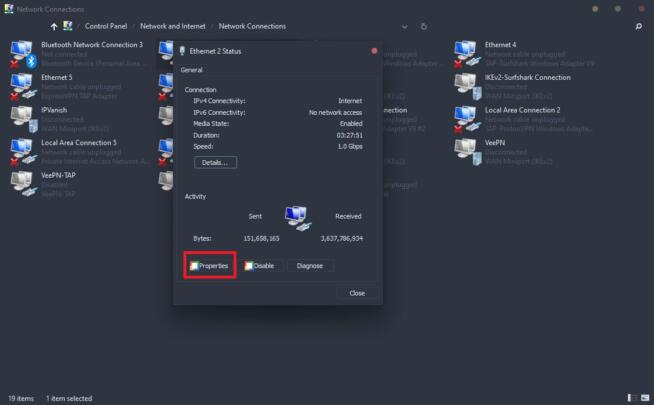
- Click on Properties.
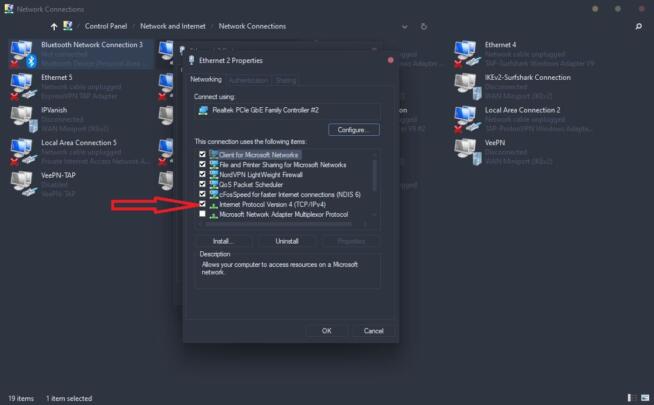
- On the list under “This connection uses the following items“ tick “Internet Protocol Version 4 (TCP/IPv4)“ and double-click on it to open this entry.
- Tick the option that says “Use the following DNS server address.“
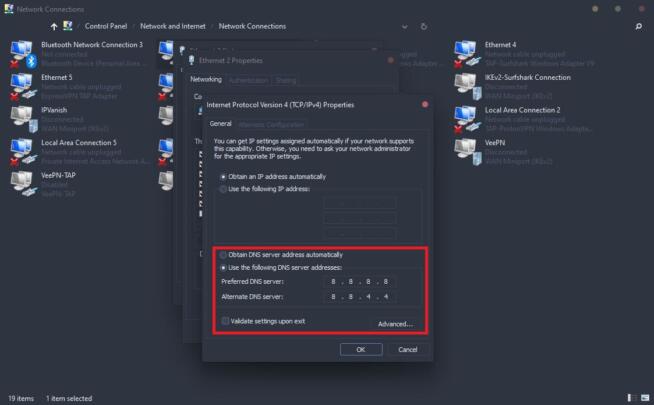
- For “Preferred DNS server“ enter 8.8.8.8 and for “Alternate DNS server“ enter 8.8.4.4.
- Click OK and close the window.
- Go back to Chrome and try visiting the site, it should work now.
1.5 Restarting the DNS Client
On Windows, a DNS client tends to stop working properly, which causes multiple problems with Chrome. However, the “the site can’t be reached” Chrome error fix can be easy and might revolve around restarting the DNS client. Let’s see how to do that.
- Click on the Windows button.
- Type in “cmd“ and tap Enter.
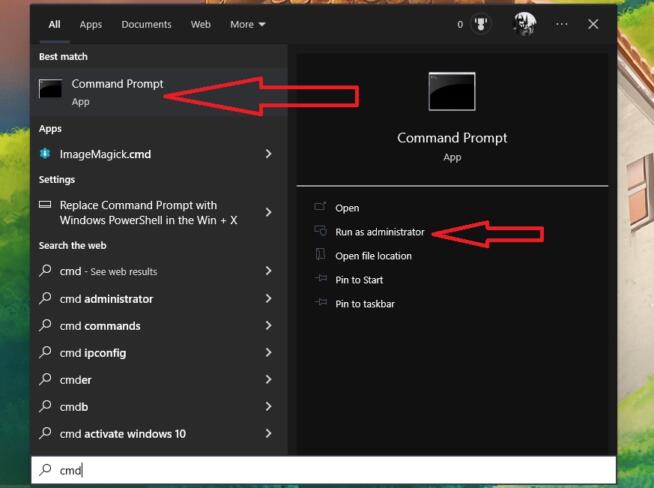
- In the Windows Command Prompt enter the following command “net stop dnscache“ and press Enter.

- Wait for a moment for the DNS client to stop working and you’ll get the message “The DNS Client service was stopped successfully.“
- Now it’s time to start it again by typing “net start dnscache“ and pressing Enter.

- The DNS client will be reset now, which should fix the problem.
1.6 Resetting Your Router/Modem
Many times, resetting your router or modem will fix the majority of network issues. Besides, it’s also very simple to do, although it differs if you have a modem/router combination and separate modems and routers.
If you have a 2-in-1 device, to restart it, I recommend unplugging it from the socket and waiting for at least 5 minutes before plugging it back in. After that, wait a few more minutes for the router/modem to stabilize and the problem should disappear.
If you have a separate modem and router, follow these steps:
- Find the reset button on your router. It should be very small and located next to the antenna. Press and hold it until the lights on the modem start to flicker.
- As soon as the lights start flickering, release the button.
- Wait for a few minutes until the router stabilizes and all the necessary lights turn green.
- Reset your modem by unplugging it from the socket.
- Plug it into the socket again after 3-5 minutes and wait for it to stabilize.
- Open Chrome again and try to visit the site.
IMPORTANT: Some modems have the so-called backup batteries inside, so to fully reset them, you need to open them up and remove the batteries as well. After doing that, put them back in a few minutes and plug the modem into a socket as you’d do in Step 6.
1.7 Disabling Particular Extensions
While extending its functionality, some Chrome extensions tend to influence the internet connection and produce errors like “the site can’t be reached.“ You can try disabling some extensions by following these steps:
- Launch Chrome and open Settings.
- On the left side, click on Extensions.
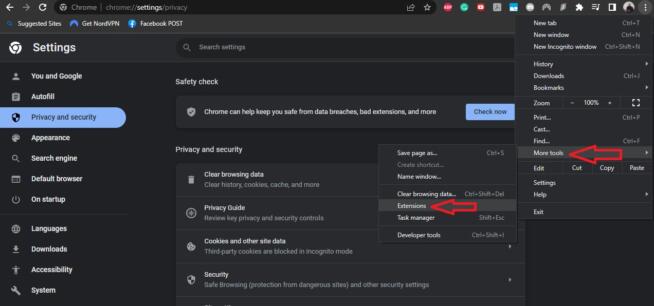
- A new window will open where you can see all extensions that are installed.
- Use the blue button to disable the extension you want. Alternatively, you can click on Remove to uninstall them completely.
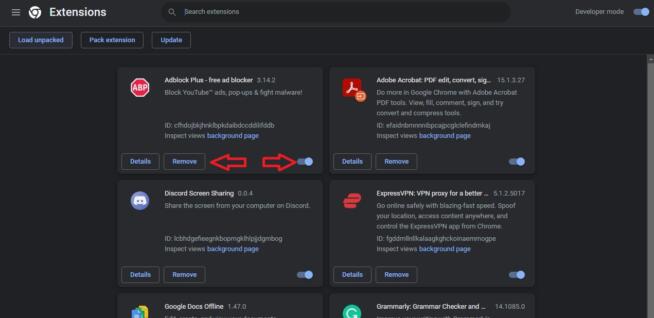
- Close and open Chrome again to see if it works.
1.8 Reinstalling Network Drivers
Another solution worth trying is reinstalling your network drivers. To do that:
- Right-click on the Windows button.
- Select Device Manager.
- Click on Network Adapters to expand the section.
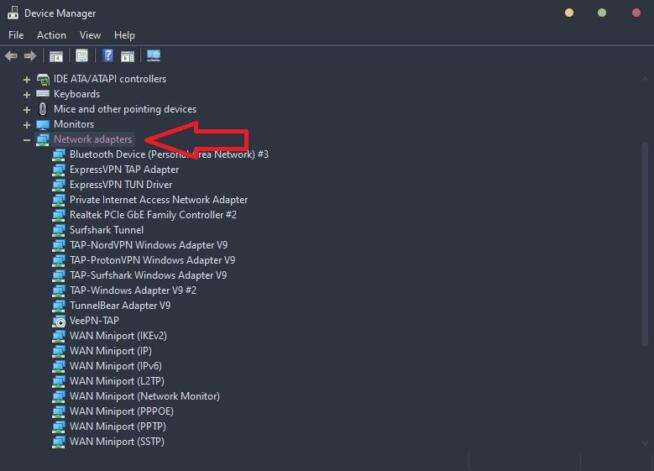
- Find your network adapter, right-click on it, and click “Uninstall device.“
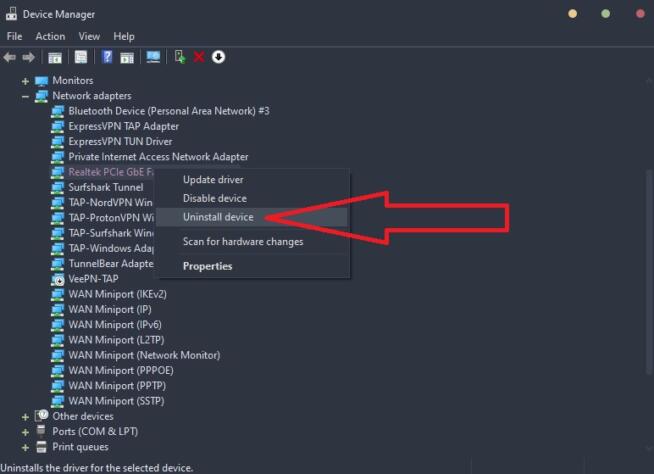
- Restart your computer and the network driver will install automatically.
1.9 Resetting the TCP/IP Settings
Resetting your TCP/IP can be a potential Google Chrome fix if you can’t reach the website you want. Thankfully, it takes no more than a minute to make this work, so here are the required steps:
- Open the Command Prompt by typing “cmd“ in the start menu and pressing Enter.
- Once you open the Command Prompt (Administrator), type in “netsh int ip reset“ and press Enter.
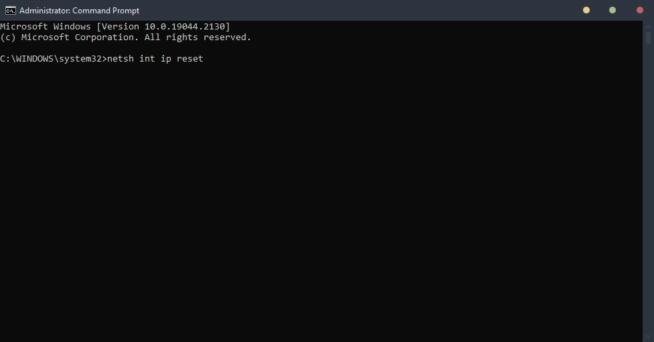
- The TCP/IP reset will take a few seconds and you’ll get a message when it’s finished.
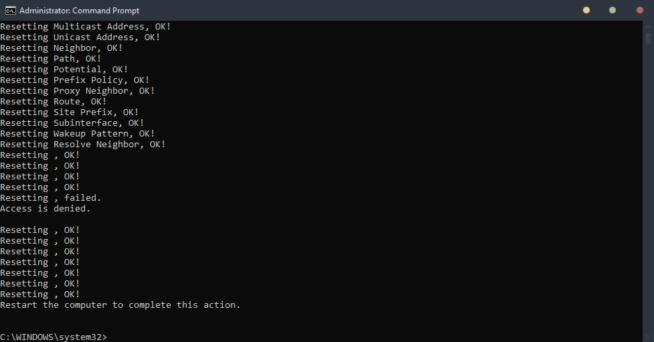
- Restart the computer and see if the issue is resolved.
1.10 Reinstalling Google Chrome
The final fix is to reinstall Google Chrome by completely removing it from your PC and then installing it again. Here are the steps to perform this solution:
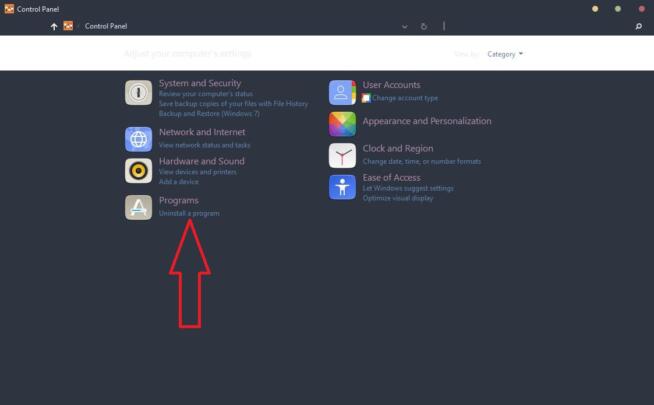
- Open Control Panel
- Choose “Uninstall a program.“
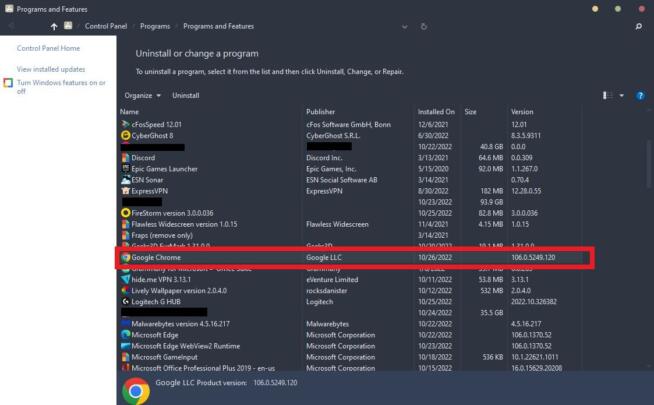
- Find Google Chrome on the list, double-click on it, and follow the steps to uninstall it.
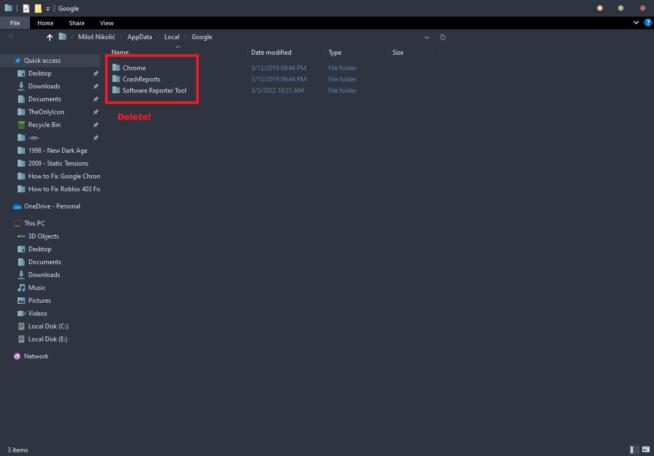
- To make sure it’s completely removed, go to this folder “C:\Users\[User Name]\AppData\Local\Google“ and permanently delete all files in that folder.
- Go to its official site and download Google Chrome.
- Install it, reset your computer, and try opening the site again.
2. Summary
With everything said, I hope we’ve helped resolve the “the site can’t be reached” Chrome error. We gave you 10 possible solutions, but even if they don’t work, you can try changing your browser and trying to access the website you want through Edge, Firefox, or any other option.
Or perhaps, you can do a malware scan or disable a VPN if you use one. Malware and VPNs can sometimes interfere with your connection and produce errors like this. Did you manage to apply the “the site can’t be reached” Chrome error fix?
Is it working? Let us know in the comments section below.
We earn commissions using affiliate links.


