Accessing a website only to see the “your IP has been banned” error feels discouraging. This means as long as you’re connected to your network, accessing a particular site is impossible. However, the same issue can appear in many other scenarios.
Your IP address can be banned from a particular game server as well. While the ban can be temporary, sometimes, we’re talking about a permanent ban. And in this case, the waiting game simply won’t work. This, by inertion, begs the question – how to fix the “your IP has been banned” error?
Well, there are quite a few methods we want to go over. We suggest reading this guide carefully, as our solutions are simple and effective.
1. How to Fix Your IP Has Been Banned in 2025 – Why Is Your IP Address Banned?
Before moving on to the solutions, we want to swiftly go over the reasons why your IP address can get banned. We think you already know some of them but still, let’s examine the potential causes.
1.1 Various Violations
Violating the rules of a particular site or gaming server is the #1 reason for a ban. We won’t go deeper into examples, as we think you know what we mean. Usually, it’s the inappropriate comment, swear, or anything similar that gets your IP banned.
These bans are usually temporary but if the same practice repeats, a permanent ban is typical.
1.2 Unauthorized Access
Accessing a particular site from an unauthorized network can also produce the “your IP has been banned” error. Usually, we’re talking about insecure public WiFi networks that assign the same IP to dozens of users at the same time.
Furthermore, the site might detect that network as vulnerable and not secure enough for uninterrupted access.
1.3 Geo-Restrictions
One of the most typical reasons for an IP ban is geo-restriction. If you’re not in the region where a particular site is available, you’ll get an error message like this:
Meanwhile, users in that particular country can freely access the site and enjoy it fully.
1.4 Too Many Requests From the Same IP
Websites can detect when there are multiple requests from the same IP. Once again, we go back to reason #2 on this list. If 10 people using the same IP want to access the site, it might detect the IP as spam, preventing all users from accessing it.
Of course, many other reasons can be discussed but we went with the basic ones. Other reasons for an IP ban include spamming, virus/malware infection of your device, and so on.
2. Your IP Has Been Banned: Possible Fixes
For today’s guide, we have more pressing matters to address. We want solutions – not reasons – and in this article, we’re going to give them to you. Here’s how to fix the “your IP has been banned” error without problems.
2.1 Connecting to Another Network
If an IP is under a ban, the logical solution is to somehow alter your IP. Remember that each network has its unique public IP – the one websites see. Well, the key is to change your IP by connecting to another network. You can do this by using another WiFi hotspot, for example.
Or, if you have mobile data, try turning off your WiFi and using mobile data instead. This should alleviate the ban and let you access the site or gaming server. The downside is that your mobile data most likely isn’t unlimited, rendering this option temporary.
2.2 Using a VPN
An unlimited solution, so to speak, is to use a VPN. Now, people often stay away from VPNs because they’re not free. The truth is they’re inexpensive and if we’re talking about NordVPN or even ExpressVPN, it’s hard to go wrong.
VPNs like these will permanently fix the “your IP has been banned” error and make it easy to circumvent any type of block. For one, they’ll change your IP to another country, which means even geo-blocks can be bypassed. Two, they’ll also encrypt your connection and add a layer of security.
Finally, they also keep no logs, so they’re perfect for ensuring your online privacy. Even if a particular VPN-given IP gets banned, you have thousands of them to pick, each ensuring you can again access the site you wanted or play the game on a server that has your IP banned.
Using a VPN is simple and requires a few quick steps. These include:
Installing a VPN on your device. Both of them work on any desktop/mobile platform, including iOS, Android, Windows, Mac, and Linux.
Signing in to the app with the email and password provided in the first step.
Connecting to a VPN server of your choice.
As soon as you establish a connection, try visiting the site again. The “your IP has been banned” error should now be fully gone. And with unlimited traffic from the VPN, you don’t have to worry about crossing any limits, let alone manually changing the network.
Because you’ll get a new IP from the VPN, you don’t need to do anything except connect to the server. There are also numerous free VPNs you can try, such as ProtonVPN with unlimited bandwidth but slower speeds and no torrenting capabilities.
2.3 Changing Your IP Manually
Did you know there is a way to change your IP address manually without using a VPN? This option can also fix the “your IP has been banned” error with no additional VPN-like benefits. It basically revolves around getting another IP from your ISP’s IP address pool.
Here’s how to manually alter your IP and bypass this issue easily on Windows, Mac, iOS, and Android.
Windows
Open Settings.
Select Network and Internet.
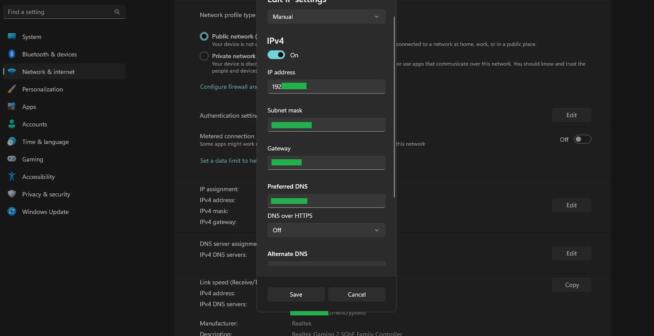
Select your network, which should be named Ethernet, and click on Properties.
Scroll down and find the part with your IP Assignment and IPv4 address, mask, and gateway.
Now, click on Edit, and in the first drop-down menu, select Manual.
Type in the new IP address under “IP Address” and fill in the other credentials like subnet mask, gateway, preferred/alternate DNS, and so on.
Click on Save and try to visit the site again. Is the error still there? With a different IP, it should be gone and resolved.
Android
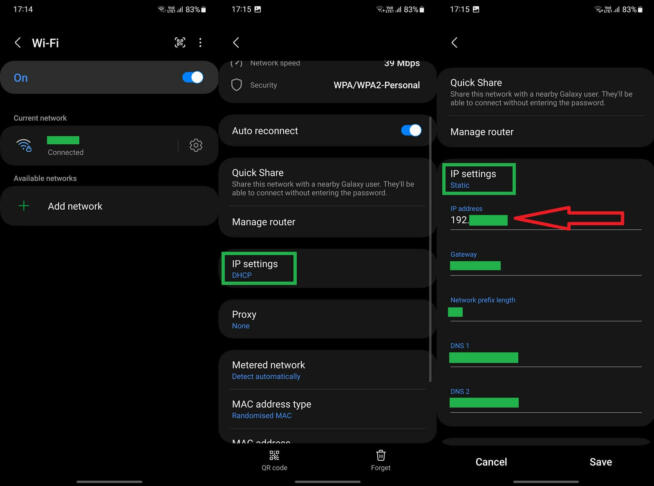
Go to Settings.
Visit your network settings and find the network you’re using.
Tap the Gear icon next to the network to access additional settings.
Select IP Settings and instead of DHCP, set it to Static.
You can now enter a new IP, gateway, and other relevant settings.
Tap Save and see if the problem persists.
iOS
Open Settings and select Wi-Fi.
Find the network you’re connected to and click the “i” button to open its settings.
Once again, set your IP to Static.
Find the IP Address field and enter the new IP address you want to use. If needed, enter additional information like subnet mask and gateway.
Save your changes and the “your IP has been banned” error should disappear.
macOS
Open System Preferences.
Select Network.
Find the network you’re using and click on Advanced to open additional settings.
Under the TCP/IP tab, find “Configure IPv4” and select the option that says “Manually.”
Enter your new IP next to the “IPv4 Address” empty field.
Save your settings by clicking on OK.
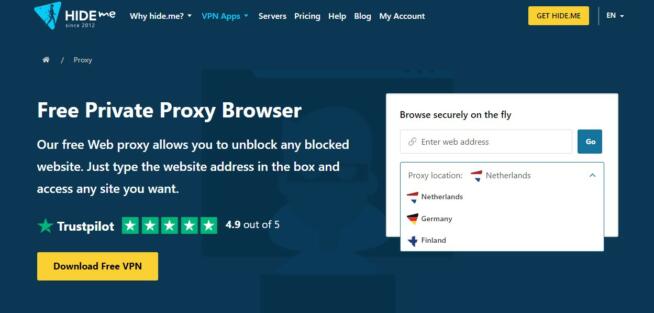
2.4 Using a Proxy
Another method to fix the IP ban error is to use a proxy service. We don’t usually recommend this one, as it’s less efficient than a VPN, and can oftentimes produce more problems. For example, a website can detect an IP that belongs to a proxy and still block your access.
On top of that, proxies usually aren’t very safe because they don’t encrypt your traffic. Let’s not mention that most free proxies also track your online activities and store your personal data. And in the case of paid proxies, they often come with hefty price tags, making them unsuitable for an average internet user.
However, as a short-term solution to fix the banned IP issue, they frequently work. We recommend using a free proxy from Hide.me, as it also lets you select the proxy location. This will help get over certain geo-blocks but not all of them.
Hide.me is a VPN, actually, and its proxy service is among the safest. Since it has no traffic limits, you can use it indefinitely. However, each time you want to access a particular site, you’ll have to use it until the ban expires. And if it’s a permanent ban, you’ll have to use it each time you’re going on that site.
3. Clean Your Device From Malware/Viruses
Earlier in this guide, we mentioned that viruses and malware can cause the “your IP has been banned” error. You can try scanning your device with antivirus or anti-malware software and see what comes up. Use Malwarebytes or a full-fledged antivirus, for instance.
If the app finds a threat or threats, make sure you remove them first and foremost. Once the computer/laptop is clean, go to the site again and see if the ban is still there. Some users reported this method fixed their problem.
4. Reaching Out to the Website
If nothing helps, consider contacting the website if you can. Sometimes, an IP ban can be unjustified and the admin can mistakenly ban you. Of course, if you think you haven’t violated any rules or done anything malicious, it’s completely normal to try this option.
Requesting an IP ban to be nullified isn’t justified if you know you did something wrong. This method very rarely works but it’s worth a shot – it’s free and doesn’t take time. Just find the email of the site or a support contact form and shoot an email – see what happens.
5. In Conclusion
Don’t let the IP ban error message discourage you from using a website or a gaming server. As you can see, there are 6 methods that you can try to remedy this issue. One that’s surely going to work is changing your IP with a VPN – alas, this method usually isn’t free.
More “approachable” methods include connecting to another network, changing your IP manually, or clearing your device’s malignancies. Finally, you can go with a proxy or contact the site and request it to remove your IP ban, which is the least likely to work.
Have you encountered this issue already? And if so, how did you overcome it? Let other readers know in the comment section below the article.
Marcus is a cybersecurity analyst with a focus on VPN and proxy services. As the founder and driving force behind a prominent VPN and proxy website, Private Proxy Guide, Marcus has emerged as a trusted authority in the digital realm. With a passion for staying ahead of evolving cyber threats, he has played a pivotal role in educating and empowering individuals and businesses to safeguard their online presence.