Although not as widely used as Windows 10, Windows 11 is going to become a popular option as soon as support for Windows 10 stops. Besides, Windows 11 isn’t fleshed out as its older brother and as such, it’s more prone to issues and glitches in certain situations.
But what if you encounter any issues with your sound or you simply don’t have sound at all? Well, the only reasonable option is to restart your audio driver in Windows 11 and not immediately go and buy new speakers, a pair of headphones, or a monitor (if you use a monitor speaker).
Today, I’ll show you how to restart the audio driver in Windows 11 and fix your issues with the sound if you can’t hear anything or you experience sound glitches.
1. How to Restart the Audio Driver in Windows 11: An Easy Guide
Here are the required steps to restart the audio driver in Windows 11.
- Press Windows + X at the same time.
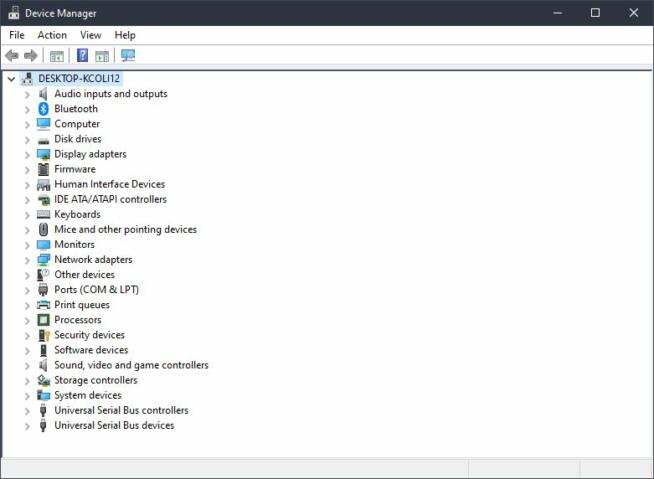
- Select Device Manager.

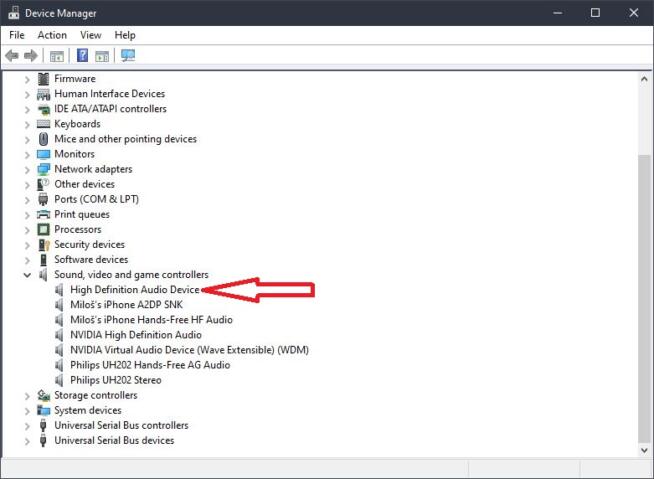
- In the Device Manager menu, click on “Sound, video, and game controllers.“
- Find your adapter from the list and double-click on it. For me, it’s a “High Definition Audio Device.“

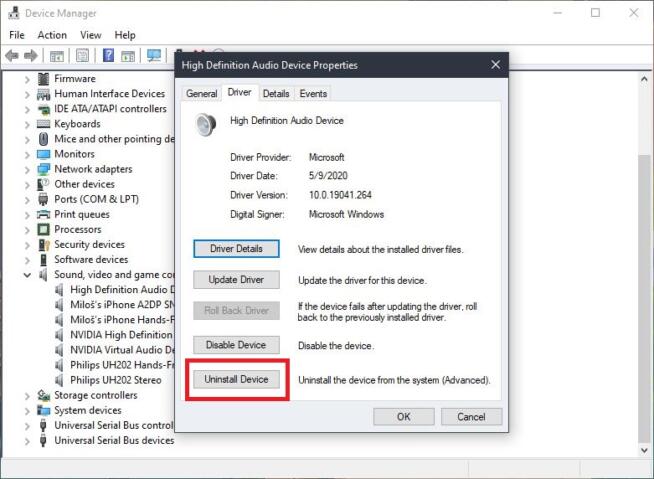
- Select the “Driver“ tab.
- Click on “Uninstall Device.“

- When prompted, tick the box next to “Attempt to remove the driver for this device.“ Press Uninstall.
- Restart your computer.
- Windows will now automatically install the driver during the boot process, which will effectively restart the audio driver in Windows 11. To test it out, try listening to music or anything else. Sound problems and glitches should be removed now.
2. Bottom Line
Now that you know how to restart the audio driver in Windows 11, you should be able to remedy your sound problems. If problems persist, make sure you inspect your audio system physically or reset system sounds to their default settings.
In most cases, you can solve this type of problem without replacing your speakers or headphones.
We earn commissions using affiliate links.


![Best Driver Update Software [year] Improve PC Performance Best Driver Updater Tools](https://www.privateproxyguide.com/wp-content/uploads/2022/08/Best-Driver-Updater-Tools-150x150.jpg)
![Best Password Managers for Windows, iOS & Android [year] best password managers 2021](https://www.privateproxyguide.com/wp-content/uploads/2021/03/best-password-managers-2021-150x150.jpg)


![Best Android Emulators for PC and Windows 10 in [year] Best Android Emulators for PC](https://www.privateproxyguide.com/wp-content/uploads/2019/10/10-best-android-emulators-for-pc-150x150.jpg)
![Best Cloud Hosting Providers for Linux & Windows [year] best cloud hosting providers](https://www.privateproxyguide.com/wp-content/uploads/2021/03/best-cloud-hosting-providers-150x150.jpg)


